Difference between revisions of "Tutorial: SQLite and Processing, Part II"
(→Testing) |
(→Eclipse) |
||
| Line 17: | Line 17: | ||
* Start Eclipse | * Start Eclipse | ||
* Create a '''new project''', call it ''SQLiteTest'' | * Create a '''new project''', call it ''SQLiteTest'' | ||
| − | * Create a '''new package''', call it ''SQlitePackage | + | * Create a '''new package''', call it ''SQlitePackage'' |
* Create a '''new Java classes''' in the pacakge called '''example1.java''' and copy/paste the contents of the '''SQLite_example1.pde''' file which you'll find in the example folder of the zip file. | * Create a '''new Java classes''' in the pacakge called '''example1.java''' and copy/paste the contents of the '''SQLite_example1.pde''' file which you'll find in the example folder of the zip file. | ||
* Locate the '''SQL.java''' and '''SQLite.java''' programs in the '''source''', '''de''', '''bezier''', '''data''', '''sql''' folders of the zip file, and import them into the package using Eclipse's '''File''', '''Import''', '''File System''' utility. | * Locate the '''SQL.java''' and '''SQLite.java''' programs in the '''source''', '''de''', '''bezier''', '''data''', '''sql''' folders of the zip file, and import them into the package using Eclipse's '''File''', '''Import''', '''File System''' utility. | ||
| Line 40: | Line 40: | ||
<br /> | <br /> | ||
| + | |||
=Final Project= | =Final Project= | ||
Revision as of 16:26, 30 June 2011
--D. Thiebaut 17:01, 30 June 2011 (EDT)
This is the second part of a quick tutorial to accessing an SQLite database from Processing. Check out Part 1 for how to run the example in Processing's IDE.
Contents
Setup
- First follow the steps of this great tutorial for creating Processing applications with Eclipse. Remember the steps for adding the core.jar library to your Eclipse project.
- Get the same archive zip file as in Tutorial 1
- Unzip it
Eclipse
- Start Eclipse
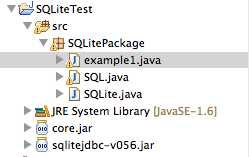
- Create a new project, call it SQLiteTest
- Create a new package, call it SQlitePackage
- Create a new Java classes in the pacakge called example1.java and copy/paste the contents of the SQLite_example1.pde file which you'll find in the example folder of the zip file.
- Locate the SQL.java and SQLite.java programs in the source, de, bezier, data, sql folders of the zip file, and import them into the package using Eclipse's File, Import, File System utility.
- Edit the 2 SQL*.java files so that the package line at the top reads
package SQLitePackage;
- Edit the contents of example1.java as illustrated in here.
- Import the core.jar Processing library into your project (see above).
- Import the file sqlitejdbc-v053-pure.jar from the library folder of the unzipped archive you downloaded, and add it as a library to your project (via the build path).
Note that the project also works with the newer sqlitejdb-v056.jar file available from www.zentus.com/sqlitejdbc.
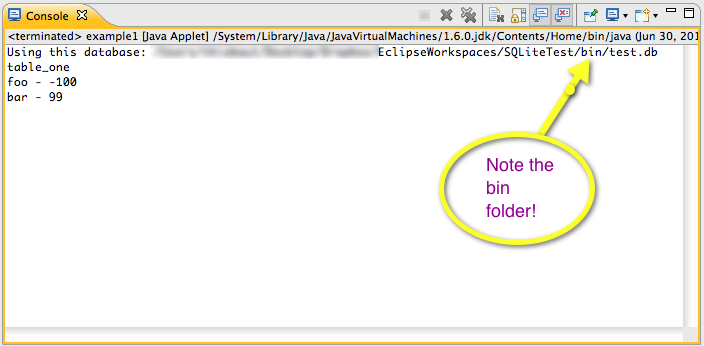
- Create a bin folder in your SQLiteTest project folder. You may have to use a Terminal window, or Windows Explorer for this.
- Copy the test.db file from the archive's data folder into the newly created bin folder.
Note that this is the trick for making the project work with the SQLite database files, as by default the JDBC driver will create a blank database file if it doesn't find the one you specify, and when your program attempts to open a table, the driver will invariably return a java.sql.SQLException: no such table: error message...
Final Project
Testing
- Run the project, and observe the same output as in Tutorial 1.

