Difference between revisions of "Kinect + Processing + Eclipse"
(→Create a new Processing Applet) |
(→Run!) |
||
| (7 intermediate revisions by the same user not shown) | |||
| Line 54: | Line 54: | ||
cp openkinect/library/libKinect.jnilib /Library/Java/Extensions/ | cp openkinect/library/libKinect.jnilib /Library/Java/Extensions/ | ||
| + | * We now need to specify that the libKinect.jnilib file we just copied to the Java Extensions folder is the ''native library'' for '''openkinect.jar''' | ||
| + | ** Open the project properties | ||
| + | ** Pick the Java Build Path | ||
| + | ** Libraries Tab | ||
| + | ** Open '''openkinect.jar''' and edit the entry '''Native Library Location: (None)'''. Enter '''/Library/Java/Extensions/''' as the new location. | ||
<br /> | <br /> | ||
| + | <center>[[Image:KinectLibraryJavaExtension.png|550px]]</center> | ||
| + | <br /> | ||
| + | |||
| + | |||
| + | <br /> | ||
| + | |||
==Create a new Processing Applet== | ==Create a new Processing Applet== | ||
* Right-click on '''src''' under the project, in the '''Project Explorer''' window, and select '''Add New Class''' | * Right-click on '''src''' under the project, in the '''Project Explorer''' window, and select '''Add New Class''' | ||
| − | * Call your class ''' | + | * Call your class '''PointCloud''' and accept all the defaults before closing. |
| − | * Paste in Shiffman's ''Point Cloud'' Processing example program (one of the 3 programs supplied in openkinect.zip), which | + | * Paste in Shiffman's ''Point Cloud'' Processing example program (one of the 3 programs supplied in openkinect.zip), which has been slightly modified to work with Eclipse: |
<br /> | <br /> | ||
<br /> | <br /> | ||
| Line 172: | Line 183: | ||
==Specify 32-bit processing== | ==Specify 32-bit processing== | ||
| − | * The '''openkinect''' library is written for 32-bit | + | * The '''openkinect''' library is written for 32-bit systems, which may not be the case for our machine. To force the compilation to stay in 32-bit mode, we just need to add the "-d32" flag to the project building command. |
** Pick '''Run Configurations''' from the '''Run''' menu, | ** Pick '''Run Configurations''' from the '''Run''' menu, | ||
** In the '''Arguments Tab''', select '''VM Arguments''' and enter "-d32" | ** In the '''Arguments Tab''', select '''VM Arguments''' and enter "-d32" | ||
** '''Apply''' | ** '''Apply''' | ||
<br /> | <br /> | ||
| − | <center>[[Image:MinusD32Kinect.png| | + | <center>[[Image:MinusD32Kinect.png|550px]]</center> |
<br /> | <br /> | ||
| − | |||
==Run!== | ==Run!== | ||
* You should now be able to launch the program successfully: | * You should now be able to launch the program successfully: | ||
| + | <br /> | ||
| + | <center>[[Image:DFTPointCloudOnKinect.png|500px]]</center> | ||
| + | <br /> | ||
| − | [[Category:Tutorials]][[Category:Kinect]] | + | [[Category:Tutorials]][[Category:Kinect]][[Category:Processing]][[Category:Eclipse]] |
Latest revision as of 15:39, 21 June 2012
--D. Thiebaut 15:21, 4 November 2011 (EDT)
This tutorial is just a quick tech-note to install Daniel Shiffman's Processing library and make it work with Eclipse. This tutorial assumes a Mac platform.
Contents
System Snapshot
- Mac OS Lion
- MacPro
- Processing 1.5
- Eclipse Helios Service Release 1
Downloads
- Get Processing (if you don't have it already)
- Get Shiffman's openkinect.zip.
- Install Eclipse if necessary
Steps
New Project
- Open Eclipse
- Create a new Java project in Eclipse
Get the Processing core library
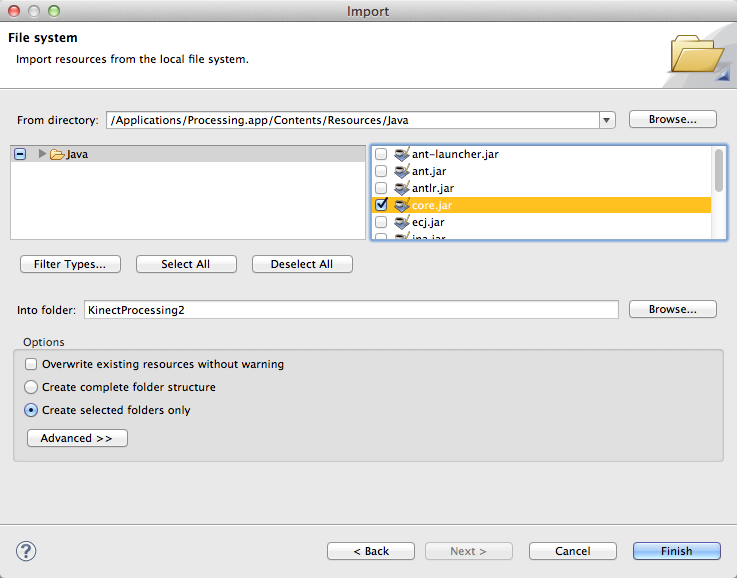
- Right-click (or Ctrl-click) on the project, and click on Import
- From the import menu, click 'File System
- Browse through your hierarchy of files and find the core.jar file inside the Processing.app application folder. On my machine, this was located in /Applications/Processing.app/Contents/Resources/Java
- Click on the box next to core.jar and then click on Finish
Add the core library to the build path
- Click on the project, right click on it, and select Properties
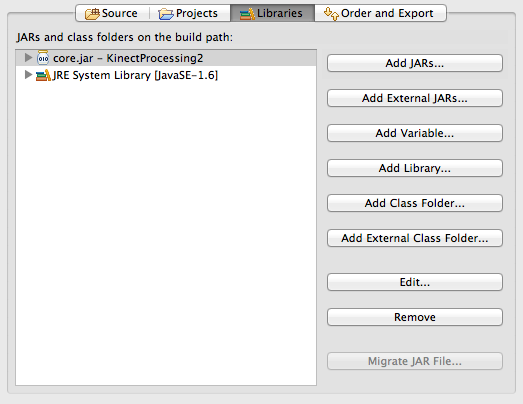
- In the Libraries tab, click Add Jar, then open up your project in the new window, and select core.jar.
- You should have a new library in your build path:
Add OpenKinect Library and Support Files
- Unzip the openkinect.zip file in a separate folder.
- Using the same method described above to import the core.jar file into the project, import the openkinect.jar file from the openkinect.zip archive into the project.
- Add it to the build path.
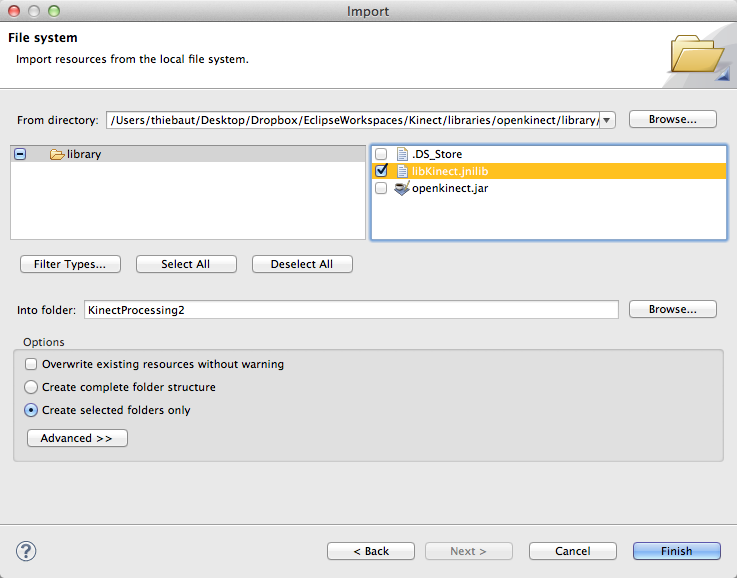
- Open a Terminal window, and cd your way to the folder containing the unzipped openkinect archive. Find libKinect.jnilib library file, and copy it to the Java Extensions folder on your machine.
- For me, this was done by typing this in Terminal:
cp openkinect/library/libKinect.jnilib /Library/Java/Extensions/
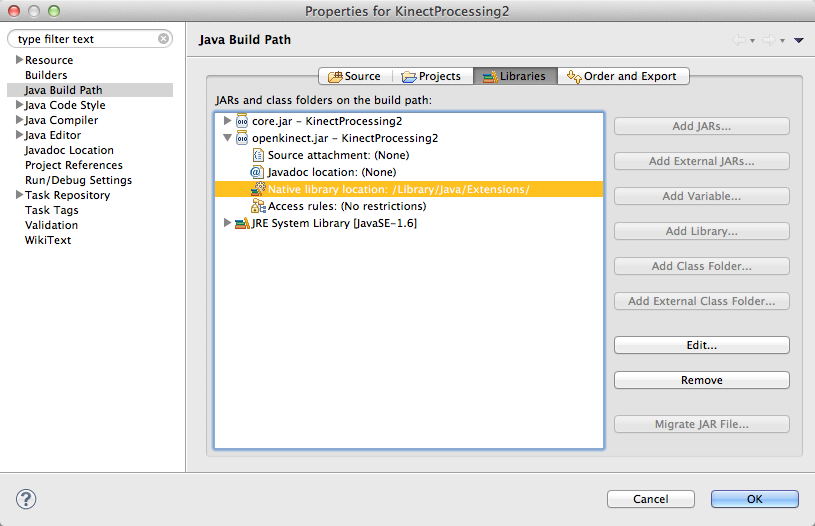
- We now need to specify that the libKinect.jnilib file we just copied to the Java Extensions folder is the native library for openkinect.jar
- Open the project properties
- Pick the Java Build Path
- Libraries Tab
- Open openkinect.jar and edit the entry Native Library Location: (None). Enter /Library/Java/Extensions/ as the new location.
Create a new Processing Applet
- Right-click on src under the project, in the Project Explorer window, and select Add New Class
- Call your class PointCloud and accept all the defaults before closing.
- Paste in Shiffman's Point Cloud Processing example program (one of the 3 programs supplied in openkinect.zip), which has been slightly modified to work with Eclipse:
import org.openkinect.*;
import org.openkinect.processing.*;

import processing.core.PApplet;
import processing.core.PVector;


public class PointCloud extends PApplet {
	Kinect kinect;

	float a = 0;

	// Size of kinect image
	int w = 640;
	int h = 480;


	// We'll use a lookup table so that we don't have to repeat the math over and over
	float[] depthLookUp = new float[2048];

	public void setup() {
	  size(800,600,P3D);
	  kinect = new Kinect(this);
	  kinect.start();
	  kinect.enableDepth(true);
	  // We don't need the grayscale image in this example
	  // so this makes it more efficient
	  kinect.processDepthImage(false);

	  // Lookup table for all possible depth values (0 - 2047)
	  for (int i = 0; i < depthLookUp.length; i++) {
	    depthLookUp[i] = rawDepthToMeters(i);
	  }
	}

	public void draw() {

	  background(0);
	  fill(255);
	  textMode(SCREEN);
	  text("Kinect FR: " + (int)kinect.getDepthFPS() + "\nProcessing FR: " + (int)frameRate,10,16);

	  // Get the raw depth as array of integers
	  int[] depth = kinect.getRawDepth();

	  // We're just going to calculate and draw every 4th pixel (equivalent of 160x120)
	  int skip = 4;

	  // Translate and rotate
	  translate(width/2,height/2,-50);
	  rotateY(a);

	  for(int x=0; x<w; x+=skip) {
	    for(int y=0; y<h; y+=skip) {
	      int offset = x+y*w;

	      // Convert kinect data to world xyz coordinate
	      int rawDepth = depth[offset];
	      PVector v = depthToWorld(x,y,rawDepth);

	      stroke(255);
	      pushMatrix();
	      // Scale up by 200
	      float factor = 200;
	      translate(v.x*factor,v.y*factor,factor-v.z*factor);
	      // Draw a point
	      point(0,0);
	      popMatrix();
	    }
	  }

	  // Rotate
	  a += 0.015f;
	}

	// These functions come from: http://graphics.stanford.edu/~mdfisher/Kinect.html
	float rawDepthToMeters(int depthValue) {
	  if (depthValue < 2047) {
	    return (float)(1.0 / ((double)(depthValue) * -0.0030711016 + 3.3309495161));
	  }
	  return 0.0f;
	}

	PVector depthToWorld(int x, int y, int depthValue) {

	  final double fx_d = 1.0 / 5.9421434211923247e+02;
	  final double fy_d = 1.0 / 5.9104053696870778e+02;
	  final double cx_d = 3.3930780975300314e+02;
	  final double cy_d = 2.4273913761751615e+02;

	  PVector result = new PVector();
	  double depth =  depthLookUp[depthValue];//rawDepthToMeters(depthValue);
	  result.x = (float)((x - cx_d) * depth * fx_d);
	  result.y = (float)((y - cy_d) * depth * fy_d);
	  result.z = (float)(depth);
	  return result;
	}

	public void stop() {
	  kinect.quit();
	  super.stop();
	}


}
Specify 32-bit processing
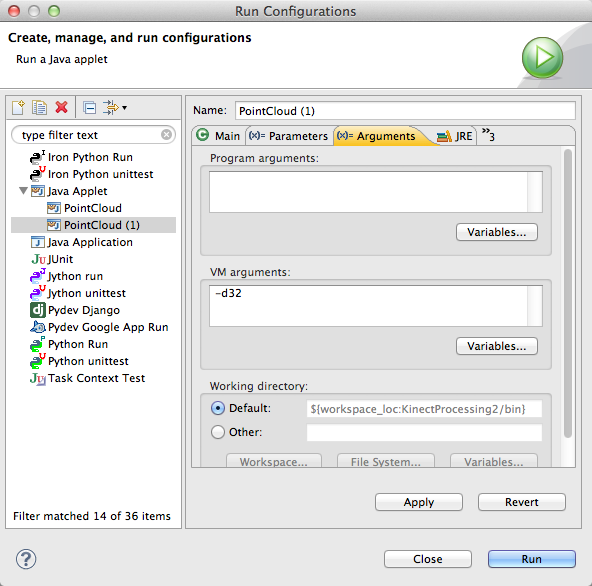
- The openkinect library is written for 32-bit systems, which may not be the case for our machine. To force the compilation to stay in 32-bit mode, we just need to add the "-d32" flag to the project building command.
- Pick Run Configurations from the Run menu,
- In the Arguments Tab, select VM Arguments and enter "-d32"
- Apply
Run!
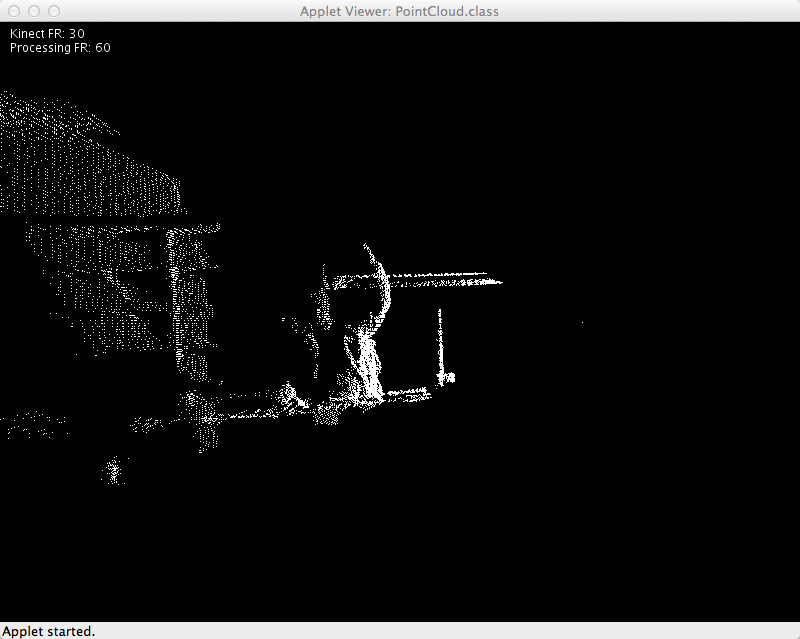
- You should now be able to launch the program successfully:
