Difference between revisions of "CSC111 Lab 14 2011"
(→Challenge #2) |
|||
| (4 intermediate revisions by the same user not shown) | |||
| Line 8: | Line 8: | ||
</tanbox> | </tanbox> | ||
| | | | ||
| − | [[Image:AliceSplash.jpg]] | + | [[Image:AliceSplash.jpg|150px]] |
|} | |} | ||
<br /> | <br /> | ||
| Line 23: | Line 23: | ||
=Download Alice and open the scene= | =Download Alice and open the scene= | ||
* Point your browser at [http://www.alice.org/index.php?page=downloads/download_alice2.2 here] | * Point your browser at [http://www.alice.org/index.php?page=downloads/download_alice2.2 here] | ||
| − | * Click the "Download Alice 2.2" link for Windows or Mac, depending on which you are using. Save the installation file to the desktop. Downloading might take a few minutes! | + | * Click the "Download Alice 2.2" link for Windows or Mac, depending on which you are using. Save the installation file to the desktop. Downloading might take a few minutes! (If it's taking too long, you may try these two copies on beowulf: [http://cs.smith.edu/~111a/Alice2.2.dmg Mac version], or [http://cs.smith.edu/~111a/Alice2.2.zip Windows version].) |
* Extract the files! On Windows, right-click the .zip and click "Extract all", then follow the instructions. | * Extract the files! On Windows, right-click the .zip and click "Extract all", then follow the instructions. | ||
* Once you have it open, double-click Alice.exe to run Alice. | * Once you have it open, double-click Alice.exe to run Alice. | ||
| Line 45: | Line 45: | ||
<br/> | <br/> | ||
| − | Modify the program so that the penguin flaps its wings 3 times | + | Modify the program so that the penguin flaps its wings 3 times. Hit "Play" again to view the scene. |
<br/><br/> | <br/><br/> | ||
*In the upper left box, you can see the elements of your world in a tree form. This is called the Object Tree:<br/> | *In the upper left box, you can see the elements of your world in a tree form. This is called the Object Tree:<br/> | ||
| Line 56: | Line 56: | ||
</center><br/> | </center><br/> | ||
*Drag the "turn_head_right" method into the bottom of "world.my first method", below the other code. Play the scene again. | *Drag the "turn_head_right" method into the bottom of "world.my first method", below the other code. Play the scene again. | ||
| − | *Now, let's make a loop. Drag in the "loop" label from the bottom of the " | + | *Now, let's make a loop. Drag in the "loop" label from the bottom of the "world.my first method" tab. Select a number of times - let's say 5. |
*The loop has a place inside it to put the contents of the loop- currently, it says "Do Nothing". Drag the "turn_head_right" so it is inside the loop, not above it. What happens? | *The loop has a place inside it to put the contents of the loop- currently, it says "Do Nothing". Drag the "turn_head_right" so it is inside the loop, not above it. What happens? | ||
| Line 112: | Line 112: | ||
Go the the penguin's methods tab, and click "Create a new method". Call it "pirouette" and add code that makes the penguin jump and spin at the same time. Add a call to that method in your "my first method" code. | Go the the penguin's methods tab, and click "Create a new method". Call it "pirouette" and add code that makes the penguin jump and spin at the same time. Add a call to that method in your "my first method" code. | ||
| + | <br /> | ||
| + | <br /> | ||
| + | <br /> | ||
| + | <br /> | ||
| + | <br /> | ||
=Add an instance of another class= | =Add an instance of another class= | ||
*Click the green "Add Objects" button on the thumbnail of the scene. From this window, you can use your mouse to rearrange the objects in the scene, and browse through the provided objects to add them. | *Click the green "Add Objects" button on the thumbnail of the scene. From this window, you can use your mouse to rearrange the objects in the scene, and browse through the provided objects to add them. | ||
| Line 131: | Line 136: | ||
<br/> | <br/> | ||
<br/> | <br/> | ||
| − | + | Make sure you demonstrate your final scripts before you leave the lab to get Final Exam points!!! | |
| + | <br /> | ||
| + | If you want to keep your script for use later, save your final .a2w file. It contains solutions to all the challenges you completed. Feel free to expand the scene after the challenges have been completed! | ||
<br /> | <br /> | ||
Latest revision as of 13:21, 15 December 2011
--Julia Burns 4:43, 15 December 2011 (EDT)
Contents
Julia has prepared a special lab for you, for our last meeting of the year. Doing this lab is *not* optional, and you will get 1/3 point on the final exam if you demonstrate before the lab is over that you have solved one of the last 2 challenges! |
About Alice
Alice is a programming language like Python which was designed to teach programming to novices. Unlike Python, Alice runs in its own drag-and-drop environment: instead of writing code, the programmer drags and drops code segments into the editor window. The main purpose of Alice is to create 3D "scenes" using objects provided with Alice.
From the Alice website:
Alice is an innovative 3D programming environment that makes it easy to create an animation for telling a story, playing an interactive game, or a video to share on the web. Alice is a freely available teaching tool designed to be a student's first exposure to object-oriented programming. It allows students to learn fundamental programming concepts in the context of creating animated movies and simple video games. In Alice, 3-D objects (e.g., people, animals, and vehicles) populate a virtual world and students create a program to animate the objects.
In Alice's interactive interface, students drag and drop graphic tiles to create a program, where the instructions correspond to standard statements in a production oriented programming language, such as Java, C++, and C#. Alice allows students to immediately see how their animation programs run, enabling them to easily understand the relationship between the programming statements and the behavior of objects in their animation. By manipulating the objects in their virtual world, students gain experience with all the programming constructs typically taught in an introductory programming course.
Alice is the ideal tool to experiment with object oriented programming. In Alice, each object on the screen is an instance of a class, and each class has certain built-in methods, from which you, the programmer, can build other, more complicated methods, so the range of scenes is limitless.
Download Alice and open the scene
- Point your browser at here
- Click the "Download Alice 2.2" link for Windows or Mac, depending on which you are using. Save the installation file to the desktop. Downloading might take a few minutes! (If it's taking too long, you may try these two copies on beowulf: Mac version, or Windows version.)
- Extract the files! On Windows, right-click the .zip and click "Extract all", then follow the instructions.
- Once you have it open, double-click Alice.exe to run Alice.
- Download winter.a2w. (right-click and click "save as").
- In Alice, press "file -> open world" to open winter.a2w.
- Press the play button to watch the scene!
Make the first changes to the scene
- Look at the code in "World.my first method". Each line makes a call to one of the methods of the instance of class penguin: first the "turn to face" method, then the "walking" method, and so on. The methods take input, too: they each have parameters in the form of dropdown lists.
Challenge #1 |
Modify the program so that the penguin flaps its wings 3 times. Hit "Play" again to view the scene.
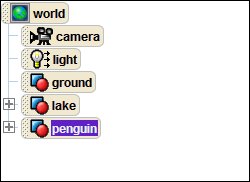
- In the upper left box, you can see the elements of your world in a tree form. This is called the Object Tree:
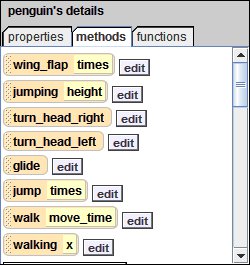
- Click on the "penguin" label, and the penguin's details will appear in the panel below. Within that panel, click the "methods" tab:
- Drag the "turn_head_right" method into the bottom of "world.my first method", below the other code. Play the scene again.
- Now, let's make a loop. Drag in the "loop" label from the bottom of the "world.my first method" tab. Select a number of times - let's say 5.
- The loop has a place inside it to put the contents of the loop- currently, it says "Do Nothing". Drag the "turn_head_right" so it is inside the loop, not above it. What happens?
Challenge #2 |
Modify the loop so the penguin turns its head right, then left, then flaps its wings, and repeats the whole sequence twice.
Challenge #3 |
The "Do Together" command is a nice feature of Alice that is harder to do in Python. Try making the penguin jump and turn its head at the same time.
Challenge #4 |
Click the + sign next to Penguin on the object tree, and you can see its subcomponents. Can you use the methods of the wings to make the penguin wave? (Hint: try to figure out the difference between "turn" and "roll". You can use them both to your advantage.)
Challenge #5 |
Go the the penguin's methods tab, and click "Create a new method". Call it "pirouette" and add code that makes the penguin jump and spin at the same time. Add a call to that method in your "my first method" code.
Add an instance of another class
- Click the green "Add Objects" button on the thumbnail of the scene. From this window, you can use your mouse to rearrange the objects in the scene, and browse through the provided objects to add them.
- Add another animal, such as a fish, squirrel, or gorilla robot. (Try to pick something with arms.) Hit "Done' to go back to the main screen.
Challenge #6 |
Use the various methods of your animals to make them turn to face each other, approach each other, and wave. If you have time, you can do a more involved scene!
Make sure you demonstrate your final scripts before you leave the lab to get Final Exam points!!!
If you want to keep your script for use later, save your final .a2w file. It contains solutions to all the challenges you completed. Feel free to expand the scene after the challenges have been completed!


