Difference between revisions of "PyQt4 Lab 1"
(→Creating the GUI (form)) |
(→Installing PyQt) |
||
| (10 intermediate revisions by the same user not shown) | |||
| Line 7: | Line 7: | ||
=Installing PyQt= | =Installing PyQt= | ||
| − | * First install SIP which allows binding of C++ and python program. SIP can be found at http://www.riverbankcomputing.co.uk/software/sip/download. The last step of the installation gave me an error message, but this was for something relatively trivial which shouldn't influence the operation of the package. | + | * First install SIP which allows binding of C++ and python program. SIP can be found at RiverBank Computing (http://www.riverbankcomputing.co.uk/software/sip/download). The last step of the installation gave me an error message, but this was for something relatively trivial which shouldn't influence the operation of the package. |
| − | * Then download and install PyQt4, also from | + | * Then download and install PyQt4, also from RiverBank: http://www.riverbankcomputing.co.uk/software/pyqt/download . As of today (2/1/09), this installs Python 2.6 on your system. It may be different for you depending on when you install this package. |
| + | * Note where the installation will store the different packages, and add these directories to your environment Path using '''Control Panel/System/Advanced/Environment Variables'''. | ||
* A test for verifying that your installation works | * A test for verifying that your installation works | ||
| Line 29: | Line 30: | ||
* In the '''New Form''' menu that appears, select a MainWindow | * In the '''New Form''' menu that appears, select a MainWindow | ||
| + | <br /> | ||
| + | <br /> | ||
<center>[[Image:TutorialPyQt2.png | 700px]]</center> | <center>[[Image:TutorialPyQt2.png | 700px]]</center> | ||
| + | <br /> | ||
| + | <br /> | ||
* Drag a '''TextEdit''' widget to the window, along with two '''push buttons'''. Right click on these 3 widgets to change their names to ''textEdit'', ''closeButton'', and ''clearButton''. Also change the caption on the two buttons to ''Close'', and ''Clear'', also using right click to access the properties of the widgets. | * Drag a '''TextEdit''' widget to the window, along with two '''push buttons'''. Right click on these 3 widgets to change their names to ''textEdit'', ''closeButton'', and ''clearButton''. Also change the caption on the two buttons to ''Close'', and ''Clear'', also using right click to access the properties of the widgets. | ||
* Use the layout button to make sure the widgets align properly. | * Use the layout button to make sure the widgets align properly. | ||
| + | <br /> | ||
| + | <br /> | ||
<center>[[Image:TutorialPyQt3.png | 700px ]]</center> | <center>[[Image:TutorialPyQt3.png | 700px ]]</center> | ||
| + | <br /> | ||
| + | <br /> | ||
| + | |||
| + | * Add two connections, one between the '''clicked()''' slot of the '''Clear''' button, and the '''clear()''' slot of the '''textEdit''', and one between the '''clicked()''' slot of the '''Close''' button, and the '''close()''' slot of the main window. | ||
| + | |||
| + | * Create a new folder on your disk, and save the form there as '''form1.ui'''. The ''ui'' extenstion stands for ''user interface'' and is a format used by Qt. A copy of this form is available [[PyQt4 Tutorial 1 form1.ui | here]]. Note that the code linking the buttons to the text-edit and to the form is there! | ||
| + | |||
| + | =The Python Code= | ||
| + | |||
| + | * Convert form1.ui into a python representation. Open a DOS window (console) and type: | ||
| + | |||
| + | pyuic4 form1.ui > editor.py | ||
| + | |||
| + | |||
| + | :The contents of '''editor.py''' is available [[PyQt4 Tutorial 2 editor.py | here]]. | ||
| + | |||
| + | :This file is now in python and creates a GUI class including the visual elements. Do not edit it. The code you will be adding to give life to your application should '''not''' be in this file, but in another one instead. | ||
| + | |||
| + | * Now create a new python program called '''start.py''' (inspired from the tutorial [http://www.rkblog.rk.edu.pl/w/p/simple-text-editor-pyqt4/ here]): | ||
| + | |||
| + | <code><pre> | ||
| + | # start.py | ||
| + | # D. Thiebaut | ||
| + | import sys | ||
| + | from PyQt4 import QtCore, QtGui | ||
| + | from editor import Ui_MainWindow | ||
| + | |||
| + | class StartQT4(QtGui.QMainWindow): | ||
| + | def __init__(self, parent=None): | ||
| + | QtGui.QWidget.__init__(self, parent) | ||
| + | self.ui = Ui_MainWindow() #Ui_notepad() | ||
| + | self.ui.setupUi(self) | ||
| + | self.ui.textEdit.setText('Welcome! Please start typing!') | ||
| + | |||
| + | if __name__ == "__main__": | ||
| + | app = QtGui.QApplication(sys.argv) | ||
| + | myapp = StartQT4() | ||
| + | myapp.show() | ||
| + | sys.exit(app.exec_()) | ||
| + | </pre></code> | ||
| + | |||
| + | * Run the program '''start.py''' (from within Idle by typing F5, or in a DOS window by typing <tt>python start.py</tt>. | ||
| + | <br /> | ||
| + | <br /> | ||
| + | <center> | ||
| + | [[Image:PyQt45.png]] | ||
| + | </center> | ||
| + | |||
| + | * When you see the window above open, click on the '''Clear''' button to verify that it erases the text edit area, and that the '''Close''' button indeed closes the window. | ||
| + | |||
| + | ::You're in business! | ||
Latest revision as of 12:09, 1 February 2009
© D. Thiebaut 2009.
This tutorial is a quick introduction to PyQt, a binding of Python with the Qt4 GUI library. Qt was originally made by Trolltech, now bought by Nokia, and is a powerful platform for developing GUI applications in C++ or Java for Windows, MacOS, and Linux, as well as embedded platforms.
This tutorial shows the basic steps for installing PyQt on a Windows XP machine (sorry, still not using and resisting using Vista), and creating a simple app.
Installing PyQt
- First install SIP which allows binding of C++ and python program. SIP can be found at RiverBank Computing (http://www.riverbankcomputing.co.uk/software/sip/download). The last step of the installation gave me an error message, but this was for something relatively trivial which shouldn't influence the operation of the package.
- Then download and install PyQt4, also from RiverBank: http://www.riverbankcomputing.co.uk/software/pyqt/download . As of today (2/1/09), this installs Python 2.6 on your system. It may be different for you depending on when you install this package.
- Note where the installation will store the different packages, and add these directories to your environment Path using Control Panel/System/Advanced/Environment Variables.
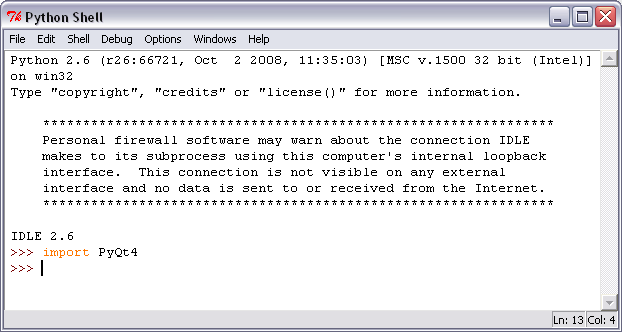
- A test for verifying that your installation works
- Go Start/All Programs/Python 2.6/IDLE (again, it may be a different version for you)
- If the python shell window is not open, open it up (Run/Python Shell)
- Open a Python Shell window, and type
import PyQt4
- If you do not get an error message, then PyQt4 is installed correctly.

Creating the GUI (form)
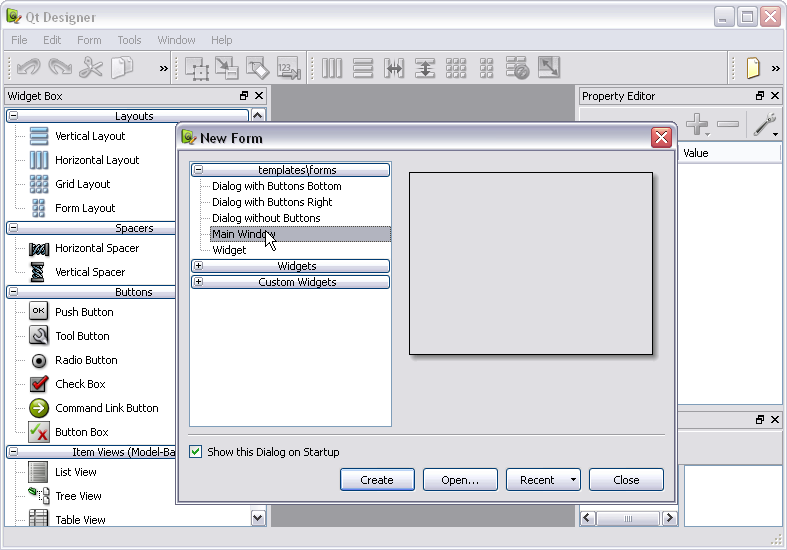
- Locate the Qt Designer that should have been installed as part of the previous step, and launch it.
- In the New Form menu that appears, select a MainWindow

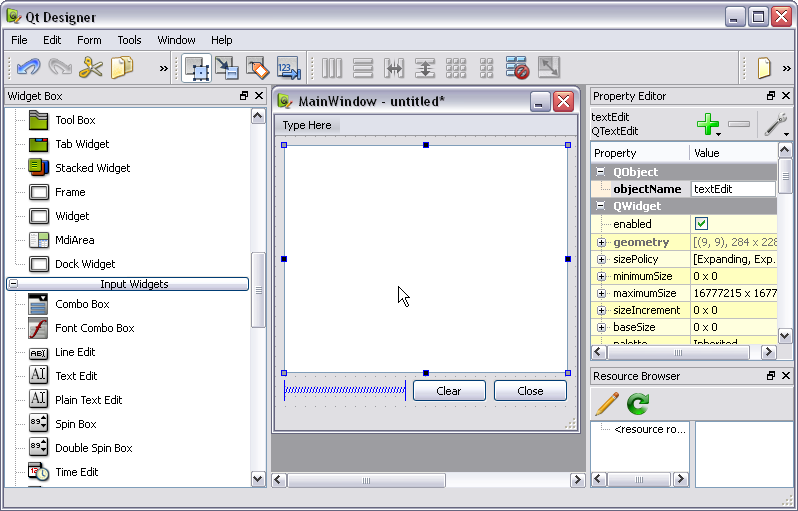
- Drag a TextEdit widget to the window, along with two push buttons. Right click on these 3 widgets to change their names to textEdit, closeButton, and clearButton. Also change the caption on the two buttons to Close, and Clear, also using right click to access the properties of the widgets.
- Use the layout button to make sure the widgets align properly.

- Add two connections, one between the clicked() slot of the Clear button, and the clear() slot of the textEdit, and one between the clicked() slot of the Close button, and the close() slot of the main window.
- Create a new folder on your disk, and save the form there as form1.ui. The ui extenstion stands for user interface and is a format used by Qt. A copy of this form is available here. Note that the code linking the buttons to the text-edit and to the form is there!
The Python Code
- Convert form1.ui into a python representation. Open a DOS window (console) and type:
pyuic4 form1.ui > editor.py
- The contents of editor.py is available here.
- This file is now in python and creates a GUI class including the visual elements. Do not edit it. The code you will be adding to give life to your application should not be in this file, but in another one instead.
- Now create a new python program called start.py (inspired from the tutorial here):
 # start.py
 # D. Thiebaut
 import sys
 from PyQt4 import QtCore, QtGui
 from editor import Ui_MainWindow

 class StartQT4(QtGui.QMainWindow):
	def __init__(self, parent=None):
		QtGui.QWidget.__init__(self, parent)
		self.ui = Ui_MainWindow() #Ui_notepad()
		self.ui.setupUi(self)
		self.ui.textEdit.setText('Welcome! Please start typing!')

 if __name__ == "__main__":
	app = QtGui.QApplication(sys.argv)
	myapp = StartQT4()
	myapp.show()
	sys.exit(app.exec_())
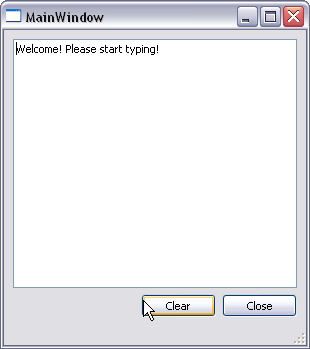
- Run the program start.py (from within Idle by typing F5, or in a DOS window by typing python start.py.
- When you see the window above open, click on the Clear button to verify that it erases the text edit area, and that the Close button indeed closes the window.
- You're in business!
