Difference between revisions of "CSC111 Lab 3"
(→Part 4: Reversing a Sound File) |
|||
| (12 intermediate revisions by the same user not shown) | |||
| Line 111: | Line 111: | ||
* Try one or two other sound files. | * Try one or two other sound files. | ||
| − | =Part 3: Altering | + | =Part 3: Altering a sound file= |
* You will reduce the intensity of the sound by dividing all the samples by half | * You will reduce the intensity of the sound by dividing all the samples by half | ||
| Line 129: | Line 129: | ||
# lower its intensity by half | # lower its intensity by half | ||
| − | for i in range( 1, getLength( sound ) | + | for i in range( 1, getLength( sound ) ): |
value = getSampleValueAt( sound, i ) # get the value of the i-th sample | value = getSampleValueAt( sound, i ) # get the value of the i-th sample | ||
| − | + | setSampleValueAt( sound, i, value / 2 ) # set the sample to half its original value | |
# play new waveform back | # play new waveform back | ||
| Line 141: | Line 141: | ||
=Part 4: Reversing a Sound File= | =Part 4: Reversing a Sound File= | ||
| − | <center>[[Image:CSC111_lab3_sound1_sound2.png | | + | <center>[[Image:CSC111_lab3_sound1_sound2.png | 300px]]</center> |
* The goal is to create 2 sound objects, '''sound1''' and '''sound2''' from the same file, and take the value of the sample at Index 1 in sound1 and to store it at Index N-1 in sound2. Identically for the sample at Index 2 which will go to Index N-2 in sound2. | * The goal is to create 2 sound objects, '''sound1''' and '''sound2''' from the same file, and take the value of the sample at Index 1 in sound1 and to store it at Index N-1 in sound2. Identically for the sample at Index 2 which will go to Index N-2 in sound2. | ||
| Line 206: | Line 206: | ||
Follow the steps below, and use the [[CSC111_Lab_3#JES_Sound_Functions | list of sound functions]] at the end of this lab for additional information, when needed: | Follow the steps below, and use the [[CSC111_Lab_3#JES_Sound_Functions | list of sound functions]] at the end of this lab for additional information, when needed: | ||
* Create a sound object from a file, as we did before | * Create a sound object from a file, as we did before | ||
| − | * Get the number of samples | + | * Get the number of samples ''N'' in the sound |
| − | + | * Create a new sound object that is twice as long as your original sound object with '''makeEmptySound( 2*''N'' )'''. The resulting sound is totally silent (all samples are 0). | |
| − | + | * Create a new variable called '''offset''' which will contain a delay in samples where the original sound will be copied in the empty sound object. | |
| − | * Create a new sound object that is twice as long as your original sound object with '''makeEmptySound( | + | * Copy your original sound inside the new empty sound, at the given offset |
| − | * Copy your original sound inside the new empty sound, at | + | * Play the new sound and verify that you can "delay" the original sound by 1000 samples. |
| + | * Modify the offset and verify that your program indeed delays the playing by more or less of a delay, depending on the number stored in '''offset''' | ||
<br /> | <br /> | ||
| Line 218: | Line 219: | ||
<br /> | <br /> | ||
| + | <br /> | ||
| + | <br /> | ||
| + | |||
| + | =Part 7: Overlapping sounds= | ||
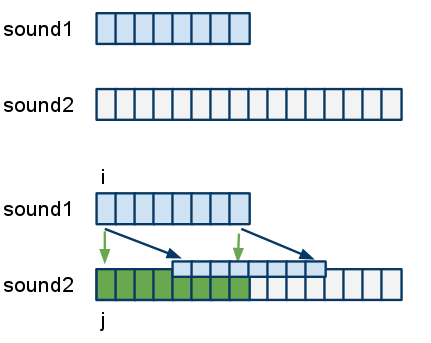
| + | This time you will '''add''' two copies of the same sound, but delaying one relative to the other, as illustrated in the figure below. | ||
| + | Note that with sounds, you can simply add the samples values together to ''overlap'' the sounds, and make it sound like they are occuring simulateneously. | ||
| + | <br /> | ||
| + | <br /> | ||
| + | <br /> | ||
| + | <center> [[Image:CSC111_overlapping_sounds.png | 300px]]</center> | ||
| + | |||
| + | <br /> | ||
| + | <br /> | ||
| + | |||
| + | =Part 8: Echo= | ||
| + | Same setup as Part 7, but the sound samples that are delayed are going to be attenuated (their value divided by some number). | ||
| + | |||
| + | <br /> | ||
| + | <br /> | ||
| + | |||
| + | <center> [[Image:CSC111_overlapping_and_echoing_sounds.png | 300px]]</center> | ||
| + | <br /> | ||
| + | <br /> | ||
| + | |||
| + | =Part 9: ECHO Echo echo= | ||
| + | |||
| + | Same as Part 8, but now you will make 2 copies of your sound object, attenuate the first one by 0.5, the second one by 0.25, and delay each by 5000 from each other, and create a reverberation effect. | ||
| + | |||
| + | <br /> | ||
| + | <br /> | ||
| + | |||
| + | <center>[[Image:CSC111_Full_Echo.png | 300px]]</center> | ||
| + | |||
<br /> | <br /> | ||
<br /> | <br /> | ||
| Line 316: | Line 350: | ||
The function pauses execution until the note is finished. For much more complete support of MIDI music, see the next section. | The function pauses execution until the note is finished. For much more complete support of MIDI music, see the next section. | ||
| + | |||
| + | <br /> | ||
| + | <br /> | ||
| + | <br /> | ||
| + | <br /> | ||
| + | <br /> | ||
| + | [[Category:CSC111]][[Category:Python]][[Category:Jes]] | ||
Latest revision as of 20:36, 11 February 2010
You are going to use the computers in Windows mode today. Be sure to reboot them if they are in Mac mode, please!
Contents
- 1 Software Setup (to be performed before the lab)
- 2 Part 1 (Official Start of the Lab): Your First JES Program
- 3 Part 2: Playing Sound Files
- 4 Part 3: Altering a sound file
- 5 Part 4: Reversing a Sound File
- 6 Part 5: Reversing in Place
- 7 Part 6: Moving a sound wave into a different position
- 8 Part 7: Overlapping sounds
- 9 Part 8: Echo
- 10 Part 9: ECHO Echo echo
- 11 JES Sound Functions
Software Setup (to be performed before the lab)
Before you can use the JES programming environment, you need to install it first.
- Login to your Novell account.
- Open your H: drive in Windows Explorer.
- Open Windows Explorer a second time, so that you have two windows open.
- In the second window, enter this address in the Address bar: \\rescent\pc\COURSES\CSC\CSC111
- This is the place on the Novell network where you will find JES-related files.
- Drag the folder named jes-3-1-1windows from the CSC111 window to your H: drive.
- You will see another folder in CSC111 folder called Sound Files. Drag it as well from the CSC111 window to your H: drive.
- You can now close the windows showing the CSC111 folder. You won't need it for the rest of this lab.
- In the window showing your H: drive, open the JES folder and click on the JES icon (snake face with glasses :-)
- After a few (long) seconds, you should get the JES programming environment.
If you want to install JES on your personal Windows computer
If you want to install JES on your Windows laptop or computer, you can get Jes from the Google code web site. Grab the 3.2.1 version for Windows and install it on your Windows machine.
If you want to install JES on your personal Mac
Jes for the Mac is available on Google code. Get Jes 3.2.1 for the Mac, open the zip file, and move the JES 3.2.1.app to your Applications folder.
Additional Notes for Mac Users
If you want to download the Sound Files to your MacBook or MacPro, Follow these steps (you must be on campus for this to work):
- Click on the desktop to bring up the Finder menu
- Click on Go
- Click on Connect to Server
- Click on aft://rescent.smith.edu
- Click on RESCENT.PC
This will create a new Drive called RESCENT.PC on your Desktop.
- Open the new drive
- Select Courses
- Select CSC
- Select CSC111
- Drag the Sound Files folder to your Desktop.
Part 1 (Official Start of the Lab): Your First JES Program
Open JES by double-clicking on the icon or navigating through the start menu (on pcs)
- In the window that opens, the top portion is program area, and the bottom portion is command area (the interactive window we have already seen on beowulf).
- In the Program area, type in the following lines, being careful to follow the format exactly (including all punctuation and indenting)
.

def main():
    name = raw_input( "what is your name? " )
    print "hello there, " + name + "!"

.
- Save the file by typing Control-S.
- A popup window opens up. Save the file as hello.py in your H: drive
- Click on Load Program button to load the file just stored in JES.
- In the command area (black window), type
main()
- to call the function.
- Make sure you see the pop-up window asking for your name, and the response of the program in the interactive area.
Part 2: Playing Sound Files
- In the JES program area, type in the following main() function:
.

def main():
  file = pickAFile()
  sound = makeSound( file )
  blockingPlay( sound )

.
- Save the file as sound1.py
- Click on Load Program
- In the interactive area, type
main()
- When prompted for a sound file, select thisisatest.wav in the Sound Files folder.
- Make sure the speakers are on, but not too loud and listen to the sentence being played.
- Try one or two other sound files.
Part 3: Altering a sound file
- You will reduce the intensity of the sound by dividing all the samples by half
- Copy/Paste the program below in JES
- Read it to make sure you understand it.
.

def main():
  # select  a sound file
  file = pickAFile()
  sound = makeSound( file )

  # play it
  blockingPlay( sound )

  # lower its intensity by half
  for i in range( 1, getLength( sound ) ):
     value = getSampleValueAt( sound, i )    # get the value of the i-th sample
     setSampleValueAt( sound, i, value / 2 )  # set the sample to half its original value

  # play new waveform back
  blockingPlay( sound )

.
Part 4: Reversing a Sound File
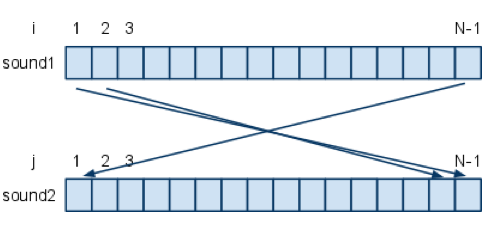
- The goal is to create 2 sound objects, sound1 and sound2 from the same file, and take the value of the sample at Index 1 in sound1 and to store it at Index N-1 in sound2. Identically for the sample at Index 2 which will go to Index N-2 in sound2.
- Complete the table below and write down the relationship existing between i and j:
| i | j | i+j |
| 1 | ||
| 2 | ||
| 3 | ||
| ... | ||
| N-2 | ||
| N-1 |
- From the table above extract the equation that yields j as a function of i
- Write your for-loop to reverse sound1 into sound2
      N = ...
      for i in range( 1, N ):
           j = ...
           sample = getSampleValueAt( sound1, i )
           setSampleValueAt( sound2, j, sample )
- Test your program by making it play sound1 first, then sound2.
Part 5: Reversing in Place
- Same problem as for Part 4, but instead of using two sound objects, sound1 and sound2, do the transformation in place, i.e. using only one sound object.
- Hints: use two variables, sample1 and sample2, one taken from the first half of the array of samples, one taken from the 2nd half, and swap them!
Part 6: Moving a sound wave into a different position
Follow the steps below, and use the list of sound functions at the end of this lab for additional information, when needed:
- Create a sound object from a file, as we did before
- Get the number of samples N in the sound
- Create a new sound object that is twice as long as your original sound object with makeEmptySound( 2*N ). The resulting sound is totally silent (all samples are 0).
- Create a new variable called offset which will contain a delay in samples where the original sound will be copied in the empty sound object.
- Copy your original sound inside the new empty sound, at the given offset
- Play the new sound and verify that you can "delay" the original sound by 1000 samples.
- Modify the offset and verify that your program indeed delays the playing by more or less of a delay, depending on the number stored in offset
Part 7: Overlapping sounds
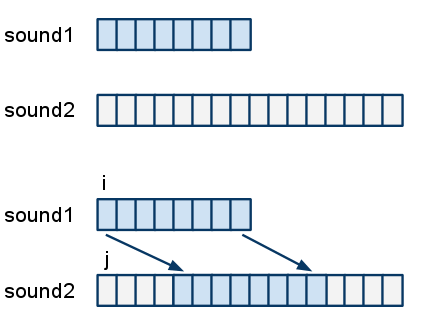
This time you will add two copies of the same sound, but delaying one relative to the other, as illustrated in the figure below.
Note that with sounds, you can simply add the samples values together to overlap the sounds, and make it sound like they are occuring simulateneously.
Part 8: Echo
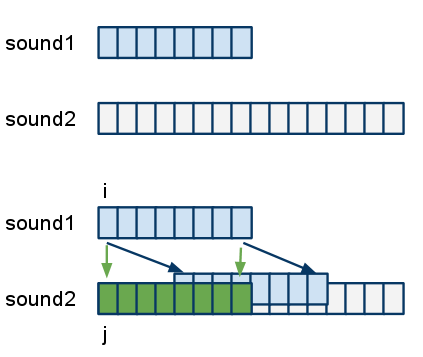
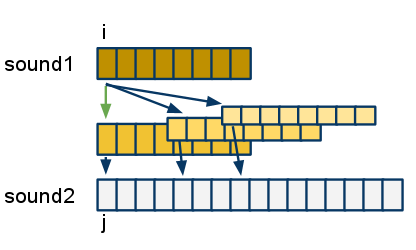
Same setup as Part 7, but the sound samples that are delayed are going to be attenuated (their value divided by some number).
Part 9: ECHO Echo echo
Same as Part 8, but now you will make 2 copies of your sound object, attenuate the first one by 0.5, the second one by 0.25, and delay each by 5000 from each other, and create a reverberation effect.
JES Sound Functions
This is just reference material taken from Depaw U. that you may want to play with.
A sound is treated as a collection of sample values, much as a picture is a collection of pixels. Here are the functions on sounds:
| makeSound(file) | Return a sound loaded from a WAV, AU, or AIFF file |
| makeEmptySound(sec) | Return a blank sound (all samples 0) of length sec seconds |
| writeSoundTo(s, file) | Save s in the given file; uses the same format as when loaded (makeEmptySound creates a sound in WAV format) |
| openSoundTool(s) | Open the sound exploration window for s |
| play(s) | Play sound s in the background |
| playAtRate(s, r) | Play s at speed r--1.0 is normal, 2.0 is twice as fast, etc. |
| playInRange(s, b, e) | Play s from sample number b to e |
| playAtRateInRange(s, r, b, e) | Play s from b to e at speed r |
| blockingPlay(s) | Play s and wait for it to finish (also, blockingPlayInRange and blockingPlayAtRateInRange) |
| getSamples(s) | Return the collection of samples in s (not quite a list, but indexable and usable in a for loop) |
| getLength(s) | Return the number of samples in s |
| getSamplingRate(s) | Return the number of samples per second in s |
There are also some useful methods on sound and sample objects:
| s.getSampleValue(i) | Return the (left channel, if stereo) value of the ith sample in s (the first sample is at index 1) |
| s.getLeftSampleValue(i) | Return the left channel value at index i |
| s.getRightSampleValue(i) | Return the right channel value at index i |
| s.setSampleValue(i, v) | Set the (left) value of sample i to v; the range of sample values is -32,768 to +32,767 |
| s.setLeftSampleValue(i, v) | Same |
| s.setRightSampleValue(i, v) | Guess what? |
| s.getSampleObjectAt(i) | Extracts the sample object at index i, without creating a whole collection of samples |
| samp.value | Return the value of sample samp; change the value by assigning to this |
| samp.left | Return or change the left channel value of samp |
| samp.right | Return or change the right channel value of samp |
Finally, JES provides a simple function to play a MIDI note:
| playNote(n, dur, vol) | plays note number n (middle C is 60, C-sharp is 61, etc.; the range is 0-127) for dur milliseconds at volume vol (maximum is 127). |
The function pauses execution until the note is finished. For much more complete support of MIDI music, see the next section.
