Difference between revisions of "CSC220 C++Qt Crash Course"
(→What is Qt?) |
(→A Dialog to Read Files) |
||
| (89 intermediate revisions by the same user not shown) | |||
| Line 1: | Line 1: | ||
--[[User:Thiebaut|D. Thiebaut]] 16:25, 2 December 2010 (UTC) | --[[User:Thiebaut|D. Thiebaut]] 16:25, 2 December 2010 (UTC) | ||
---- | ---- | ||
| − | <center> | + | <!--center> |
<font size="+2">Page under construction!</font> | <font size="+2">Page under construction!</font> | ||
<br \>[[File:UnderConstruction.jpg|300px]] | <br \>[[File:UnderConstruction.jpg|300px]] | ||
| − | </center> | + | </center--> |
<br /> | <br /> | ||
| Line 18: | Line 18: | ||
=What is Qt?= | =What is Qt?= | ||
| + | [[Image:QtCreator.png|right|100px]] | ||
| + | <br /> | ||
| + | * <font size="+1">Qt is a cross-platform application framework </font> | ||
| + | ::that is widely used for developing application software with graphical user interface (GUI) (in which case Qt is referred to as a widget toolkit when used as such) | ||
| + | <br /> | ||
| + | * <font size="+1">Qt uses standard C++</font> | ||
| + | ::but makes extensive use of a special code generator (called the Meta Object Compiler, or moc) | ||
| + | <br /> | ||
| + | * <font size="+1">Qt can also be used in several other programming languages</font> | ||
| + | :: via language bindings. | ||
| + | <br /> | ||
| + | * <font size="+1">It runs on all major platforms</font> | ||
| + | <br /> | ||
| + | * <font size="+1">Non-GUI features include</font> | ||
| + | <br /> | ||
| + | ** <font size="+1">SQL database access, </font> | ||
| + | <br /> | ||
| + | ** <font size="+1">XML parsing, </font> | ||
| + | <br /> | ||
| + | ** <font size="+1">thread management, </font> | ||
| + | <br /> | ||
| + | ** <font size="+1">network support, </font> | ||
| + | <br /> | ||
| + | ** <font size="+1">and a unified cross-platform API for file handling.</font> | ||
| + | <br /> | ||
| + | * <font size="+1">GNU Lesser General Public License, Qt is free and open source</font> | ||
| + | |||
| + | =Platforms= | ||
| + | [[Image:MacLogo.png| 50px | right]] | ||
| + | [[Image:WindowsLogo.png| 50px | right]] | ||
| + | [[Image:TuxLogo.png| 50px | right]] | ||
| + | [[Image:NokiaQt.png|100px|right]] | ||
| + | <br /> | ||
| + | *<font size="+1">Linux/X11</font> | ||
| + | <br /> | ||
| + | *<font size="+1">Mac OS X</font> | ||
| + | <br /> | ||
| + | *<font size="+1">Windows </font> | ||
| + | <br /> | ||
| + | *<font size="+1">Embedded Linux</font> | ||
| + | <br /> | ||
| + | *<font size="+1">Windows CE / Mobile</font> | ||
| + | <br /> | ||
| + | *<font size="+1">Symbian</font> | ||
| + | :: (Nokia Devices) | ||
| + | <br /> | ||
| + | *<font size="+1">Maemo</font> | ||
| + | <br /> | ||
| + | |||
| + | =External ports= | ||
| + | Since Nokia opened the Qt source code to the community on Gitorious various ports have been appearing. Here are some of them: | ||
| + | <br /> | ||
| + | *<font size="+1">Qt for OpenSolaris </font> | ||
| + | <br /> | ||
| + | *<font size="+1">Qt for Haiku – Qt for Haiku OS</font> | ||
| + | <br /> | ||
| + | *<font size="+1">Qt for OS/2 </font> | ||
| + | <br /> | ||
| + | *<font size="+1">Qt-iPhone – Experimental</font> | ||
| + | <br /> | ||
| + | *<font size="+1">Android-Lighthouse – Experimental </font> | ||
| + | <br /> | ||
| + | *<font size="+1">Qt for webOS – Experimental </font> | ||
| + | <br /> | ||
| + | *<font size="+1">Qt for Amazon Kindle DX – Experimental </font> | ||
| + | <br /> | ||
| + | *<font size="+1">Qt for Wayland – Experimental </font> | ||
| + | <br /> | ||
| + | |||
| + | =Language Bindings= | ||
| + | |||
| + | * http://en.wikipedia.org/wiki/Qt_(framework)#Bindings | ||
| + | |||
| + | =History= | ||
| + | |||
| + | <br /> | ||
| + | *<font size="+1"> Haavard Nord and Eirik Chambe-Eng started Qt in 1991.</font> | ||
| + | <br /> | ||
| + | * <font size="+1">Headquaters in Oslo, Norway</font> | ||
| + | <br /> | ||
| + | *<font size="+1"> incorporated at TrollTech 3 years later</font> | ||
| + | <br /> | ||
| + | *<font size="+1"> Acquired by Nokia in 2008</font> | ||
| + | |||
| + | |||
| + | ---- | ||
| + | |||
| + | |||
| + | ---- | ||
| + | |||
| + | =QtCreator= | ||
| + | |||
| + | * <font size="+1">Start Qt Creator</font> | ||
| + | <br /> | ||
| + | <br /> | ||
| + | <center> | ||
| + | [[Image:QtCreator1.png|600px]] | ||
| + | </center> | ||
| + | <br /> | ||
| + | <br /> | ||
| + | |||
| + | * <font color="magenta" size="+1">IMPORTANT: Always remember to close a project before opening a new one!</font> | ||
| + | |||
| + | <br /> | ||
| + | |||
| + | |||
| + | =Play Time!= | ||
| + | * <font size="+1">Try these examples: | ||
| + | </font><br/> | ||
| + | |||
| + | ** <font size="+1">WebKit/FancyBrowser | ||
| + | </font> | ||
| + | ::Qt includes a Web browser as a standard widget | ||
| + | ::Select the special effect (top menu) that rotates all images | ||
| + | <br /> | ||
| + | |||
| + | ** <font size="+1"> Animation Framework/Animated Tiles | ||
| + | </font> | ||
| + | ::An example of animation of images along a path | ||
| + | <br /> | ||
| + | |||
| + | ** <font size="+1"> OpenGL/Hello GL | ||
| + | </font> | ||
| + | ::An example of real-time OpenGL output | ||
| + | <br /> | ||
| + | |||
| + | =First Project: A Main Window Built From Scratch= | ||
| + | |||
| + | |||
| + | * File | ||
| + | ** Close all projects | ||
| + | * File | ||
| + | ** New File or Project | ||
| + | *** Qt C++ Project | ||
| + | **** Qt GUI Application | ||
| + | ***** Name: '''MyHello''' | ||
| + | ***** Create In: ''Pick a convenient location in your home account'' | ||
| + | ***** Click on "Make default location" | ||
| + | <br /> | ||
| + | <center>[[Image:QtCreatorMyHello1.png|500px]]</center> | ||
| + | <br /> | ||
| + | <br /> | ||
| + | <center>[[Image:QtCreatorMyHello2.png|500px]]</center> | ||
| + | <br /> | ||
| + | ==Form== | ||
| + | * Follow directions given in class to create a form with | ||
| + | ** a text browser | ||
| + | ** two push buttons | ||
| + | ** a spacer between the two buttons | ||
| + | <br /> | ||
| + | <center>[[Image:QtCreatorMyHello3.png|400px]]</center> | ||
| + | <br /> | ||
| + | * Add a layout (follow directions given in class) | ||
| + | <br /> | ||
| + | <center>[[Image:QtCreatorMyHello4.png|400px]]</center> | ||
| + | <br /> | ||
| + | |||
| + | ==Signals & Slots== | ||
| + | |||
| + | * Add a connection between the buttons (senders) and the MainWindow (receiver). | ||
| + | * this is tricky: follow this series of steps carefully! | ||
| + | <br /> | ||
| + | <center>[[Image:QtCreatorMyHello5.png|400px]]</center> | ||
| + | <br /> | ||
| + | |||
| + | <br /> | ||
| + | <center>[[Image:QtCreatorMyHello6.png|400px]]</center> | ||
| + | <br /> | ||
| + | |||
| + | |||
| + | <br /> | ||
| + | <center>[[Image:QtCreatorMyHello7.png|400px]]</center> | ||
| + | <br /> | ||
| + | |||
| + | |||
| + | <br /> | ||
| + | <center>[[Image:QtCreatorMyHello8.png|400px]]</center> | ||
| + | <br /> | ||
| + | |||
| + | * The result: | ||
| + | |||
| + | <br /> | ||
| + | <center>[[Image:QtCreatorMyHello9.png|400px]]</center> | ||
| + | <br /> | ||
| + | |||
| + | ==Programming--Step 1== | ||
| + | * Now that we have a connection between the ''clicked()'' event generated by '''pushButton1''' (the ''signal'') and the function ''helloSlot()'' of the '''mainwindow''' (the ''slot''), we can put code in the slot() function. | ||
| + | * The two files we need to program are mainwindow.h and mainwindow.cpp: | ||
| + | |||
| + | ===mainwindow.h=== | ||
| + | <source lang="cpp" highlight="9,10"> | ||
| + | class MainWindow : public QMainWindow | ||
| + | { | ||
| + | Q_OBJECT | ||
| + | |||
| + | public: | ||
| + | explicit MainWindow(QWidget *parent = 0); | ||
| + | ~MainWindow(); | ||
| + | |||
| + | public slots: | ||
| + | void helloSlot(); | ||
| + | |||
| + | private: | ||
| + | Ui::MainWindow *ui; | ||
| + | }; | ||
| + | </source> | ||
| + | |||
| + | ===mainwindow.cpp=== | ||
| + | |||
| + | <source lang="cpp" highlight="14,15,16"> | ||
| + | #include "mainwindow.h" | ||
| + | #include "ui_mainwindow.h" | ||
| + | |||
| + | MainWindow::MainWindow(QWidget *parent) : | ||
| + | QMainWindow(parent), | ||
| + | ui(new Ui::MainWindow) { | ||
| + | ui->setupUi(this); | ||
| + | } | ||
| + | |||
| + | MainWindow::~MainWindow() { | ||
| + | delete ui; | ||
| + | } | ||
| + | |||
| + | void MainWindow::helloSlot() { | ||
| + | // your code goes here | ||
| + | } | ||
| + | |||
| + | </source> | ||
| + | |||
| + | ===Build and test=== | ||
| + | * Click on the Green Triangle to verify that everything is working well. | ||
| + | |||
| + | ==Programming -- Step 2== | ||
| + | |||
| + | * Fill in the body of the newly created slot: | ||
| + | |||
| + | <br /> | ||
| + | <br /> | ||
| + | |||
| + | <source lang="cpp"> | ||
| + | void MainWindow::helloSlot() { | ||
| + | // your code goes here | ||
| + | ui->textBrowser->append( "Hello there!"); | ||
| + | } | ||
| + | |||
| + | </source> | ||
| + | <br /> | ||
| + | <br /> | ||
| + | |||
| + | * Verify that it works! | ||
| + | |||
| + | <br /> | ||
| + | <br /> | ||
| + | <center>[[Image:QtCreatorHelloThere.png|300px]]</center> | ||
| + | <br /> | ||
| + | <br /> | ||
| + | |||
| + | <tanbox> | ||
| + | [[Image:computerLab2.png|150px|right]] | ||
| + | <font size="+1">Exercise 1</font><br /><br /> | ||
| + | Perform the same operation for the "bye" button, and make it display "bye" (or another goodbye message of your liking). | ||
| + | </tanbox> | ||
| + | <br /> | ||
| + | <br /> | ||
| + | |||
| + | <tanbox> | ||
| + | [[Image:computerLab2.png|150px|right]] | ||
| + | <font size="+1">Exercise 2</font><br /><br /> | ||
| + | Add another button, a third button, called '''clear''', that will clear the text browser widget. For this you won't have to create a new slot, as the textBrowser widget already has a '''clear()''' slot associated with it. Just find it in the list of slots associated with the textBrowser. | ||
| + | <center>[[Image:QtCreatorSolutionProjectExercise2.png|200px]]</center> | ||
| + | <br /> | ||
| + | </tanbox> | ||
| + | |||
| + | <br /> | ||
| + | <br /> | ||
| + | <br /> | ||
| + | |||
| + | * A solution project is available [[Media:CSC220_MyHelloQtProject.tgz | here]] | ||
| + | |||
| + | =Second Project: A Main Window with a dialog= | ||
| + | |||
| + | * The goal of this second project is to take the first project, and add a lineEdit box to allow the user to load the contents of a KML file in the textBrowser. | ||
| + | |||
| + | * Here's a KML file in case you don't have one handy in your account: [[CSC220 biker.kml | biker.kml]] | ||
| + | |||
| + | ==Form and Slots== | ||
| + | * Repeat the steps of the previous section and create a new project with two buttons named '''Load''' (internally called pushButton1) and '''Process''' (internally called pushButton2), a ''lineEdit'' widget in between, and a textBrowser above them. Add two slots named '''processSlod()''' and '''loadFileSlot()''' to your class (in both the .h header and the .cpp source files). | ||
| + | <br /> | ||
| + | <center>[[Image:QtCreator11.png|300px]]</center> | ||
| + | <br /> | ||
| + | |||
| + | ==A Dialog to Read Files== | ||
| + | |||
| + | * Use the '''Qt Help menu''' or '''[http://doc.trolltech.com/4.5/ Qt's Help Page on the Web]''' and look for '''QFileDialog''' and '''QFile''' in the '''All Classes''' section. They will allow us to pick a file name from our account, and to read it into a string. | ||
| + | ** Look for the '''Detailed Description''' section, then look for the code examples. Programming with Qt can be done with 90% copying and pasting, and 10% programming in C++. | ||
| + | |||
| + | <br /> | ||
| + | <center>[[Image:QtCreator12.png|700px]]</center> | ||
| + | <br /> | ||
| + | |||
| + | * Figure out how to open a dialog to get a file name with an extension of .kml. In a first step, display the file name in the textBrowser: | ||
| + | |||
| + | <br /> | ||
| + | <br /> | ||
| + | <source lang="cpp"> | ||
| + | QString fileName = QFileDialog::getOpenFileName(this, ... ); | ||
| + | ui->lineEdit->setText( fileName ); | ||
| + | </source> | ||
| + | <br /> | ||
| + | <br /> | ||
| + | * Figure out how to open a file and get its contents, and display it in the textBrowser... | ||
| + | |||
| + | <br /> | ||
| + | <br /> | ||
| + | <source lang="cpp"> | ||
| + | QFile file( fileName ); | ||
| + | if (!file.open(QIODevice::ReadOnly | QIODevice::Text)) | ||
| + | return; | ||
| + | |||
| + | QTextStream in(&file); | ||
| + | while (!in.atEnd()) { | ||
| + | QString line = in.readLine(); | ||
| + | // then you need to add the line to the text browser... | ||
| + | } | ||
| + | |||
| + | </source> | ||
| + | <br /><br /> | ||
| + | |||
| + | <font color="white"><tt> | ||
| + | |||
| + | void MainWindow::loadFileSlot() { | ||
| + | :: QString fileName = QFileDialog::getOpenFileName(this, | ||
| + | :::: tr("Open File"), ".", tr("Kml Files (*.kml)")); | ||
| + | :: ui->lineEdit->setText( fileName ); | ||
| + | |||
| + | :: QFile file( fileName ); | ||
| + | :: if (!file.open(QIODevice::ReadOnly | QIODevice::Text)) | ||
| + | :::: return; | ||
| + | |||
| + | :: QTextStream in(&file); | ||
| + | :: while (!in.atEnd()) { | ||
| + | :::: QString line = in.readLine(); | ||
| + | :::: ui->textBrowser->append( line ); | ||
| + | :: } | ||
| + | } | ||
| + | |||
| + | </tt></font> | ||
| + | |||
| + | ==Processing the kml data: first step== | ||
| + | |||
| + | By the way... did you figure out that the white section above shows up the full slot when you highlight it? | ||
| + | |||
| + | Let's write some code with QStrings to process the KML data and extract just the coordinates from the data in the textBrowser. | ||
| + | |||
| + | The idea is to grab the contents of the textBrowser in a string, split it on \n characters, and extract the lines that contain coordinates. | ||
| + | |||
| + | * As a first step, lets grab the contents of the '''QTextBrowser''' widget, put it in the '''QString''', split it into a '''QStringList''', and then display it back in the browser, and number each line: | ||
| + | |||
| + | <br /> | ||
| + | <br /> | ||
| + | <source lang="cpp"> | ||
| + | void MainWindow::processSlot() { | ||
| + | QString kml = ui->textBrowser->toPlainText(); | ||
| + | QStringList lines = kml.split( "\n" ); | ||
| + | ui->textBrowser->clear(); | ||
| + | for ( int i = 0; i < lines.size(); i++ ) { | ||
| + | ui->textBrowser->append( QString( "%1: %2").arg( i ).arg( lines[i] )); | ||
| + | } | ||
| + | } | ||
| + | </source> | ||
| + | <br /> | ||
| + | <br /> | ||
| + | ==Step 2: find the coordinates== | ||
| + | |||
| + | * Explore the QString documentation, and see how you can ''find'' the ''<gx:coord>'' tag that appears on lines with coordinates. Modify the code of the slot so that your textBrowser displays only coordinate lines. | ||
| + | |||
| + | * Remove the line numbers from the coordinate lines | ||
| + | |||
| + | * Here is what you should be aiming for: | ||
| + | |||
| + | <br /> | ||
| + | <center>[[Image:QtCreator13.png|400px]][[CSC220 QtCreator Process Slot|.]]</center> | ||
| + | <br /> | ||
| + | |||
| + | * Note: Using Qt's '''[http://doc.trolltech.com/qq/qq25-webrobot.html XQuery]''' might be a more secure/appropriate way to extract the coordinates, but requires more C++ coding... | ||
| + | |||
| + | =A KML reader with tabs= | ||
| + | |||
| + | The goal of this part is to add a new widget to the form, without changing the logic of the code. | ||
| + | |||
| + | * If you have a working project for the previous part, use it. Otherwise you can use this one: [[Media:readKmlNoTabs.tgz| readKmlNoTab.tgz]] | ||
| + | |||
| + | ==Copy your project into a new directory== | ||
| + | |||
| + | * create a new directory for a new project, and copy the file from readkml/ into it. Rename a couple files, since the name of the directory should match the name of the .pro file, which is the name of the project. | ||
| + | |||
| + | cd .. | ||
| + | mkdir readkml2 | ||
| + | cd readkml2 | ||
| + | rsync -av ../readkml/* . | ||
| + | mv readKml.pro readKml2.pro | ||
| + | mv readKml.pro.user readKml2.pro.user | ||
| + | |||
| + | * Edit the .pro file and change readkml into readkml2 | ||
| + | |||
| + | QT += core gui | ||
| + | |||
| + | <font color="magenta">TARGET = '''readKml2'''</font> | ||
| + | TEMPLATE = app | ||
| + | |||
| + | SOURCES += main.cpp\ | ||
| + | mainwindow.cpp | ||
| + | |||
| + | HEADERS += mainwindow.h | ||
| + | |||
| + | FORMS += mainwindow.ui | ||
| + | |||
| + | ==Adding a Tab== | ||
| + | |||
| + | * Break the layout of your form | ||
| + | * Shrink the '''textBrowser''' | ||
| + | * Add a new '''textBrowser''', which you'll call '''textBrowser2''' | ||
| + | * Add a new ''container'': A '''tab'''. (Note: tabs look different depending on whether you are under Windows, Linux, or OS X.) | ||
| + | |||
| + | <br /> | ||
| + | <center>[[Image:QtCreator15.png | 400px]]</center> | ||
| + | <br /> | ||
| + | |||
| + | * Put textBrowser in Tab 1. Add a grid layout to make textBrowser fit inside Tab 1. | ||
| + | * Put textBrowser2 in Tab 2. Add a new grid layout to make textBrowser2 fit Tab 2. | ||
| + | * Add a grid layout to the form to make the tab and the buttons fit together. | ||
| + | |||
| + | ==A bit of coding...== | ||
| + | |||
| + | * Modify your C++ code so that the coordinates go on to '''textBrowser2''' on '''tab2''', instead of '''textBrowser1'''. | ||
| + | |||
| + | * Try it! | ||
| + | * Modify your code some more, and make the tabWidget switch to Tab2 when it displays the coordinates on textBrowser2. (Hints: look for information about ''"currentIndex"'' in '''QTabWidget''' for answers...) | ||
| + | <br /> | ||
| + | <center>[[Image:QtCreator16.png | 400px]]</center> | ||
<br /> | <br /> | ||
| − | |||
| − | + | ==Possible Improvements== | |
| − | + | Feel free to continue playing with this GUI application. Below are suggestions for improvements. You may want to start with a new copy of the [[media:readKml2WithTabs.tgz | readKml2.tgz ]] project. | |
| − | = | + | ;Copy/Paste Option |
| + | : Try to paste some text onto textBrowser. | ||
| + | : You will notice that you can't paste anything. This is because a QTextBrowser is an output device (a browser), not an input device. Replace the textBrowser by a textEdit. This will allow you to paste the clipboard directly into the textEdit. | ||
| + | |||
| + | ;File Saving Option | ||
| + | : Add a new button that will allow you to take the contents of the coordinates textBrowser and save it to file. The file name can be obtained using a QFileDialog (specifying that you want to create a new file, not find an existing one), or using the name of input file and modifying it in some way to create the name of the output file. | ||
| + | |||
| + | =Where to Continue From Here...= | ||
| + | |||
| + | * Tutorials | ||
| + | <br /> | ||
| + | <center>[[Image:QtCreatorContinueFromHere.png|500px]]</center> | ||
| + | |||
| + | <br /> | ||
| − | + | * Read the [http://doc.qt.nokia.com/qq/ Qt Quaterly ] | |
| − | + | <br /> | |
| − | + | <center>[[Image:QtQuaterly.png| 150px]]</center> | |
| − | |||
| − | |||
| − | |||
| − | |||
| − | |||
| − | |||
| − | + | <br /> | |
| − | |||
| − | |||
| − | |||
| − | |||
| − | |||
| − | |||
| − | |||
| − | |||
| − | |||
Latest revision as of 10:41, 6 December 2010
--D. Thiebaut 16:25, 2 December 2010 (UTC)
Contents
This is Part 2 of a 2-lecture/lab introduction to C++ and GUI programming with Qt. Part 1 can be found here.
Main References
- Wikipedia Page on Qt
What is Qt?
- Qt is a cross-platform application framework
- that is widely used for developing application software with graphical user interface (GUI) (in which case Qt is referred to as a widget toolkit when used as such)
- Qt uses standard C++
- but makes extensive use of a special code generator (called the Meta Object Compiler, or moc)
- Qt can also be used in several other programming languages
- via language bindings.
- It runs on all major platforms
- Non-GUI features include
- SQL database access,
- XML parsing,
- thread management,
- network support,
- and a unified cross-platform API for file handling.
- GNU Lesser General Public License, Qt is free and open source
Platforms
- Linux/X11
- Mac OS X
- Windows
- Embedded Linux
- Windows CE / Mobile
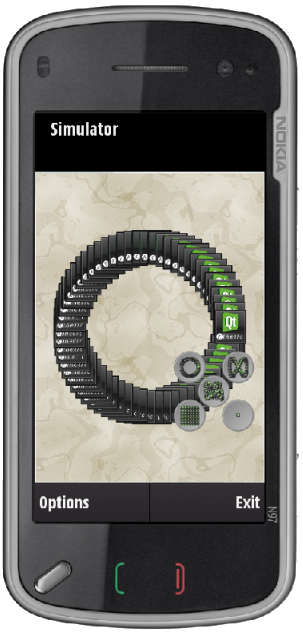
- Symbian
- (Nokia Devices)
- Maemo
External ports
Since Nokia opened the Qt source code to the community on Gitorious various ports have been appearing. Here are some of them:
- Qt for OpenSolaris
- Qt for Haiku – Qt for Haiku OS
- Qt for OS/2
- Qt-iPhone – Experimental
- Android-Lighthouse – Experimental
- Qt for webOS – Experimental
- Qt for Amazon Kindle DX – Experimental
- Qt for Wayland – Experimental
Language Bindings
History
- Haavard Nord and Eirik Chambe-Eng started Qt in 1991.
- Headquaters in Oslo, Norway
- incorporated at TrollTech 3 years later
- Acquired by Nokia in 2008
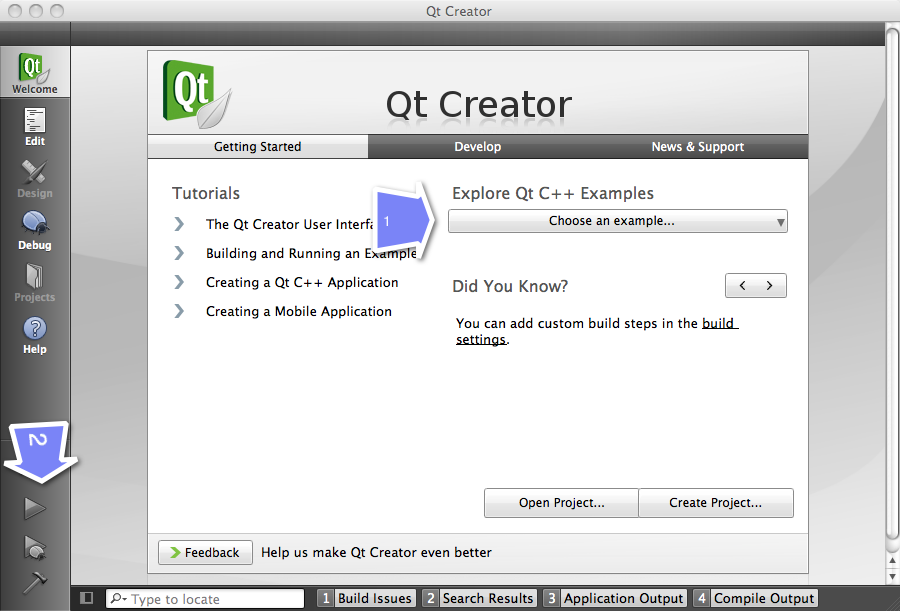
QtCreator
- Start Qt Creator
- IMPORTANT: Always remember to close a project before opening a new one!
Play Time!
- Try these examples:
- WebKit/FancyBrowser
- Qt includes a Web browser as a standard widget
- Select the special effect (top menu) that rotates all images
- Animation Framework/Animated Tiles
- An example of animation of images along a path
- OpenGL/Hello GL
- An example of real-time OpenGL output
First Project: A Main Window Built From Scratch
- File
- Close all projects
- File
- New File or Project
- Qt C++ Project
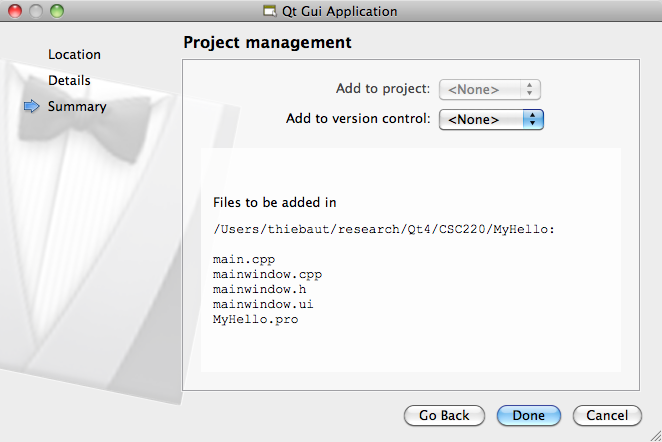
- Qt GUI Application
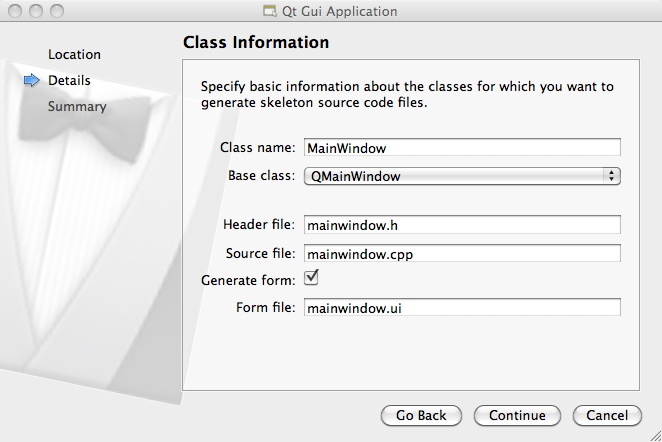
- Name: MyHello
- Create In: Pick a convenient location in your home account
- Click on "Make default location"
- Qt GUI Application
- Qt C++ Project
- New File or Project
Form
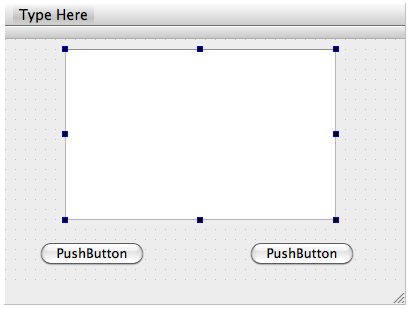
- Follow directions given in class to create a form with
- a text browser
- two push buttons
- a spacer between the two buttons
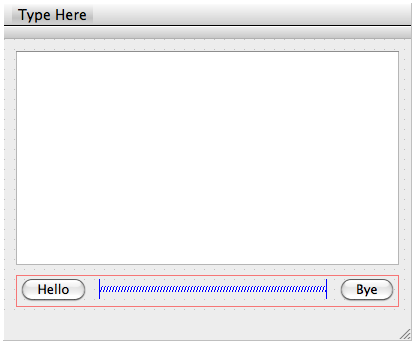
- Add a layout (follow directions given in class)
Signals & Slots
- Add a connection between the buttons (senders) and the MainWindow (receiver).
- this is tricky: follow this series of steps carefully!
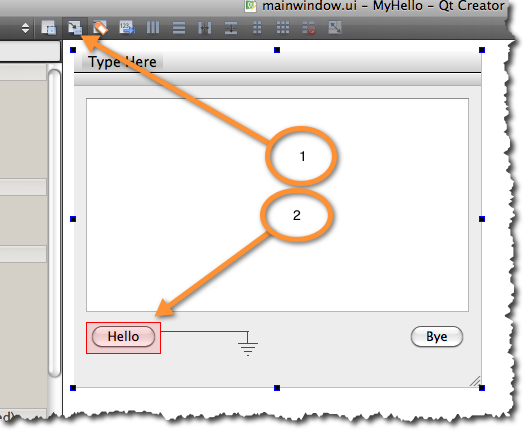
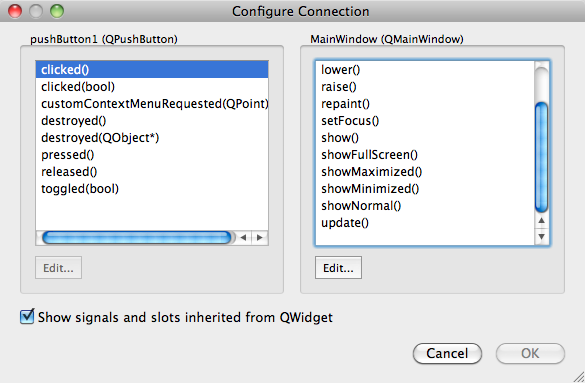
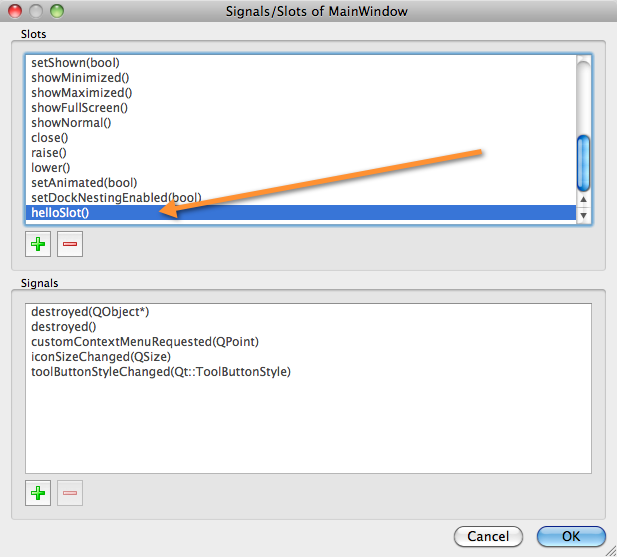
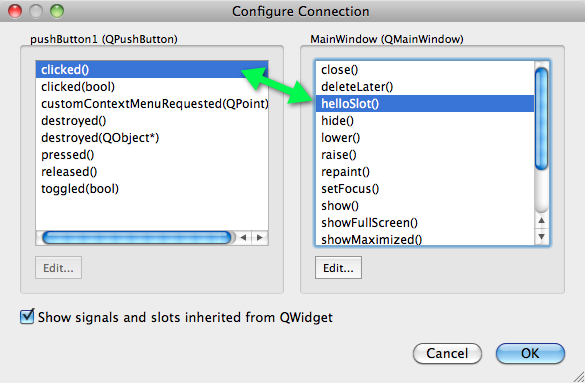
- The result:
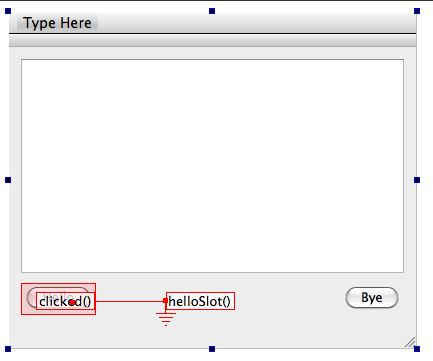
Programming--Step 1
- Now that we have a connection between the clicked() event generated by pushButton1 (the signal) and the function helloSlot() of the mainwindow (the slot), we can put code in the slot() function.
- The two files we need to program are mainwindow.h and mainwindow.cpp:
mainwindow.h
class MainWindow : public QMainWindow
{
    Q_OBJECT

public:
    explicit MainWindow(QWidget *parent = 0);
    ~MainWindow();

public slots:
    void helloSlot();

private:
    Ui::MainWindow *ui;
};
mainwindow.cpp
#include "mainwindow.h"
#include "ui_mainwindow.h"

MainWindow::MainWindow(QWidget *parent) :
    QMainWindow(parent),
    ui(new Ui::MainWindow) {
    ui->setupUi(this);
}

MainWindow::~MainWindow() {
    delete ui;
}

void MainWindow::helloSlot() {
   // your code goes here
}
Build and test
- Click on the Green Triangle to verify that everything is working well.
Programming -- Step 2
- Fill in the body of the newly created slot:
 void MainWindow::helloSlot() {
    // your code goes here
    ui->textBrowser->append( "Hello there!");
}
- Verify that it works!
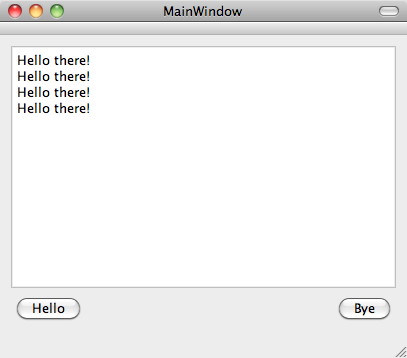
Exercise 1
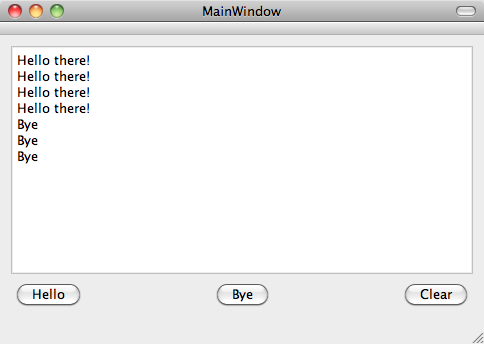
Perform the same operation for the "bye" button, and make it display "bye" (or another goodbye message of your liking).
Exercise 2
Add another button, a third button, called clear, that will clear the text browser widget. For this you won't have to create a new slot, as the textBrowser widget already has a clear() slot associated with it. Just find it in the list of slots associated with the textBrowser.
- A solution project is available here
Second Project: A Main Window with a dialog
- The goal of this second project is to take the first project, and add a lineEdit box to allow the user to load the contents of a KML file in the textBrowser.
- Here's a KML file in case you don't have one handy in your account: biker.kml
Form and Slots
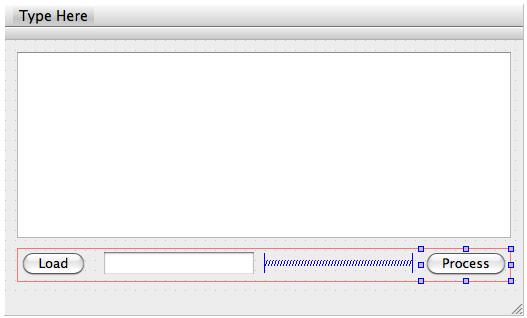
- Repeat the steps of the previous section and create a new project with two buttons named Load (internally called pushButton1) and Process (internally called pushButton2), a lineEdit widget in between, and a textBrowser above them. Add two slots named processSlod() and loadFileSlot() to your class (in both the .h header and the .cpp source files).
A Dialog to Read Files
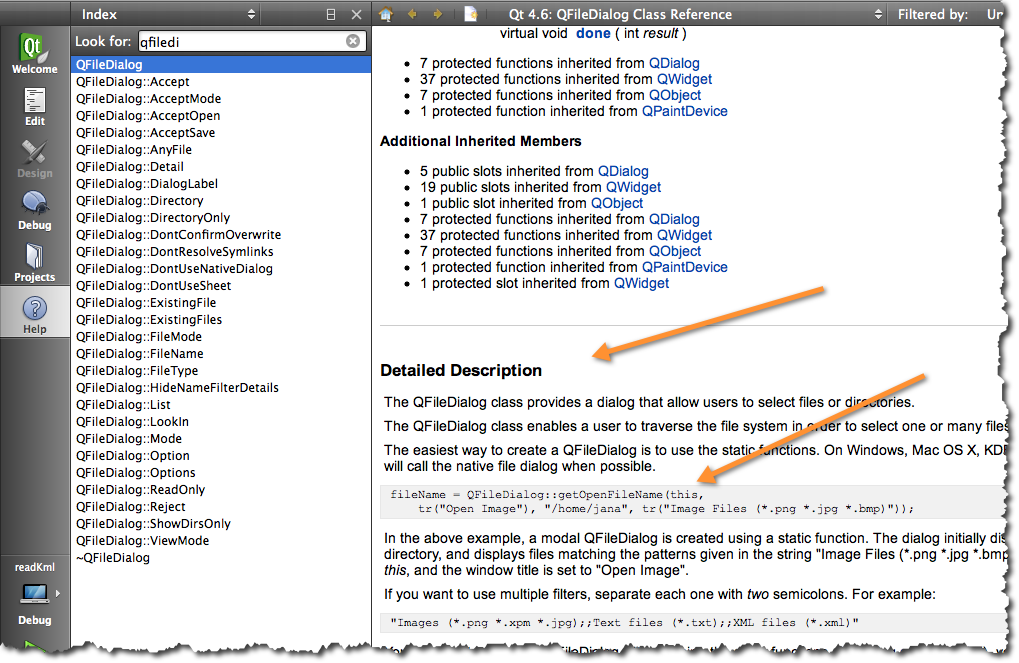
- Use the Qt Help menu or Qt's Help Page on the Web and look for QFileDialog and QFile in the All Classes section. They will allow us to pick a file name from our account, and to read it into a string.
- Look for the Detailed Description section, then look for the code examples. Programming with Qt can be done with 90% copying and pasting, and 10% programming in C++.
- Figure out how to open a dialog to get a file name with an extension of .kml. In a first step, display the file name in the textBrowser:
  QString fileName = QFileDialog::getOpenFileName(this,  ...  );
    ui->lineEdit->setText( fileName );
- Figure out how to open a file and get its contents, and display it in the textBrowser...
    QFile file( fileName );
    if (!file.open(QIODevice::ReadOnly | QIODevice::Text))
        return;

    QTextStream in(&file);
    while (!in.atEnd()) {
        QString line = in.readLine();
        // then you need to add the line to the text browser...
    }
void MainWindow::loadFileSlot() {
- QString fileName = QFileDialog::getOpenFileName(this,
- tr("Open File"), ".", tr("Kml Files (*.kml)"));
- ui->lineEdit->setText( fileName );
- QString fileName = QFileDialog::getOpenFileName(this,
- QFile file( fileName );
- if (!file.open(QIODevice::ReadOnly | QIODevice::Text))
- return;
- QTextStream in(&file);
- while (!in.atEnd()) {
- QString line = in.readLine();
- ui->textBrowser->append( line );
- }
}
Processing the kml data: first step
By the way... did you figure out that the white section above shows up the full slot when you highlight it?
Let's write some code with QStrings to process the KML data and extract just the coordinates from the data in the textBrowser.
The idea is to grab the contents of the textBrowser in a string, split it on \n characters, and extract the lines that contain coordinates.
- As a first step, lets grab the contents of the QTextBrowser widget, put it in the QString, split it into a QStringList, and then display it back in the browser, and number each line:
void MainWindow::processSlot() {
    QString kml = ui->textBrowser->toPlainText();
    QStringList lines = kml.split( "\n" );
    ui->textBrowser->clear();
    for ( int i = 0; i < lines.size(); i++ ) {
        ui->textBrowser->append( QString( "%1: %2").arg( i ).arg( lines[i] ));
    }
}
Step 2: find the coordinates
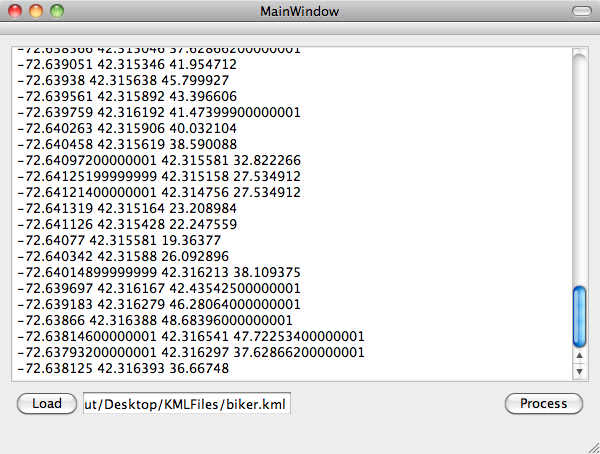
- Explore the QString documentation, and see how you can find the <gx:coord> tag that appears on lines with coordinates. Modify the code of the slot so that your textBrowser displays only coordinate lines.
- Remove the line numbers from the coordinate lines
- Here is what you should be aiming for:
 .
.
- Note: Using Qt's XQuery might be a more secure/appropriate way to extract the coordinates, but requires more C++ coding...
A KML reader with tabs
The goal of this part is to add a new widget to the form, without changing the logic of the code.
- If you have a working project for the previous part, use it. Otherwise you can use this one: readKmlNoTab.tgz
Copy your project into a new directory
- create a new directory for a new project, and copy the file from readkml/ into it. Rename a couple files, since the name of the directory should match the name of the .pro file, which is the name of the project.
 cd ..
 mkdir readkml2
 cd readkml2
 rsync -av ../readkml/*  .
 mv readKml.pro readKml2.pro
 mv readKml.pro.user readKml2.pro.user
- Edit the .pro file and change readkml into readkml2
QT       += core gui

TARGET = readKml2
TEMPLATE = app

SOURCES += main.cpp\
        mainwindow.cpp

HEADERS  += mainwindow.h

FORMS    += mainwindow.ui
Adding a Tab
- Break the layout of your form
- Shrink the textBrowser
- Add a new textBrowser, which you'll call textBrowser2
- Add a new container: A tab. (Note: tabs look different depending on whether you are under Windows, Linux, or OS X.)
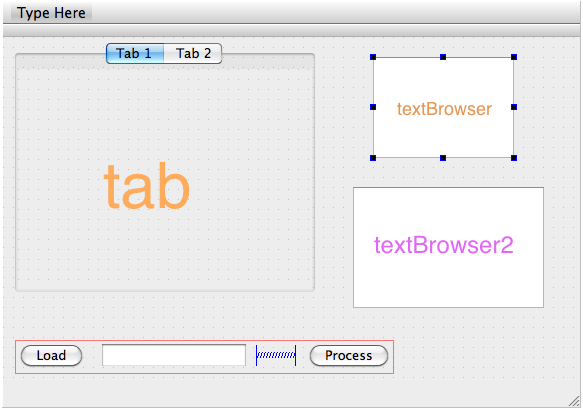
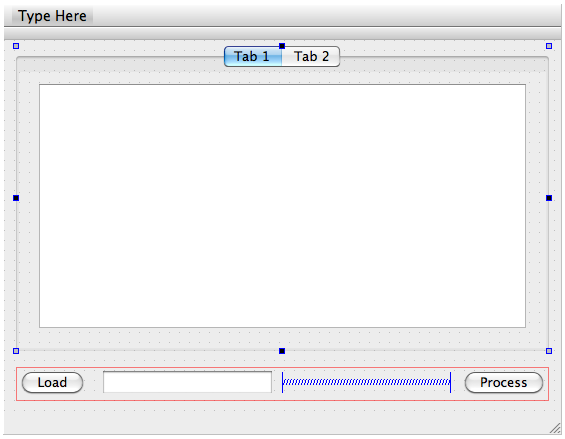
- Put textBrowser in Tab 1. Add a grid layout to make textBrowser fit inside Tab 1.
- Put textBrowser2 in Tab 2. Add a new grid layout to make textBrowser2 fit Tab 2.
- Add a grid layout to the form to make the tab and the buttons fit together.
A bit of coding...
- Modify your C++ code so that the coordinates go on to textBrowser2 on tab2, instead of textBrowser1.
- Try it!
- Modify your code some more, and make the tabWidget switch to Tab2 when it displays the coordinates on textBrowser2. (Hints: look for information about "currentIndex" in QTabWidget for answers...)
Possible Improvements
Feel free to continue playing with this GUI application. Below are suggestions for improvements. You may want to start with a new copy of the readKml2.tgz project.
- Copy/Paste Option
- Try to paste some text onto textBrowser.
- You will notice that you can't paste anything. This is because a QTextBrowser is an output device (a browser), not an input device. Replace the textBrowser by a textEdit. This will allow you to paste the clipboard directly into the textEdit.
- File Saving Option
- Add a new button that will allow you to take the contents of the coordinates textBrowser and save it to file. The file name can be obtained using a QFileDialog (specifying that you want to create a new file, not find an existing one), or using the name of input file and modifying it in some way to create the name of the output file.
Where to Continue From Here...
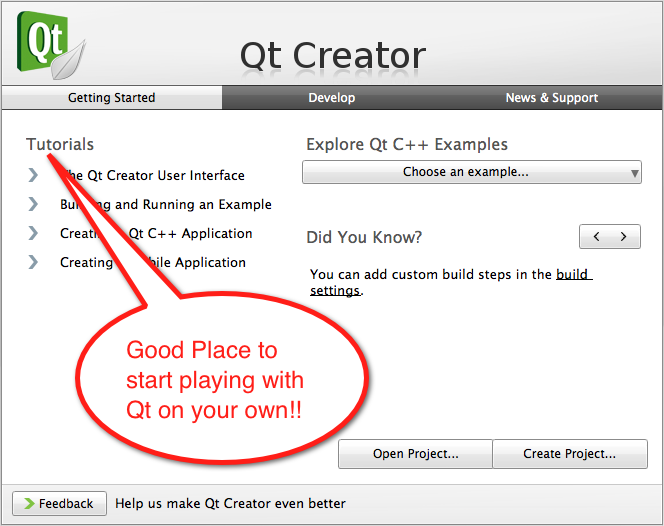
- Tutorials
- Read the Qt Quaterly
