Difference between revisions of "Tutorial: Introduction to the Arduino"
(→Arduino-Laptop Setup) |
(→Inputting characters) |
||
| Line 127: | Line 127: | ||
<center>[[Image:CSC270_ArduinoTutorial_1.png|600px]]</center> | <center>[[Image:CSC270_ArduinoTutorial_1.png|600px]]</center> | ||
<br /> | <br /> | ||
| + | |||
| + | ====Statements ===== | ||
| + | |||
| + | statement; | ||
| + | statement; | ||
| + | statement; | ||
| + | // comment | ||
| + | statement; | ||
| + | compound-statement { | ||
| + | statement; | ||
| + | statement; | ||
| + | } | ||
| + | |||
| + | ====Control Statements==== | ||
| + | |||
| + | =====IF===== | ||
| + | |||
| + | if ( ''condition equal to 0 or different from 0'' ) { | ||
| + | // Action A | ||
| + | } | ||
| + | else { | ||
| + | // Action B | ||
| + | } | ||
| + | |||
| + | |||
| + | =====FOR===== | ||
| + | |||
| + | =====SWITCH===== | ||
| + | =====WHILE===== | ||
| + | |||
| + | =====BREAK/CONTINUE===== | ||
| + | |||
<br /> | <br /> | ||
<br /><br /><br /><br /><br /><br /><br /><br /><br /><br /> | <br /><br /><br /><br /><br /><br /><br /><br /><br /><br /> | ||
[[Category:CSC270]][[Category:Arduino]][[Category:Labs]] | [[Category:CSC270]][[Category:Arduino]][[Category:Labs]] | ||
Revision as of 15:09, 20 April 2011
--D. Thiebaut 15:18, 20 April 2011 (EDT)
Contents
Misc. Information Before You Start |
Good Reference Pages
Good Tutorials on the Web
Notes for Mac Users
- You may have to install special drivers for your Mac to see the Arduino through the USB Port. Look here for more info: http://www.ftdichip.com/Drivers/VCP.htm
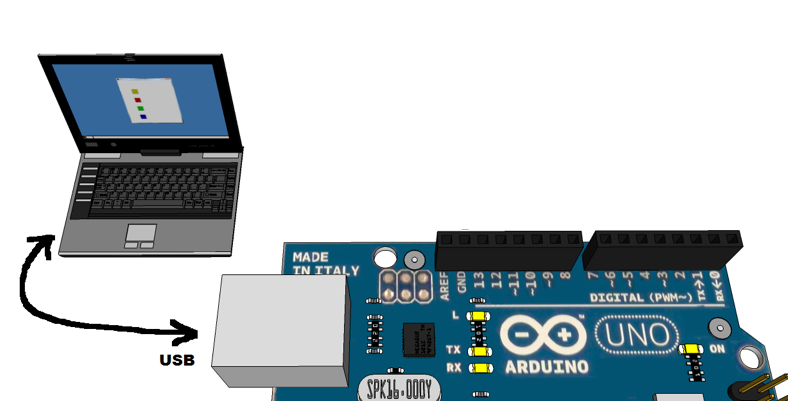
Arduino-Laptop Setup |

- Programs are written on the laptop
- Programs are compiled on the laptop
- Programs are downloaded to the Arduino
- Programs run on the Arduino
- Programs output information via the USB cable, and this information is captured by the IDE which shows it in the Serial Monitor.
- The Arduino inputs information that the User types in the Serial Monitor. This information is sent via the USB cable to the Arduino.
An Introduction to C in the Arduino Context |
Comments
// this is a comment
/* and so is this */
/* and
    this
    as
    well */
Setup() and Loop()
Output
Output strings from the Arduino to Laptop
- Done with the Serial library
- Use Serial.begin() to set the baud rate (# of bits per second)
- Then output strings with Serial.println( ... ) or Serial.print( ... )
void setup() {
 Serial.begin( 38400 );
 Serial.println( "Hello there!" );
}

void loop() {
 delay(1000);              // wait for a second
 Serial.println( "hello again!" );
}
Output numbers
- Taken from http://arduino.cc/en/Serial/Print
- Serial.print(78) gives "78"
- Serial.print(1.23456) gives "1.23"
- Serial.print(byte(78)) gives "N" (whose ASCII value is 78)
- Serial.print('N') gives "N"
- Serial.print("Hello world.") gives "Hello world."
- An optional second parameter specifies the base (format) to use; permitted values are BYTE, BIN (binary, or base 2), OCT (octal, or base 8), DEC (decimal, or base 10), HEX (hexadecimal, or base 16). For floating point numbers, this parameter specifies the number of decimal places to use. For example:
- Serial.print(78, BYTE) gives "N"
- Serial.print(78, BIN) gives "1001110"
- Serial.print(78, OCT) gives "116"
- Serial.print(78, DEC) gives "78"
- Serial.print(78, HEX) gives "4E"
- Serial.println(1.23456, 0) gives "1"
- Serial.println(1.23456, 2) gives "1.23"
- Serial.println(1.23456, 4) gives "1.2346"
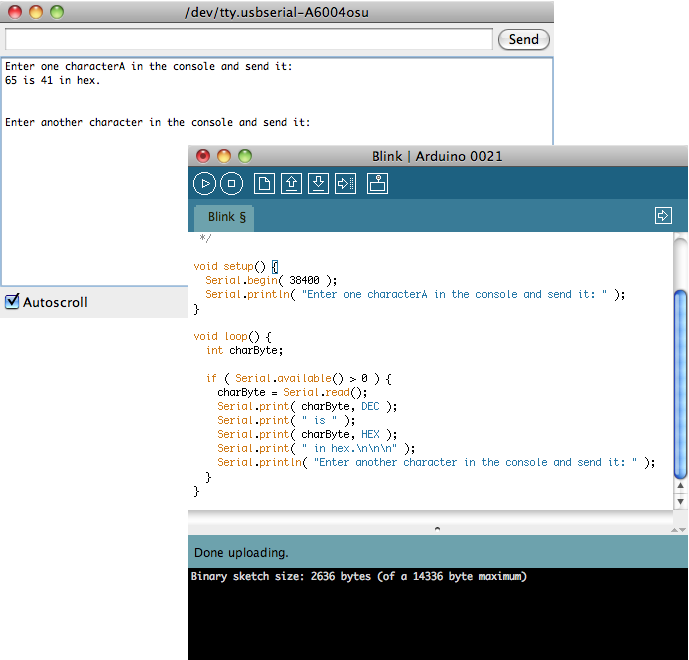
Inputting characters
- Use Serial.read() and Serial.available(), as illustrated below
void setup() {
  Serial.begin( 38400 );
  Serial.println( "Enter one characterA in the console and send it: " );
}

void loop() {
  int charByte;

  if ( Serial.available() > 0 ) {
    charByte = Serial.read();
    Serial.print( charByte, DEC );
    Serial.print( " is " );
    Serial.print( charByte, HEX );
    Serial.print( " in hex.\n\n\n" );
    Serial.println( "Enter another character in the console and send it: " );
  }
}

Statements =
statement;
statement;
statement;
// comment
statement;
compound-statement {
       statement;
       statement;
}
Control Statements
IF
if ( condition equal to 0 or different from 0 ) {
      // Action A
}
else {
      // Action B
}
FOR
SWITCH
WHILE
BREAK/CONTINUE