Difference between revisions of "How to Create a Wiki Page"
(→Images) |
(→Images) |
||
| Line 91: | Line 91: | ||
<pre>[[Image:SmithCollegeStainedGlass.jpg | 300px]]</pre> | <pre>[[Image:SmithCollegeStainedGlass.jpg | 300px]]</pre> | ||
| − | * The place holder is of the form '''<tt>[[Image:</tt>''filename.extension'' | ''file size'' px<tt>]]</tt>. | + | * The place holder is of the form '''<tt>[[Image:</tt>''filename.extension'' | ''file size'' px<tt>]]</tt>. In general the filename and extension should match the name and extension of the original file you want to include. |
| + | |||
| + | * Save your page. | ||
| + | |||
| + | * Notice that the word '''300px''' appears in red on your page. It indicates that your page makes reference to an image that will be 300 pixels wide, but that it hasn't been uploaded yet. | ||
| + | * Click on the red '''300px''' word. | ||
| + | * Follow the directions and select the image file from your computer, and upload it. | ||
| + | * Go back to your original page using the '''Back''' button at the top of your browser. | ||
| + | * Reload your page. | ||
| + | * You should see your picture appear. | ||
| + | * You can change the size of your picture by using a number other than 300 in the place-holder. 200 will make it smaller. 500 bigger. | ||
| + | |||
<br /> | <br /> | ||
<br /> | <br /> | ||
Revision as of 20:51, 1 October 2012
--D. Thiebaut 20:33, 1 October 2012 (EDT)
This is a short tutorial on creating Wiki pages. Wiki pages are very simple to create and require understanding a very simple syntax for creating document elements and embedding images or create references. This tutorial gets you started. This is the same system of editing used by Wikipedia. Both Wikipedia and this system of pages (cs.smith.edu/classwiki) use the same software for maintaining these pages.
Contents
Login
To create a page you need an account number and password. One such pair should have been given to you earlier. If not, contact the manager of this wiki system (dthiebaut@smith.edu) for assistance.
- Point your browser to this URL: cs.smith.edu/classwiki
- Click on log in:

- In the login window enter your credentials.
- When your return to the main page, the top right caption should read log out to indicate that you are now logged in.
Creating a New Wiki Page
There are two different ways of creating wiki pages. We'll concentrate on the simplest one now, which happens when a Wiki page contains a link to a page that does not exist yet. When this happens the link appears in red. This is a standard rule with this system of wikis: when something appears in red, it means that it hasn't been created yet and by clicking on it you get to create it.
Follow the steps below to create a page. We'll assume in this tutorial that you are creating a new page for the CSC103 How Computers Work PC Demolition Lab.
- Point your browser to this URL: cs.smith.edu/classwiki/index.php/CSC103_Page_Fall_2012
- Click on the red link that corresponds to the account that was given to you.
- You should now find yourself in an edit window, with a simple menu at the top.

- You are now ready to enter some text.
Elements of a Wiki page
Text
- Go ahead and enter some text. Anything you want. Maybe a poem. The idea is to type some words.
- When you are done, click on the Save page button at the bottom of the page.
- Observe that the Wiki system will wrap text whenever it can, and not necessarily follow your formatting. That's the default behavior.
Important rule: new lines must always start at the leftmost margin. Do not put spaces in front of new lines!
Headers
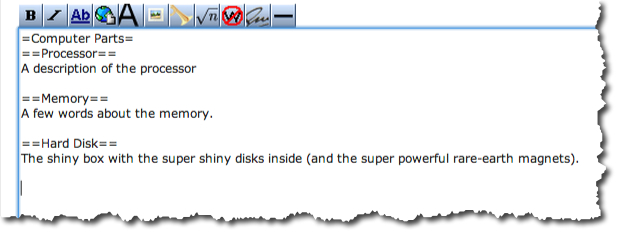
Headers are created by putting equal signs around words. One equal sign for Header 1 headers, two equal signs for Header 2, etc...
- Click on the Edit menu option at the top of the page:
- Add some headers to your page
- Save your page.
- Notice ow the headers appear in your page.
- Notice how the headers are automatically added to the Table of Contents at the top of the page. The Wiki system will start creating a table of contents as soon as you have two or more headers.
Images
To include an image in your page, you need to have the image available in a folder of your computer first. Then you edit the text of your wiki and create an entry in it, a place-holder of sort, that defines what picture to include, and how big to make it.
- First, make sure you have a picture available on your desktop, or some place easy to locate. If you do not have one easy to find yet, grab one from Google images, or right click on the image below to save it to your desktop.

- Now edit your Wiki page and add a place holder for your image somework at the beginning of a line, like this:
[[Image:SmithCollegeStainedGlass.jpg | 300px]]
- The place holder is of the form [[Image:filename.extension | file size px]]. In general the filename and extension should match the name and extension of the original file you want to include.
- Save your page.
- Notice that the word 300px appears in red on your page. It indicates that your page makes reference to an image that will be 300 pixels wide, but that it hasn't been uploaded yet.
- Click on the red 300px word.
- Follow the directions and select the image file from your computer, and upload it.
- Go back to your original page using the Back button at the top of your browser.
- Reload your page.
- You should see your picture appear.
- You can change the size of your picture by using a number other than 300 in the place-holder. 200 will make it smaller. 500 bigger.
Additional Reference Material


