Difference between revisions of "CSC111 Lab 5"
(→Setup for Grahics!) |
(→Functions and Stick Figures) |
||
| Line 49: | Line 49: | ||
<br /> | <br /> | ||
;Question 1 | ;Question 1 | ||
| − | : Modify the definition of the main() function only, and, this time, make it display a stick figure with a "round body" (which uses an O for the torso of the stick figure). '''<font color="magenta">Remember, you can only modify the main function. You cannot modify any of | + | : Modify the definition of the main() function only, and, this time, make it display a stick figure with a "round body" (which uses an O for the torso of the stick figure). '''<font color="magenta">Remember, you can only modify the main function. You cannot modify any of the functions other than main().</font>''' |
<br /> | <br /> | ||
Revision as of 13:00, 25 February 2010
This lab deals with functions and graphics. Note that you will not be able to run graphics program when connected to beowulf through secure shell (except if you have a Mac). The rule will be that we'll be using Mac OS X to run the graphics program. There is a section at the end of this lab to explain how to setup your own personal computer for running graphics programs.
Contents
Functions and Stick Figures
Cut and paste the following code into a python program.
# stick.py
# Draws sticks on the screen

def head():
    print
    print "   o     "

def body():
    print "  /|\\   "

def legs():
    print " _/ \\_  "
    print

def roundBody():
    print "  /O\\    "

def longLegs():
    print "  / \\   "
    print "_/   \\_ "


def main():
    head()
    body()
    legs()

main()
- Run your program. Verify that it displays a stick figure.
- Question 1
- Modify the definition of the main() function only, and, this time, make it display a stick figure with a "round body" (which uses an O for the torso of the stick figure). Remember, you can only modify the main function. You cannot modify any of the functions other than main().
- Question 2
- Similar question: make the program draw a stick figure with a "round body" and "long legs." Again, you can only change the definition of the main function.
- Now, something a bit more complicated: create a new function called skinnyStickFigure() that will not contain a single print statement, but that will call other functions to display a skinny short stick figure (with a thin body and short legs). Your program should look something like this:
# newstick.py
# Draws sticks on the screen

def head():
    print
    print "   o     "

def body():
    print "  /|\\   "

def legs():
    print " _/ \\_  "
    print

def roundBody():
    print "  /O\\    "

def longLegs():
    print "  / \\   "
    print "_/   \\_ "
    print

def skinnyStickFigure():
    #add your code here


def main():
    skinnyStickFigure()

main()
- Verify that it works.
- Question 3
- Modify your program and add the definition of a new function called roundLongFigure() which will print a round-bodied long-legged stick figure. Your new function should not contain print statements, but only calls to other functions that are already part of your program. Call it from your main program after you call skinnyStickFigure(), as follows:
def main():
    skinnyStickFigure()
    roundLongFigure()
Happy Birthday with Functions!
- Write a program that will use functions and that will display a "Happy Birthday" message on the screen.
- Requirements. Your program should contain:
- One function, hbday(), prints "Happy birthday to you"
- One function, dear(), gets the name of the person and prints "Happy birthday, dear xxxxx"
- One function, singSong(), gets the name of the person and prints the whole song with the name of the person.
- The main program asks the user for a name and "sings" the song:
              def main():
                  name = raw_input( "person's name? " )
                  singSong( name )
- Question 4
- Go ahead and write the program.
- Question 5
- Challenge of the day
- Assume that you need to print the song for everybody in the class. We saw earlier how to write a loop that prints all the accounts of the form 111c-aa, 111c-ab, 111c-ac, ... 111c-az. Modify your program so that it prints a happy birthday song for every 111c account!
Printing Recipes
- Start with the following program:
 recipe.py
#

def printLines( recipe ):
    for line in recipe:
        print line


def main():
    recipe1 = ["Smoked Salmon Tortellini with Bechamel Sauce",
               "2 packages tortellini",
               "1 bay leaf",
               "2 whole cloves",
               "1 pinch nutmeg",
               "1 chopped red bell pepper",
               "1/2 lb fresh asparagus",
               "10 ounces fresh mushrooms" ]

    printLines( recipe1 )

main()
- Run the program and verify that it prints the recipe.
- Modify the program and add the following function to it (before the function printLines). Call separatorLine() once in your main program to see how it works.
.

def separatorLine():
     print  30 * '-' + 'oOo' + 30 * '-'

.
- Question 6
- Modify the function printLines() so that it prints the recipe that it receives as shown below. (Hints: remember that you know how to take slices out of lists!)
------------------------------oOo------------------------------
Smoked Salmon Tortellini with Bechamel Sauce
------------------------------oOo------------------------------
2 packages tortellini
1 bay leaf
2 whole cloves
1 pinch nutmeg
1 chopped red bell pepper
1/2 lb fresh asparagus
10 ounces fresh mushrooms
------------------------------oOo------------------------------
- Add a new recipe to your main program:
.

   recipe2 = [ "Bechamel Sauce", "1/4 cup butter", "2 tbsp flour", "1/4 cup milk"]


.
- Question 7
- Make your program print both recipes with separator lines. The output of your program should look something like this:
------------------------------oOo------------------------------
Smoked Salmon Tortellini with Bechamel Sauce
------------------------------oOo------------------------------
2 packages tortellini
1 bay leaf
2 whole cloves
1 pinch nutmeg
1 chopped red bell pepper
1/2 lb fresh asparagus
10 ounces fresh mushrooms
------------------------------oOo------------------------------


------------------------------oOo------------------------------
Bechamel Sauce
------------------------------oOo------------------------------
1/4 cup butter
2 tbsp flour
1/4 cup milk
------------------------------oOo------------------------------
Setup for Grahics!
This section deals with setting up your environment to run graphics programs.
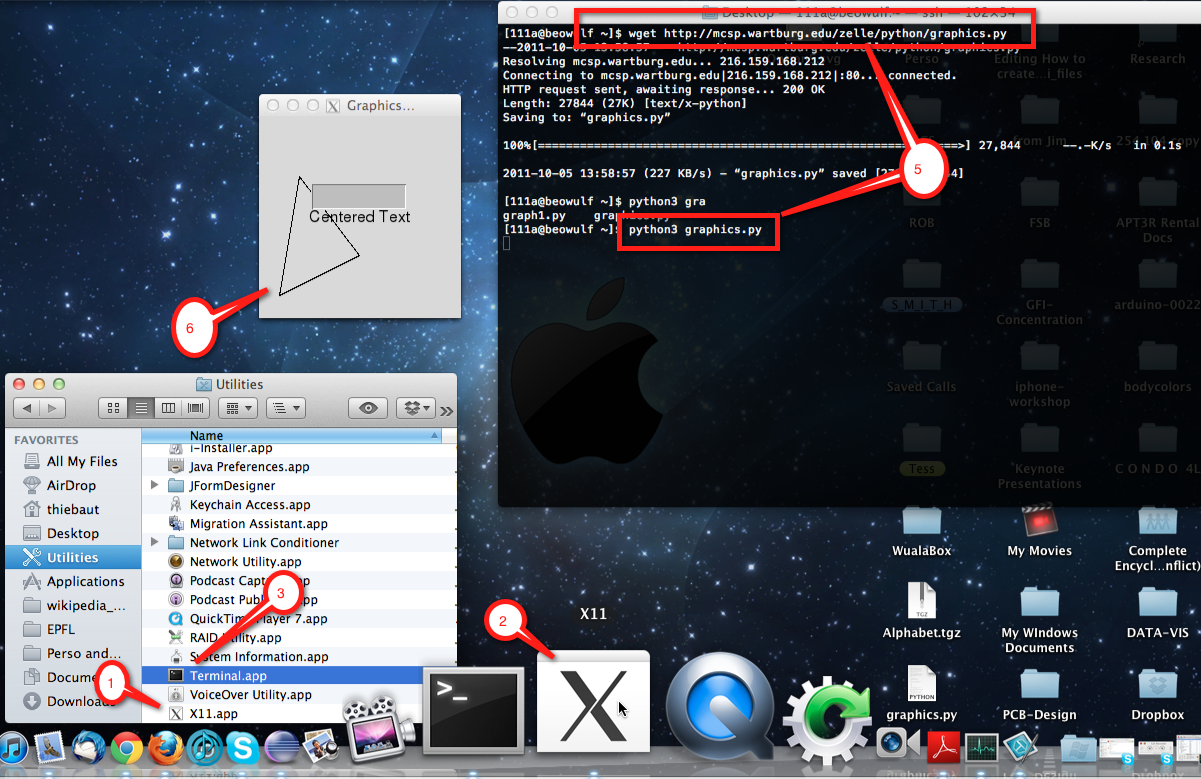
The whole process is illustrated by the image below
First, Login to the Mac with your 111c-xx account, and then follow the steps below, referring to the image above
- Open the Finder window, then the Utilities folder, then click on X11
- This opens the white XTerm window in the top left. We won't use it, but it needs to be running for the graphics to work. You can iconize this xterm window to clean up your desktop, though.
- Use the same steps (Finder --> Utilities) and open a Terminal window.
- A new black window opens up.
- In it, type the following commands:
ssh -Y 111c-xx@beowulf.csc.smith.edu (You may have to type yes to confirm)
getcopy graphics.py
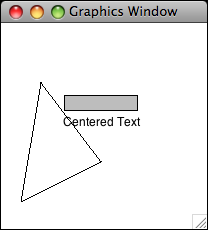
python graphics.py - If everything goes well, you should see the small gray window with a triangle and a rectangle, with the words Centered Text.
- Question 8
- Open Python in interactive mode, and try the various graphics functions, as illustrated in Section 5.3 of Zelle's textbook:
  >>> from graphics import *
  >>> win = GraphWin( "Lab 5 Demo" )
  >>> center = Point( 100, 100 )
  >>> circ = Circle( center, 30 )
  >>> circ.setFill( 'red' )
  >>> circ.draw( win )
  >>> label = Text( center, "red circle" )
  >>> label.draw( win )
  >>> rect = Rectangle( Point( 30, 30 ), Point( 70, 70 ) )
  >>> rect.draw( win )
  >>> win.close()
- Using this bit of knowledge, could you generate this figure?

The sections below are optional, and intended for those who are interested in writing graphics programs directly on their laptop computers without being connected to Beowulf.
Installing the Graphics Package on your laptop (Optional)
Use these directions if you would like to have python and the graphics library installed on your own computer.
Directions for Windows laptops
(These directions were inspired by directions posted at the Rose-Hulman Institute of Technology)
Python
- First, Install Python 2.6 on your machine, if you haven't already done so.
- Logon as an adminstrator if you have a regular user account and an administrator account for your laptop (most people use the same for both).
- Download Python (it's free!). Visit http://www.python.org/download/ and select the Python 2.6.2 Windows installer.
- Run the installer, installing it in C:\Program Files\Python26\ (vs. the default, which is C:\Python26 ). The other defaults are fine to use.
- Change the directory that the Python development environment, IDLE, starts in when loading and saving files. (By default it looks for and saves files in the program directory.)
- Log into your regular user account if it is different from your administrator account.
- Click on Start → All Programs → Python 2.6
- Right-click on IDLE (Python GUI) and choose Properties
- Change the Start in: field to point to the place where you want to keep Python program files. A good choice might be C:\Documents and Settings\yourname\My Documents\PythonFiles. (An easy way to get that path name: Open My Documents and browse to the folder. Select the pathname in the Address bar; Copy. Go back to the Idle Properties Window, and Paste into the Start In field.) Whatever folder you decide to use, you will need to use Windows Explorer to create it if it does not exist.
- Then load the Zelle Graphics library
- Download this file graphics.py.
- Save the file graphics.py in the directory C:\Program Files\Python26\Lib\site-packages
- Potential “gotchas”: (1) That is Lib, not libs, in the path. (2) if you installed Python in a different location than C:\Program Files\Python26, you’ll need to find your Python26\Lib\site-packages folder.
- To verify your installation
- Launch IDLE by clicking Start → All Programs → Python 2.6 → IDLE (Python GUI)
- At the prompt type:
from graphics import *
- if you do not get an error message, then the installation was successful.
Directions for Mac laptops
- Use Finder to create a new folder in your favorite spot. For example you can create a folder called CSC111 on your Desktop.
- Download this file graphics.py, and unzip it. Put grahpics.py in the directory (folder) you created above.
- Open a terminal window, and type the following commands:
 cd
 cd Desktop
 cd CSC111            (or whatever directory you decided to create)
 emacs testgraphics.py
- create the following python program:
from graphics import *
def main():
    test()

main()
- Run it!
python testgraphics.py
- You should get this new window on your screen:


