XGrid Tutorial Part 1: Monte Carlo
| This tutorial is intended for running distributed programs on an Apple Mac X-Grid at Smith College. Most of the steps presented here should work on other Apple grids, except for the specific details of login and host addresses. This document supersedes and extends the original tutorial CSC334 Introduction to the XGrid at Smith College. |
Setup
This section assumes that you are using your own computer, or a computer in a lab, and that you have a secure shell client available on your computer. You will use the secure shell to connect to a host in the XGrid and run your programs from there.
XGrid General Setup
(taken from http://www.macresearch.org/the_xgrid_tutorials_part_i_xgrid_basics)
Important Concepts
- job: typically a program or collection of programs, along with their data files submitted to the XGrid.
- tasks: a division of a job into smaller pieces containing a program or programs with its/their data file(s).
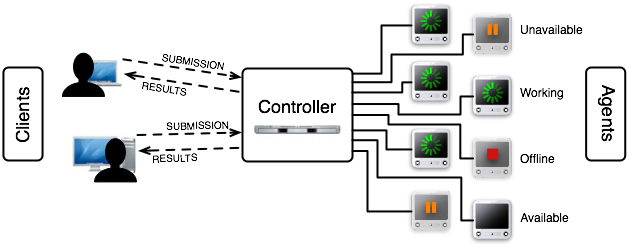
- controller: the main computer in the XGrid in charge of distributing work to the agents
- agent: the other computers in the XGrid
- client: the user or computer where the user sits, where jobs are issued.
Connection, Bash Profile, Test
The XGrid system is available for the Mac platform only. In order to use it, you will have to connect to a Mac Pro that is a client and also the server of a grid (named XGrid).
- Use one of the Windows, Linux, or Mac computers available to you and open an SSH window.
- Connect to DT's Mac Pro using your Smith CSC352 account.
- When prompted for a password, use the one given out in class.
- Create a .bash_profile file in your account on the MacPro for simplifying the connection to the Grid (you will need to do this only once, the first time you connect to the Mac Pro):
emacs -nw .bash_profile
- Copy/paste the text below in it.
export EDITOR=/usr/bin/emacs
export TERM=xterm-color
export PATH=$PATH:.

#export PS1="\w> "
PS1='[\h]\n[\t] \w\$: '
PS2='> '
# setup xgrid access
- Make sure you replace the string xxx_xxx_xxx_xxx with the one that will be given to you.
- Use Control-X Control-C to save the file.
- Make the operating system read this file as if you had just logged in:
source .bash_profile
- (Another way would have been to logout and login again.)
- Check that the XGrid is up and that you can connect to it:
xgrid -grid attributes -gid 0
- the output should be similar to what is shown below:
{
   gridAttributes =     {
       gridMegahertz = 0;
       isDefault = YES;
       name = Xgrid;
   };
}
- You are discovering the format used by Apple to code information. It is similar to XML, but uses braces. It is called the PLIST format. We'll see it again later, when we deal with batch jobs.
Your First Distributed Program: Monte Carlo
In this section you will learn how to run a Python program on the XGrid in synchronous and asynchronous modes.
First, the serial version of the program
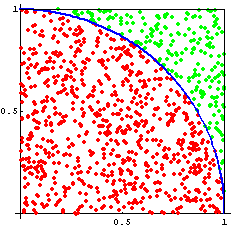
We'll pick something simple to start with: a monte-carlo Python program that generates an approximation of Pi. You can find some good information on the monte-carlo method here. A good flash demonstration is availablehere as well.
The Python code is shown below.
#!/usr/bin/env python
# montecarlo.py
# taken from http://www.eveandersson.com/pi/monte-carlo-circle
# Usage:
#      python montecarlo.py N
# or
#      ./montecarlo N
#
# where N is the number of samples wanted.
# the approximation of pi is printed after the samples have been
# generated.
#
import random
import math
import sys

# get the number of samples from the command line
# or assign 1E6 as the default number of samples.
N = 1000000
if len( sys.argv ) > 1:
   N = int( sys.argv[1] )

# generate the samples and keep track of counts
count_inside = 0
for count in range( N ):
    d = math.hypot(random.random(), random.random())
    if d < 1: count_inside += 1
count += 1

# print approximation of pi
print 30 * '-'
print n, ":", 4.0 * count_inside / count
Running the serial program
- Store the program in a file called montecarlo.py, and make it executable as follows:
chmod +x montecarlo.py
- Run the program and measure its execution time for 1000 samples:
 time ./montecarlo.py 1000

 ------------------------------
 1000 : 3.136

 real	0m0.026s
 user	0m0.016s
 sys	0m0.010s
- To test several number of samples, we can use the Bash for-loop, as follows (This command can be entered directly at the command prompt):
for N in 1000 10000 100000 1000000 10000000; do time ./montecarlo.py $N; done
- Here's the output:
------------------------------
1000 : 3.136

real	0m0.026s
user	0m0.016s
sys	0m0.010s
------------------------------
10000 : 3.1592

real	0m0.035s
user	0m0.026s
sys	0m0.009s
------------------------------
100000 : 3.14472

real	0m0.141s
user	0m0.130s
sys	0m0.011s
------------------------------
1000000 : 3.14366

real	0m1.208s
user	0m1.183s
sys	0m0.023s
------------------------------
10000000 : 3.1414768

real	0m11.901s
user	0m11.732s
sys	0m0.162s
You see that even with ten million samples, we do not get a very accurate value of Pi (3.14147) and it still took 12 seconds of user time.
Running the program on 1 Processor, on the XGrid
Although we feel that our program contains some parallelism, with all the samples being generated independently of each other, this parallelism cannot be exploited directly by the XGrid. The XGrid only deals with tasks, which are individual programs. The XGrid won't really be able to run our program any differently than the way we have done so far. But at least we can submit the program to the XGrid and get familiar with the process.
The XGrid supports two modes of operation: synchronous and asynchronous. In synchronous mode, you send the XGrid your program, which runs it, and then when it is done, it returns the results back to you.
In the asynchronous mode, however, you submit your program as a job, and you can continue issuing more Linux commands. Every so often you poll the XGrid to see if the job is done, and if it is, you ask the XGrid for the results generated by your job.
Synchronous Submission
Let's ask the XGrid to run our program:
xgrid - job run montecarlo.py 100000
Note that the result comes back to the screen.
Asynchronous Submission
Let's do the same thing, i.e. submit the program to the XGrid, and run it on one processor, but asynchronously.
xgrid -job submit montecarlo.py 100000
You will not get the results of your program. Instead you get something like this:
{
    jobIdentifier = ddddd;
}
Basically the XGrid system gave you a ticket with a number on it. You can go do your shopping, and when you're ready you can come back to the counter, present your ticket, and if the job is done, you will get your results.
Let's check to see if the job is finished, though, first:
xgrid -id ddddd -job attributes
Make sure you use the same number (ddddd) you obtained as jobIdentifier.
You should get back:
{
   jobAttributes =     {
       activeCPUPower = 0;
       applicationIdentifier = "com.apple.xgrid.cli";
       dateNow = 2010-02-15 18:04:17 -0500;
       dateStarted = 2010-02-15 18:03:59 -0500;
       dateStopped = 2010-02-15 18:04:00 -0500;
       dateSubmitted = 2010-02-15 18:03:59 -0500;
       jobStatus = Finished;
       name = "montecarlo.py";
       percentDone = 100;
       taskCount = 1;
       undoneTaskCount = 0;
   };
}
When we see that the jobStatus is Finished, we can ask for the results back:
 xgrid -id ddddd -job results

 ------------------------------
 1000000 : 3.139436
Finally, we should clean up the XGrid and remove our job, as the XGrid will keep it in memory otherwise:
xgrid -id ddddd -job delete
{
}
Asynchronous Submission Rules
Whenever you submit a job asynchronously (the most frequent case), follow these simple rules:
|
Asynchronous Submission to the XGrid with style!
Computer scientists do not like to type commands at the keyboard if they can write a script that will perform the same task. And rightly so.
We are going to use a script to submit asynchronous jobs. The script will grab the output of the xgrid command when we submit the job, get the jobIdentifier from this output and keep on polling the grid for the status of the job, until the job has finished, then the script will ask for the results back. Finally the script will remove the job from the grid.
A (crude and not terribly robust) version of this script is available here.
- Use emacs and copy/paste to create your own copy of it.
- Make it executable
chmod +x getXGridOutput.py
- Submit the job and pipe it through the Perl program:
xgrid -job submit montecarlo.py 100000 | getXGridOutput.py
- Verify that you get the result from montecarlo.py.
Finally, Some Parallelism
Let's think about it...
Ok, time to put all this together and figure out a way to generate an approximation of Pi with a large number of samples utilizing as much parallelism as possible, or as much parallelism as required to reach the shortest execution time.
Think of the problem at hand: we want to generate a huge number of samples. We compute the Put samples into bins and count how many there are in each bin. And then we gather the results...
See a simple solution?
An obvious one is to discover that if we have two different experiments,
If you have a Mac and Want to Monitor your Distributed Programs
This section can be skipped. It allows one to monitor the grid from a GUI, and observe the parallel execution of several copies of a distributed program.
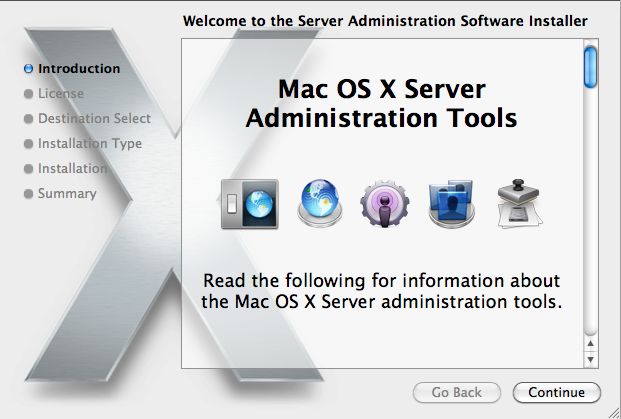
Install Apple Admin Tool
- If you do not have a Server folder in the Applications folder, and you don't have an XGrid Admin application in the Server folder, then download the admin, otherwise skip to the next step.
- Download and install package for Mac OS X 10.6 from Apple
- Install
- Launch
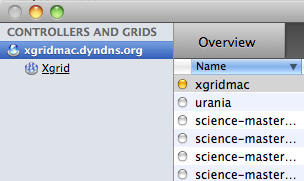
Connecting to the XGridMac server
- Locate the Server folder in your applications, and in it the XGrid icon
- Open it
- Click + to add a new a new controller.
- Enter xgridmac.xxxxxx.xxx and the password given to you in class.
- Observe that you should have access to a collection of Macs around the building


