DSPL Tutorial: First Contact
--D. Thiebaut 10:52, 3 March 2011 (EST)--D. Thiebaut 16:01, 18 April 2010 (UTC)
Contents
|
This is a first attempt at creating a data visualization using Google's DSPL language realeased in Feb. 2011. |

You can see this graph in action here.
References
- The main reference for this example is Google's own tutorial: DSPL Tutorial
- The Home of the Public Data Explorer on Google
Step 1: Read!
- Read Google's tutorial.
- The important elements to understand are that of concept, slice, and table
Step 2: Our Data
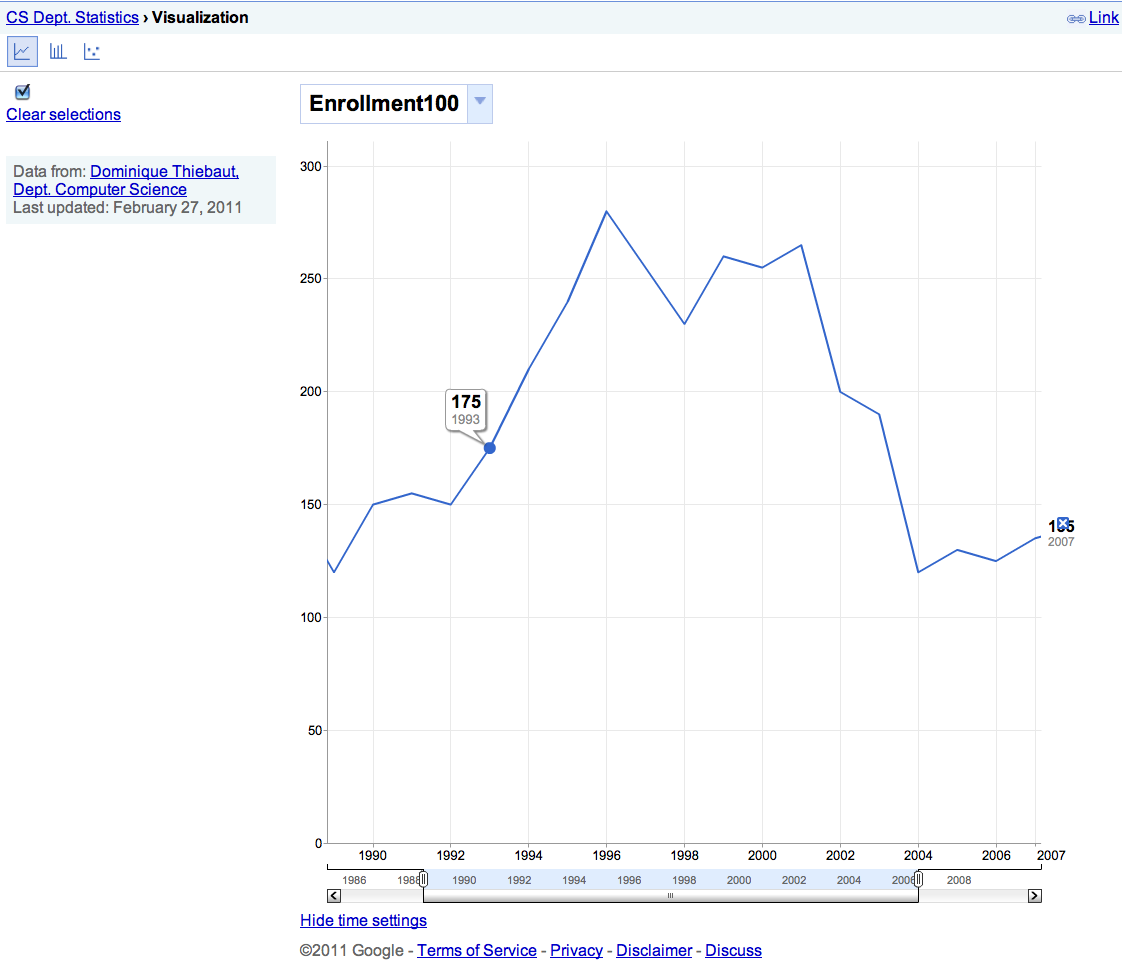
- As an example, let's assume that we want to plot the enrollment in Computer Science across several years, in 100-level classes on one hand, and 200 and 300 level classes on another hand. The data in CSV form looks like this:
department, year, enrollment100, enrollment2300
CSC, 1986, 250, 375
CSC, 1987, 200, 320
CSC, 1988, 150, 260
CSC, 1989, 120, 235
CSC, 1990, 150, 260
CSC, 1991, 155, 250
CSC, 1992, 150, 245
CSC, 1993, 175, 300
CSC, 1994, 210, 350
CSC, 1995, 240, 360
CSC, 1996, 280, 400
CSC, 1997, 255, 395
CSC, 1998, 230, 375
CSC, 1999, 260, 420
CSC, 2000, 255, 405
CSC, 2001, 265, 420
CSC, 2002, 200, 340
CSC, 2003, 190, 290
CSC, 2004, 120, 210
CSC, 2005, 130, 190
CSC, 2006, 125, 160
CSC, 2007, 135, 200
CSC, 2008, 140, 240
CSC, 2009, 135, 245
CSC, 2010, 190, 265
CSC, 2011, 150, 275
- Enrollment100 is for 100-level classes, Enrollment2300 for the 200 and 300 level classes. (Note: These data are not at all accurate or representative and are used solely for the purpose of illustration.)
Step 3: Figuring out the Concepts present in our data
- We have several concepts in the data, according to Google's definitions:
- one for the enrollment in 100-level classes. Let's call it Enrollment100
- one for the enrollment in 200 and 300-level classes. Let's call it Enrollment200-300
- one for the department. Even though we have only one department so far, we could imagine having a graph showing more departments. Let's call this concept Department.
- we also have the concept of years, but because this is a concept that appears in many graphs, Google has declared a special predefined concept for it, so we don't need to list it explicitly.
Step 4: Packaging the Concepts in XML
- We use Google's example and package the concepts in XML as follows:
  <concepts>

    <concept id="enrollment100">
      <info>
        <name>
          <value>Enrollment100</value>
        </name>
        <description>
          <value>Enrollment in 100-level classes</value>
        </description>
      </info>
      <type ref="integer"/>
    </concept>

    <concept id="enrollment2300">
      <info>
        <name>
          <value>Enrollment200-300</value>
        </name>
        <description>
          <value>Enrollment in 200 & 300-level classes</value>
        </description>
      </info>
      <type ref="integer"/>
    </concept>

    <concept id="department" extends="entity:entity">
      <info>
        <name>
          <value>Department</value>
        </name>
      </info>
      <type ref="string"/>
      <table ref="department_table" />
    </concept>

    <concept id="class" extends="entity:entity">
      <info>
        <name>
          <value>Class</value>
        </name>
      </info>
      <type ref="string"/>
    </concept>
  </concepts>
- Note that because the departments can have different values, not just CSC, we define a table named department_table which will hold the names of the various departments. See the table section below for more information.
Step 5: Creating the Slices
- The slices are similar to tables in a database. They show some relationships between concepts and assign values to some of the combinations.
- In our case we have only one table, the one shown in CSV format above. So one slice suffices to show the relationships and values.
  <slices>
    <slice id="enrollment_slice">
      <dimension concept="department"/>
      <dimension concept="time:year"/>
      <metric    concept="enrollment100"/>
      <metric    concept="enrollment2300"/>
      <table ref="enrollment_slice_table" />
    </slice>
  </slices>
- We use dimensions for the department name andn for the time, and metric for the enrollments, since they are expressed in integers.
Step 6: the Tables
- We have two tables, one for the actual data, and one for the department names:
 <tables>
  <table id="department_table">
    <column id="department" type="string"/>
    <data>
       <file format="csv" encoding="utf-8">department.csv</file>
    </data>
  </table>

  <table id="enrollment_slice_table">
    <column id="department" type="string" />
    <column id="year" type="date" format="yyyy" />
    <column id="enrollment100" type="integer" />
    <column id="enrollment2300" type="integer" />
    <data>
      <file format="csv" encoding="utf-8">enrollment.csv</file>
    </data>
  </table>

</tables>
- Both tables refer to CSV files for the actual data. The department names will be stored in a CSV file called department.csv, while the enrollment figures in a file called enrollment.csv.
Step 7: The Data Files
department.csv
name
CSC
- (make sure there are no blank lines in the csv files)
enrollment.csv
department, year, enrollment1, enrollment2
CSC, 1986, 250, 375
CSC, 1987, 200, 320
CSC, 1988, 150, 260
CSC, 1989, 120, 235
CSC, 1990, 150, 260
CSC, 1991, 155, 250
CSC, 1992, 150, 245
CSC, 1993, 175, 300
CSC, 1994, 210, 350
CSC, 1995, 240, 360
CSC, 1996, 280, 400
CSC, 1997, 255, 395
CSC, 1998, 230, 375
CSC, 1999, 260, 420
CSC, 2000, 255, 405
CSC, 2001, 265, 420
CSC, 2002, 200, 340
CSC, 2003, 190, 290
CSC, 2004, 120, 210
CSC, 2005, 130, 190
CSC, 2006, 125, 160
CSC, 2007, 135, 200
CSC, 2008, 140, 240
CSC, 2009, 135, 245
CSC, 2010, 190, 265
CSC, 2011, 150, 275
Step 8: Recap: The full XML file for the Project
- The project consist of 3 files:
- enrollment.xml
- enrollment.csv (see above)
- department.csv (see above)
The enrollment.xml file is given below:
enrollment.xml
<?xml version="1.0" encoding="UTF-8"?>
<dspl targetNamespace=""
   xmlns:xsi="http://www.w3.org/2001/XMLSchema-instance"
   xmlns="http://schemas.google.com/dspl/2010"
   xmlns:time="http://www.google.com/publicdata/dataset/google/time"
   xmlns:entity="http://www.google.com/publicdata/dataset/google/entity"
   xmlns:quantity="http://www.google.com/publicdata/dataset/google/quantity">

  <import namespace="http://www.google.com/publicdata/dataset/google/time"/>
  <import namespace="http://www.google.com/publicdata/dataset/google/entity"/>
  <import namespace="http://www.google.com/publicdata/dataset/google/quantity"/>

  <info>
    <name>
      <value>CS Dept. Statistics</value>
    </name>
    <description>
      <value>Very interesting data</value>
    </description>
    <url>
      <value>http://cs.smith.edu/dftwiki</value>
    </url>
  </info>

  <provider>
    <name>
      <value>Dominique Thiebaut, Dept. Computer Science</value>
    </name>
    <url>
      <value>http://cs.smith.edu/dftwiki</value>
    </url>
  </provider>

  <!-- ====================================================================== -->
  <!--                                  CONCEPTS                              -->
  <concepts>

    <concept id="enrollment100">
      <info>
        <name>
          <value>Enrollment100</value>
        </name>
        <description>
          <value>Enrollment in 100-level classes</value>
        </description>
      </info>
      <type ref="integer"/>
    </concept>

    <concept id="enrollment2300">
      <info>
        <name>
          <value>Enrollment200-300</value>
        </name>
        <description>
          <value>Enrollment in 200 & 300-level classes</value>
        </description>
      </info>
      <type ref="integer"/>
    </concept>

    <concept id="department">
      <info>
        <name>
          <value>Department</value>
        </name>
      </info>
      <type ref="string"/>
      <table ref="department_table" />
    </concept>

    <concept id="class" extends="entity:entity">
      <info>
        <name>
          <value>Class</value>
        </name>
      </info>
      <type ref="string"/>
    </concept>
  </concepts>

  <!-- ====================================================================== -->
  <!--                                   SLICES                              -->
  <slices>
    <slice id="enrollment_slice">
      <dimension concept="department"/>
      <dimension concept="time:year"/>
      <metric    concept="enrollment100"/>
      <metric    concept="enrollment2300"/>
      <table ref="enrollment_slice_table" />
    </slice>
  </slices>

  <!-- ====================================================================== -->
  <!--                                  TABLES                                -->

  <tables>
  <table id="department_table">
    <column id="name" type="string"/>
    <data>
       <file format="csv" encoding="utf-8">department.csv</file>
    </data>
  </table>

  <table id="enrollment_slice_table">
    <column id="department" type="string"/>
    <column id="year" type="date" format="yyyy" />
    <column id="enrollment100" type="integer">
    <column id="enrollment2300" type="integer" />
    <data>
      <file format="csv" encoding="utf-8">enrollment.csv</file>
    </data>
  </table>

</tables>

</dspl>
Step 9: Submit the Project to Google's Public Data Set Viewer
- Package the three files into a ZIP compress folder, say enrollment.zip
- Upload the zip file to Google's upload site
- fix any errors reporting by the uploader.
Step 10: Visualize the Data
