CSC334 Introduction to the XGrid at Smith College
--D. Thiebaut 21:34, 3 November 2008 (UTC)
This is an introduction/laboratory on using an XGrid system in CSC334, Fall 08, at Smith College.
Contents
Introduction
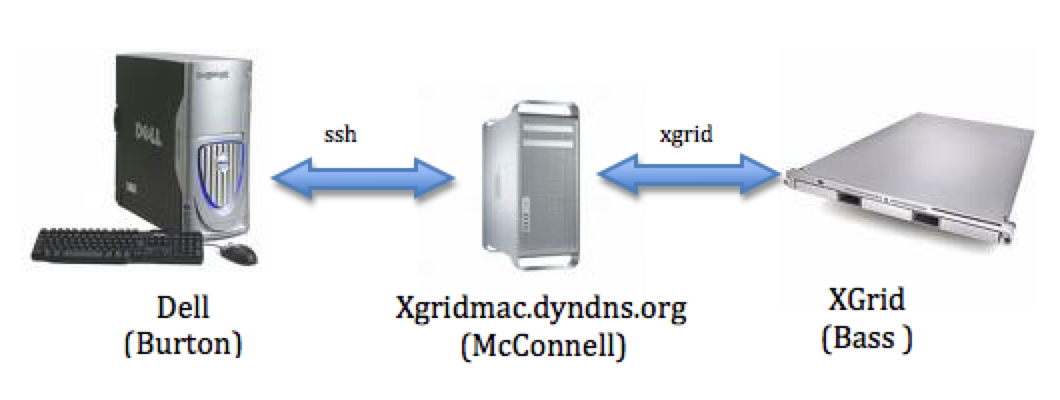
This first tutorial introduces the basic concepts of an XGrid system, and how to program it from the command line. The document assumes that the access is performed from a Windows XP PC which connects to an XGrid system through a Mac Pro intermediary.
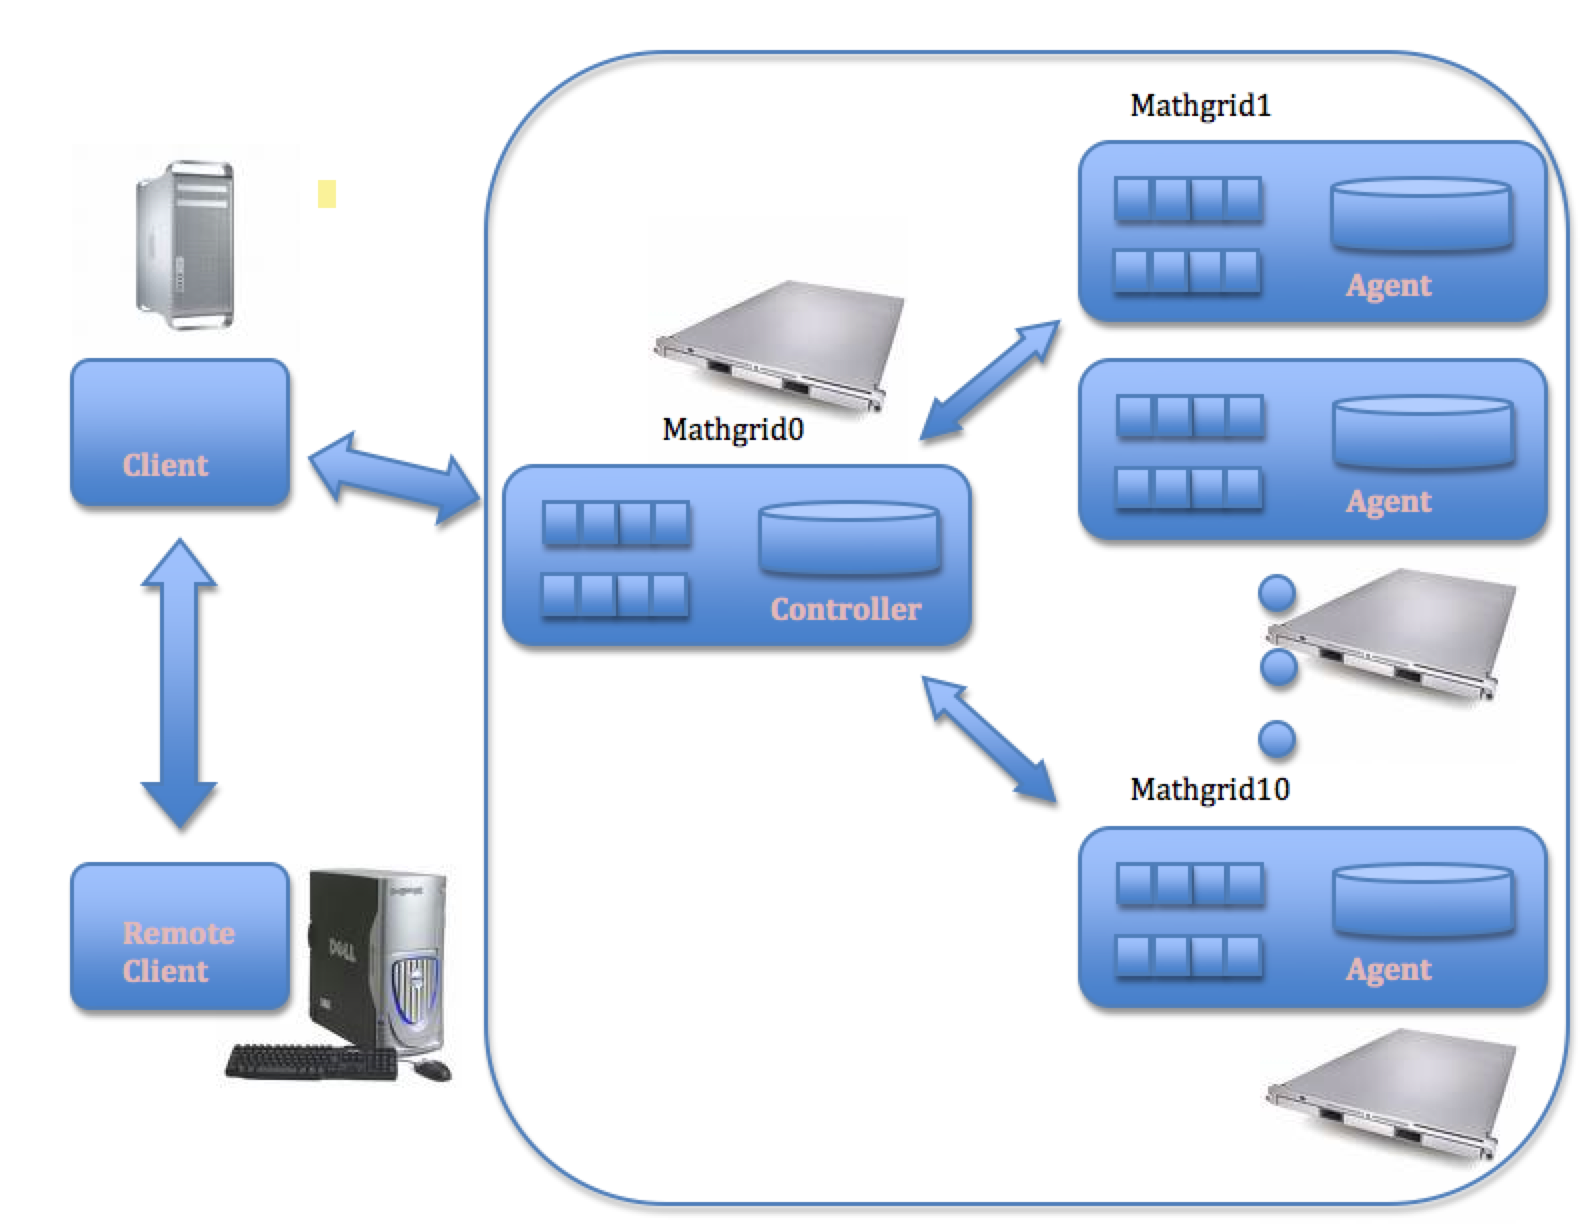
Setup for CSC334
XGrid General Setup
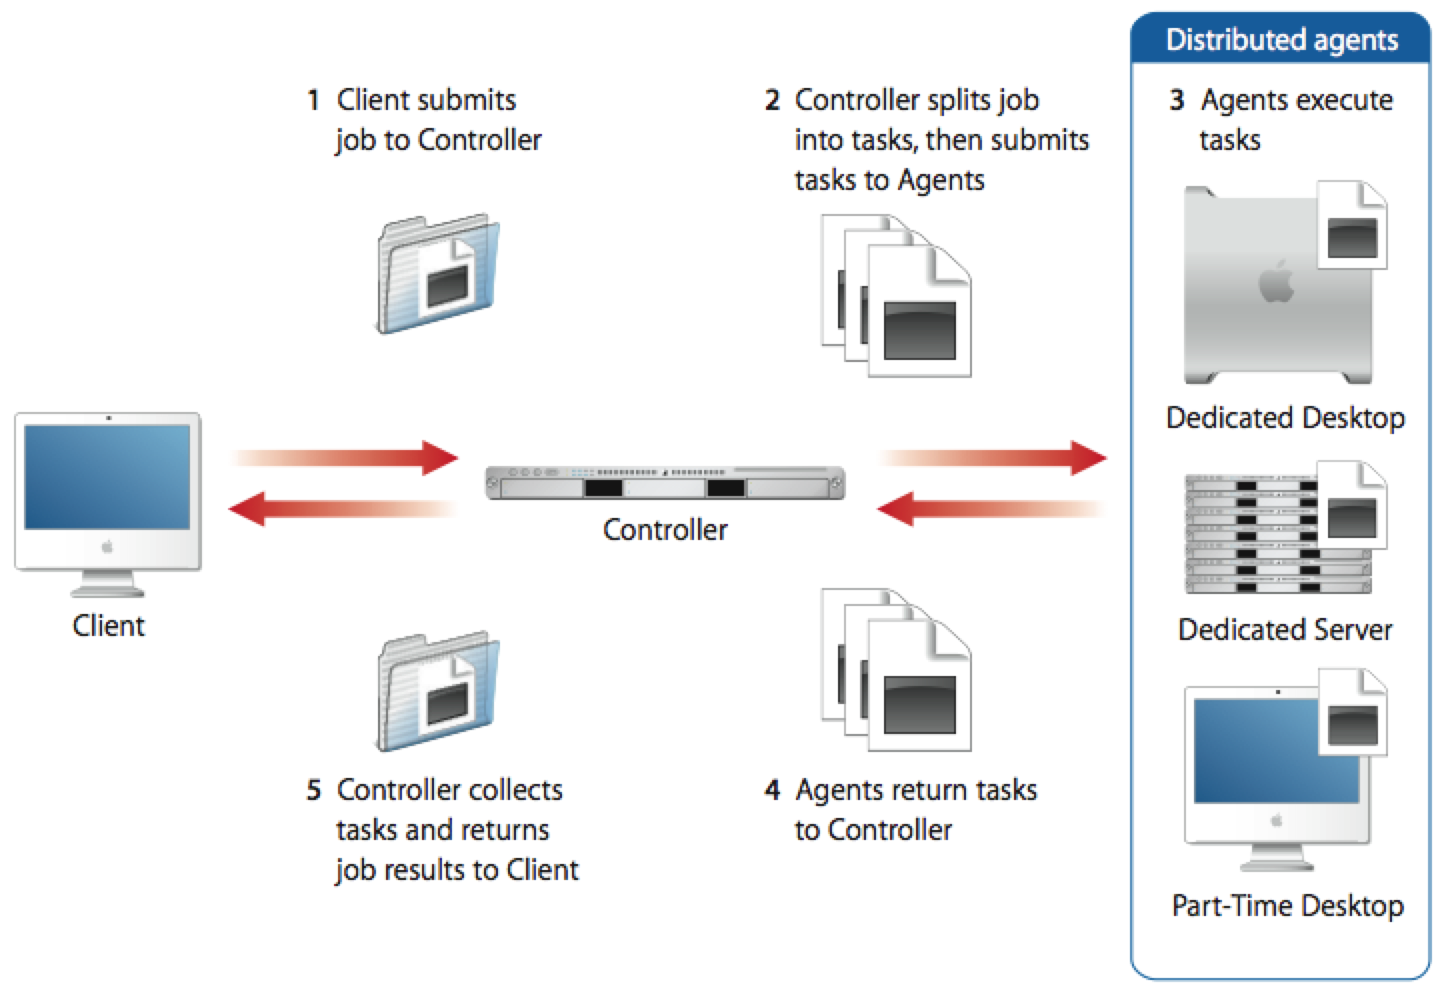
(taken from http://images.apple.com/server/macosx/docs/Xgrid_Admin_and_HPC_v10.5.pdf)
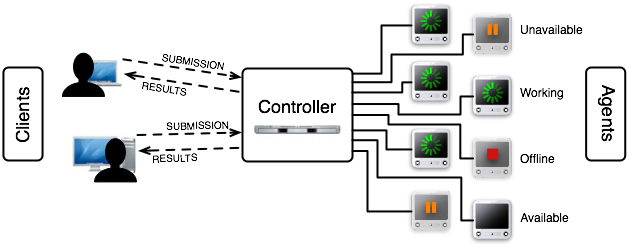
(taken from http://www.macresearch.org/the_xgrid_tutorials_part_i_xgrid_basics)
Important Concepts
- job: typically a program or collection of programs, along with their data files submitted to the XGrid.
- tasks: a division of a job into smaller pieces containing a program or programs with its/their data file(s).
- controller: the main computer in the XGrid in charge of distributing work to the agents
- agent: the other computers in the XGrid
- client: the user or computer where the user sits, where jobs are issued.
Getting Started!
The XGrid system is available from the Mac platform only. In order to use it, you will have to connect to a Mac Pro that is a client of the XGrid.
Its address in xgridmac.dyndns.org.
- Use one of the Windows XP PC (or Linux PC), and open an SSH window.
- Connect to DT's Mac Pro using your Smith or MtHolyoke email name.
ssh -Y username@xgridmac.dyndns.org
- When prompted for a password, use the one given out in class.
- Create a .bash_profile file for simplifying the connection to the Grid (you will need to do this only once, the first time you connect to the Mac Pro):
emacs -nw .bash_profile
- and copy/paste the text below in it.
export EDITOR=/usr/bin/emacs
export TERM=xterm-color

#export PS1="\w> "
PS1='[\h]\n[\t] \w\$: '
PS2='> '

# setup xgrid access
export XGRID_CONTROLLER_HOSTNAME=mathgrid0.smith.edu
export XGRID_CONTROLLER_PASSWORD=xxx_xxx_xxx_xxx
- Make sure you replace the string xxx_xxx_xxx_xxx with the one that will be given to you.
- Use Control-X Control-C to save the file.
- Make this file take effect:
source .bash_profile
- Check that the XGrid is up and that you can connect to it:
xgrid -grid attributes -gid 0
- the output should be similar to what is shown below:
{
   gridAttributes =     {
       gridMegahertz = 0;
       isDefault = YES;
       name = Xgrid;
   };
}
- You are discovering the format used by Apple to code information. It is similar to XML, but uses braces. It is called the PLIST format. We'll see it again later, when we deal with batch jobs.
Our Target Perl Program: Generating a Histogram
We are going to use a very simplistic program as our target for exploring XGrid programming. The program will simply generate a given number of random amino acids, and will compute their histogram.
Here is an example of how it will work:
./genAminoHisto.pl 1000

ASP: 46
PRO: 50
ILE: 51
LYS: 61
GLY: 46
TRP: 47
CYS: 48
PHE: 49
GLN: 54
SER: 55
ASN: 38
VAL: 49
LEU: 47
TYR: 58
GLU: 53
ARG: 51
THR: 53
MET: 52
ALA: 46
HIS: 46
In this case we ask the Perl program to generate 1000 random amino acids, and to compute a histogram (frequency of occurrence) for them. We see that we roughly get 50 samples of each of the 20 amino acids.
|
EXERCISE #1 Generate the pseudo code for the program. |
The code for the program is available here.
Create a copy of this program in your XGrid account, make it executable, then run it for different sample sizes to get a sense of how it works:
emacs genAminoHisto.pl             (and copy/paste the code in the editor.  Save with Ctrl-X Ctrl-C)

chmod+x genAminoHisto.pl           (to make the program executable)

./genAminoHisto nnn               (where nnn is an integer of your choice)
Find a value of nnn that requires about 1 (or more) minute of computer time.
Submitting the program to the XGrid
Although we feel that our program contains some parallelism, with the 20 amino acids, and having 20 different counters to accumulate the frequency with which each one appears in the random sequence, this parallelism cannot be exploited directly by the XGrid. The XGrid only deals with tasks, individual programs. The XGrid won't really be able to run our program any differently than the Mac to which you are currently logged in can. But at least we can submit the program to the XGrid and get familiar with the process.
The XGrid supports two modes of operation: synchronous and asynchronous. In synchronous mode, you send the XGrid your program, which runs it, and then when it is done, it returns the results back to you.
In the asynchronous mode, however, you submit your program as a job, and you can continue issuing more Linux commands. Every so often you poll the XGrid to see if the job is done, and if it is, you ask the XGrid for the results generated by your job.
Synchronous Submission
Let's ask the XGrid to run our program:
xgrid -job run genAminoHisto.pl 1000
Notice that the results come back right away.
|
EXERCISE #2 Remember the number of samples you found earlier which kept the Mac Pro (xgridmac) busy for about a minute? Try it on the XGrid to find out how long the program takes on the XGrid. What do you observe? Does it take longer on the XGrid than on the Mac Pro? Shorter? About the same? How do you think the Mac Pro compares to the XGrid? |
Asynchronous Submission
Let's do the same thing as before, but now we submit the job asynchronously.
xgrid -job submit genAminoHisto.pl 1000
You will not get the results of your program. Instead you get something like this:
{
    jobIdentifier = ddddd;
}
Basically the XGrid system gave you a ticket with a number on it. You can go do your shopping, and when you're ready you can come back to the counter, present your ticket, and if the job is done, you will get your results.
Let's check to see if the job is finished, though, first:
xgrid -id ddddd -job attributes
Make sure you use the same number (ddddd) you obtained as jobIdentifier.
You should get back:
{
   jobAttributes =     {
       activeCPUPower = 0;
       applicationIdentifier = "com.apple.xgrid.cli";
       dateNow = 2008-11-03 21:59:01 -0500;
       dateStarted = 2008-11-03 21:56:07 -0500;
       dateStopped = 2008-11-03 21:56:07 -0500;
       dateSubmitted = 2008-11-03 21:56:07 -0500;
       jobStatus = Finished;
       name = "genAminoHisto.pl";
       percentDone = 100;
       taskCount = 1;
       undoneTaskCount = 0;
   };
}
When we see that the jobStatus is Finished, we can ask for the results back:
xgrid -id ddddd -job results

ASP: 49
PRO: 54
ILE: 47
LYS: 44
GLY: 50
CYS: 51
TRP: 42
PHE: 57
GLN: 45
SER: 46
ASN: 49
VAL: 52
LEU: 44
TYR: 51
GLU: 65
ARG: 57
THR: 57
ALA: 51
MET: 48
HIS: 41
Finally, we should clean up the XGrid and remove our job, as the XGrid will keep it in memory otherwise:
xgrid -id ddddd -job delete
{
}
Asynchronous Submission Rules
Whenever you submit a job asynchronously (the most frequent case), follow these simple rules:
- job submit. Get jobIdentifier.
- loop:
- check job attributes.
- if status is Finished break out of loop.
- job results.
- job delete.
References
- Tutorial Part I by Charles Parnot, maintainer of one of the largest XGrid systems at Stanford.
- Command-Line Tutorial Part II
- XGrid Programming at Smith, maintained by D. Thiebaut
- A movie of a presentation of the XGrid (click on the movie icon).
- Tutorials on setting up and using an XGrid system.
- A movie on the use of Perl on an XGrid system.


