Tutorial: Accessing a MySql database in Java (Eclipse)
--D. Thiebaut (talk) 20:03, 2 March 2015 (EST)
To access a remote database server from your Java program, you need to make sure you have several things setup first:
- A database server installed on a computer, with the port 3306 opened, so that computers on the outside can access the database running on it. You can bypass this requirement if you run the database server on your own computer, in which case the host will be localhost, instead of some string of the form name.domain.com.
- A Java library, called a connector that will take SQL commands generated by your Java program, and will send them to the MySQL server over the network.
- A database setup with one or several tables, all residing on the MySQL server. The best way to create tables on a MySQL server is to use a package such as PhpMyAdmin. It is free, and can be installed on any computer, as a Web application. See the PhpMyAdmin documentation for more information.
This tutorial concentrates on Step 2, above.
Steps
These steps are inspired for a good tutorial which can be found on www.vogella.com.
- Install Eclipse on your computer
- Download JDBC (Java DataBase Connectivity) from http://www.mysql.com/products/conector. Select "Platform Independent"
- Unzip/unpack it. Open the new folder create by the unpacking. Make sure you see a jar file in the folder, with a name similar to mysql-connector-java-5.1.34-bin.jar
- Create a new java project in Eclipse. Call it MySQLTest1 (or whatever name you want).
- Drag & drop the JDBC connector jar file (mysql-connector-java-5.1.34-bin.jar) to your project in Eclipse. Select copy file and not "link file".
- Create 2 java classes in the project (source code given below)
- Main.java, and
- MySQLAccess.java
- Click on mysql-connector-java-5.1.34-bin.jar in the project to highlight it
- Control-click or right-click on it to open the pop-up: pick Build-Path, and then Configure Build-Path
- A new window opens up. In the right hand-side, click on the Libraries tab.
- Click on Add JARs
- In the JAR Selection window, double-click on MySQLTest1 (or whatever your project name is).
- Select the mysql-connector-java-5.1.34-bin.jar library.
- Click Ok.
- The mysql connector is now a library available when compiling your java code.
- Select your Main class in your project, in the Package Explorer window, and run it as an Application.
- If everything goes well, you should see an output in your console, which is read directly from the database server in the lab.
User: lars
Website: http://www.vogella.com
Summary: Summary
Date: 2009-09-14
Comment: My first comment
User: lars
Website: http://www.vogella.com
Summary: Summary
Date: 2009-09-14
Comment: My first comment
User: Test
Website: TestWebpage
Summary: TestSummary
Date: 3910-01-11
Comment: TestComment
The columns in the table are:
Table: comments
Column 1 id
Column 2 MYUSER
Column 3 EMAIL
Column 4 WEBPAGE
Column 5 DATUM
Column 6 SUMMARY
Column 7 COMMENTS
Main.java
// Adapted from http://www.vogella.com/tutorials/MySQLJava/article.html
public class Main {
  public static void main(String[] args) throws Exception {
    MySQLAccess dao = new MySQLAccess();
    dao.readDataBase();
  }

}
MySQLAccess.java
// Adapted from http://www.vogella.com/tutorials/MySQLJava/article.html
import java.sql.Connection;
import java.sql.DriverManager;
import java.sql.PreparedStatement;
import java.sql.ResultSet;
import java.sql.SQLException;
import java.sql.Statement;
import java.util.Date;

public class MySQLAccess {

  private Connection connect = null;
  private Statement statement = null;
  private PreparedStatement preparedStatement = null;
  private ResultSet resultSet = null;

  final private String host = "xxxxxxxxxxxxxxxxxxxxxxxx";
  final private String user = "xxxxxxxx";
  final private String passwd = "xxxxxxxxxxx";

  public void readDataBase() throws Exception {
    try {
      // This will load the MySQL driver, each DB has its own driver
      Class.forName("com.mysql.jdbc.Driver");

      // Setup the connection with the DB
      connect = DriverManager
          .getConnection("jdbc:mysql://" + host + "/feedback?"
              + "user=" + user + "&password=" + passwd );

      // Statements allow to issue SQL queries to the database
      statement = connect.createStatement();
      // Result set get the result of the SQL query
      resultSet = statement
          .executeQuery("select * from feedback.comments");
      writeResultSet(resultSet);

      // PreparedStatements can use variables and are more efficient
      preparedStatement = connect
          .prepareStatement("insert into  feedback.comments values (default, ?, ?, ?, ? , ?, ?)");
      // "myuser, webpage, datum, summary, COMMENTS from feedback.comments");
      // Parameters start with 1
      preparedStatement.setString(1, "Test");
      preparedStatement.setString(2, "TestEmail");
      preparedStatement.setString(3, "TestWebpage");
      preparedStatement.setDate(4, new java.sql.Date(2009, 12, 11));
      preparedStatement.setString(5, "TestSummary");
      preparedStatement.setString(6, "TestComment");
      preparedStatement.executeUpdate();

      preparedStatement = connect
          .prepareStatement("SELECT myuser, webpage, datum, summary, COMMENTS from feedback.comments");
      resultSet = preparedStatement.executeQuery();
      writeResultSet(resultSet);

      // Remove again the insert comment
      preparedStatement = connect
      .prepareStatement("delete from feedback.comments where myuser= ? ; ");
      preparedStatement.setString(1, "Test");
      preparedStatement.executeUpdate();

      resultSet = statement
      .executeQuery("select * from feedback.comments");
      writeMetaData(resultSet);

    } catch (Exception e) {
      throw e;
    } finally {
      close();
    }

  }

  private void writeMetaData(ResultSet resultSet) throws SQLException {
    //   Now get some metadata from the database
    // Result set get the result of the SQL query

    System.out.println("The columns in the table are: ");

    System.out.println("Table: " + resultSet.getMetaData().getTableName(1));
    for  (int i = 1; i<= resultSet.getMetaData().getColumnCount(); i++){
      System.out.println("Column " +i  + " "+ resultSet.getMetaData().getColumnName(i));
    }
  }

  private void writeResultSet(ResultSet resultSet) throws SQLException {
    // ResultSet is initially before the first data set
    while (resultSet.next()) {
      // It is possible to get the columns via name
      // also possible to get the columns via the column number
      // which starts at 1
      // e.g. resultSet.getSTring(2);
      String user = resultSet.getString("myuser");
      String website = resultSet.getString("webpage");
      String summary = resultSet.getString("summary");
      Date date = resultSet.getDate("datum");
      String comment = resultSet.getString("comments");
      System.out.println("User: " + user);
      System.out.println("Website: " + website);
      System.out.println("Summary: " + summary);
      System.out.println("Date: " + date);
      System.out.println("Comment: " + comment);
    }
  }

  // You need to close the resultSet
  private void close() {
    try {
      if (resultSet != null) {
        resultSet.close();
      }

      if (statement != null) {
        statement.close();
      }

      if (connect != null) {
        connect.close();
      }
    } catch (Exception e) {

    }
  }

}
Setting up Database
- Point your browser to a phpmyadmin installation that can access your MySQL server.
- Enter your MySQL account and password.
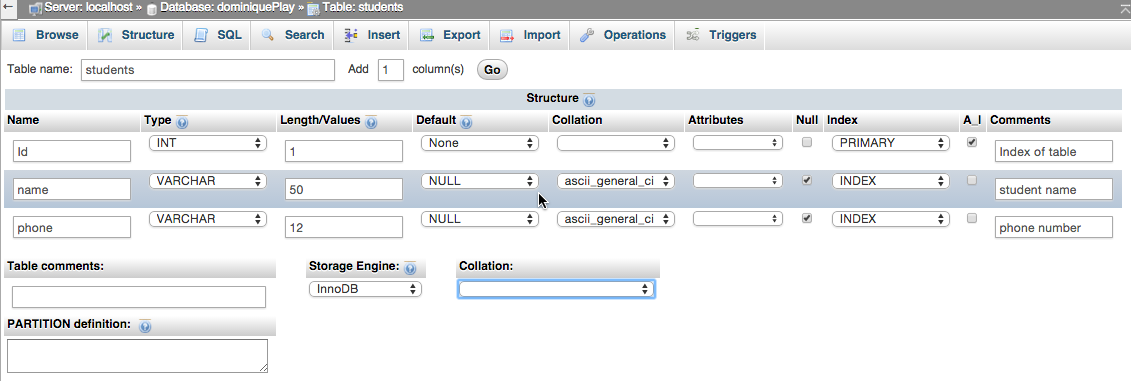
- In PhpMyAdmin, select Create Table, and call it students. Make it contain 3 columns.

- Create another table, called calls with 5 columns.(we are going to record phone calls).
