CSC220 Lab 8: Redirecting Email to Database
--D. Thiebaut 13:06, 19 November 2010 (UTC)
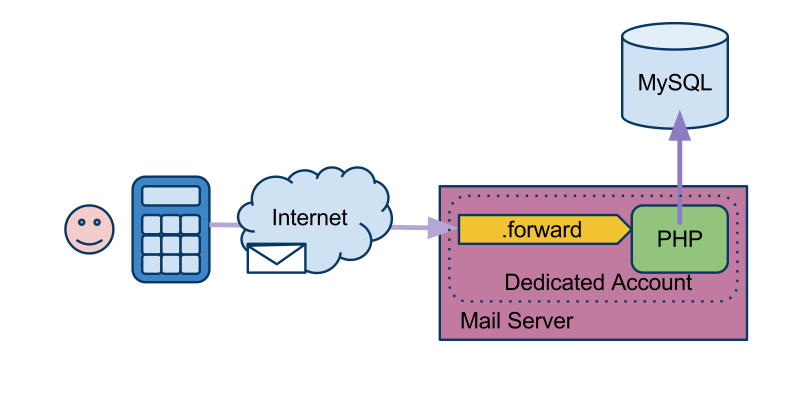
This lab will show you the step to setup an email capture system, where an email is sent to a specific account where all mail if forwarded to a php program which parses the messages, and stores the relevant ones in a MySql database.
Contents
Setup

- Algorithm
- Mobile device (blue phone) sends email with kml to predefined email account
- Email arrives on mail server, addressed to a dedicated account (e.g. 220a_xx@hadoop0.xxxxx.xxxxx)
- .foward file in 220a_xx account forwards email to php program parseEmail.php
- php program parses email message, extract relevant information, and stores it on remote MySql Server (xgridmac).
Dedicated Account
- The information will be given to you in class
- Server
- An account of the form 220a_xx (replace xx by your own Id)
- A password
Login
- Follow the steps below. More information will be given in class.
ssh 220a_xx@hadoop0.xxxxx.xxx
- Note the underscore in the account name. This is your new account.
- If you have trouble connecting, try connecting with your regular 220a account to the new server, then ssh to your new account on localhost:
    ssh 220a-xx@hadoop0.xxxxx.xxx

    ssh 220a_xx@localhost
- You should now be logged in as local user 220a_xx on hadoop0
- Create a bin directory where you will put your php code.
mkdir bin
dot-forward
- Setup a dot-forward file in your new account.
    cd
    emacs .forward
- Store a pipe command in the file
"|/usr/bin/php -q /home/220a_xx/bin/parseMail.php", \220a_xx
- The -q switch forces php not to output headers, as it would do if it were to output html to a remote browser.
- Make sure you set the double quotes correctly. Of course, replace xx by your User Id.
A sample php filter
- First we will make the php program store the incoming email to a local file.
- Create a new file called parseMail.php in you bin directory:
    cd ~/bin
    emacs parseMail.php
- Enter this code:
<?php
//  parseMail.php
// D. Thiebaut


//--- open stdin as if it were a file ---
$body = "";
$f = fopen('php://stdin', 'r');
while ($line = fgets( $f )) {
    $body .= $line;
}
fclose( $f );

//--- save mail in local file (for testing) ---
$out = fopen( "/home/220a_xx/bin/phpemails.txt", "a+" );
fwrite($out, $body);
fclose($out);

?>
- Make bin and its contents readable by all:
chmod -R a+r ~/bin
Test
- Send a simple test email to 220a_xx@hadoop0.xxxxxx.xxx
- Verify that it has been captured in file ~/bin/phpemails.txt
Storing the email message into your database
Now is time for you to do some work!
- Create a new table in your database on xgridmac, with two fields: Id (auto increment, unsigned int, primary index), and email (mediumtext).
- Use the MySql skeleton program available here and modifiy parseMail.php so that it stores the body of the message to your new table.
- Verify that it works!
Where to go from here
- All you need to do now is some parsing of the mail message and extract the sender's email address, and the kml contents in the body of the message, at the least, and store that information in your kmldata table.
- This site has good information on parsing mail messages: http://thedrupalblog.com/configuring-server-parse-email-php-script
- Php has a slew of functions for parsing mail. Take a look at them, they might be useful if the above link doesn't work for you:
- mailparse_msg_extract_part_file
- mailparse_msg_extract_part
- mailparse_msg_extract_whole_part_file
- mailparse_msg_free
- mailparse_msg_get_part_data
- mailparse_msg_get_part
- mailparse_msg_get_structure
- mailparse_msg_parse_file
- mailparse_msg_parse
Date Trick
- One way to mark the date when data is inserted in a table is to create a field with type datetime. Let's call this field date.
- When you insert data in the table containing this field, you can tag the current time as follows:
INSERT INTO `mytable` ( `somefield`, `somefield`, `date` ) VALUES ( 'somedata', 'somedata', NOW() );
- the NOW() function will generate the current date and time, and that value will be automatically stored in the date field of your table.