Tutorial: So you want to run your code on Amazon?
--D. Thiebaut (talk) 13:23, 12 January 2014 (EST)
This short tutorial highlights the different steps necessary to run a Java application on an Amazon c3-x8large instance, which boast 32 64-bit cores running at 2.8 GHz accessing 60 GB of shared RAM, along with 640 GB of SSD storage--at the time of this writing.
From opening Amazon AWS page to running the program can be as short as 10 minutes, if you do this often enough!
1) Create an Account on Amazon Web Services (AWS)
You'll need to associate a credit card number with Amazon's AWS service. Start here aws.amazon.com and go through the various menus to create an account on AWS and enter your credit card information.
2) Connect to your AWS Account
Just point your browser to aws.amazon.com and enter your credentials.
3) Pick an Instance and Launch It

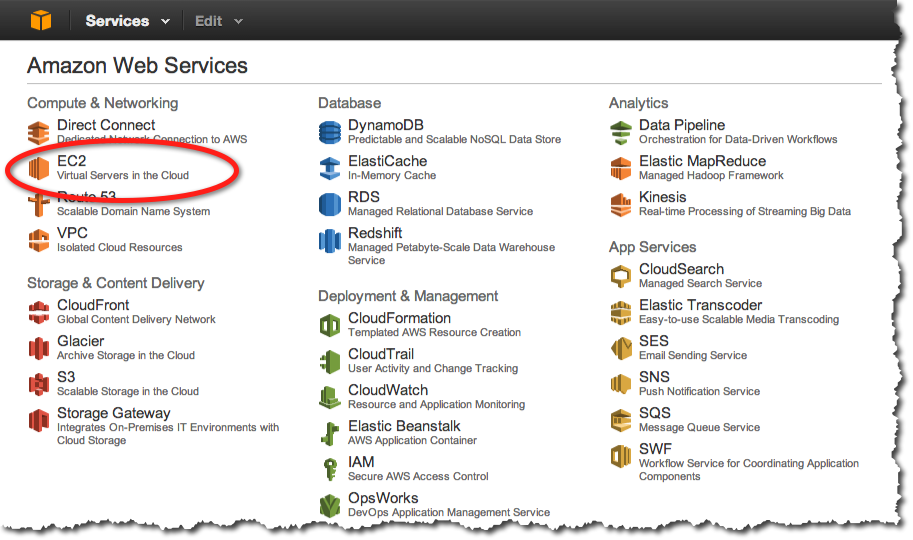
- Point your browser to console.aws.amazon.com/console/home?# and select EC2.
- Launch Instance
- Pick the environment you prefer. The default Amazon Linux AMI 2013.09.2 should work well for most Linux-type applications. If you prefer Ubuntu, there's also an Ubuntu OS which you can run on your instance.
- Select the 64-bit configuration unless you know you need 32-bit, maybe because some older compiler/setup you need to use.
- Pick the Instance Type that is best for your need. I usually use EC2 for compute-intensive application, so Compute Optimize is a good category to pick for this. You may have other needs.
- Pick the Instance Size that is best for you. If your application is multithreaded, I recommend going for the maximum number of cores, which is offered by the c3.8xlarge instance. Its characteristics (as of January 2014) are:
- c3.8xlarge:
- 32 cores giving it the equivalent processing power of 108 t1.small instances
- 60 GB Ram
- 2 x 320GB SSD drives
- 10 Gigabit/sec network speed
- c3.8xlarge:
- Accept all the defaults provided for this instance and LAUNCH the AMI.
- I'll assume that you do not already have a Key Pair, so select Create Key Pair, and give it a name. Say "myAWSKey"
- The download of your local key should start. I recommend moving your key to a folder where you keep other keys, for example your local .ssh folder:
mv ~/Download/myAWSKey.pem ~/.ssh
chmod 400 ~/.ssh/myAWSKey.pem - Launch!
Your AWS EC2 instance should launch. This may take a few minutes for it to be fully initialized.
4) Connect to your new Instance using SSH
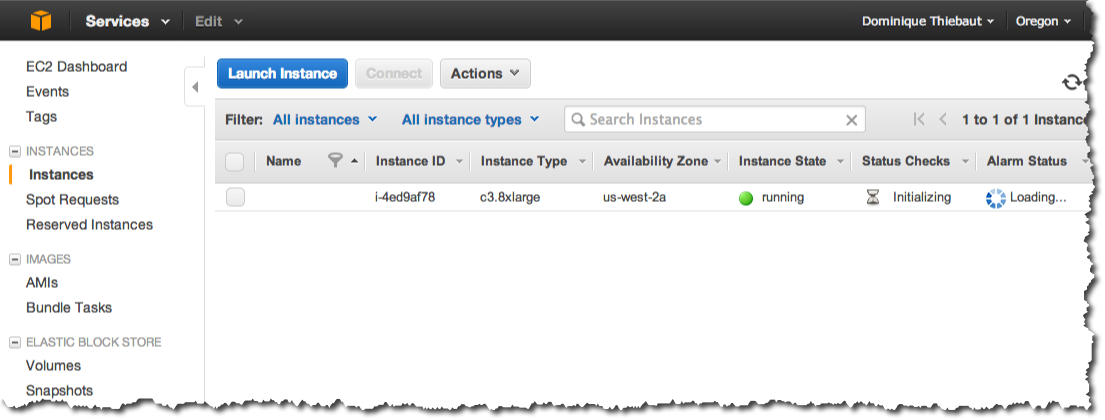
- There should be an option on the launch page to see all your running instances. Select it and observe your instance in the initialization process:

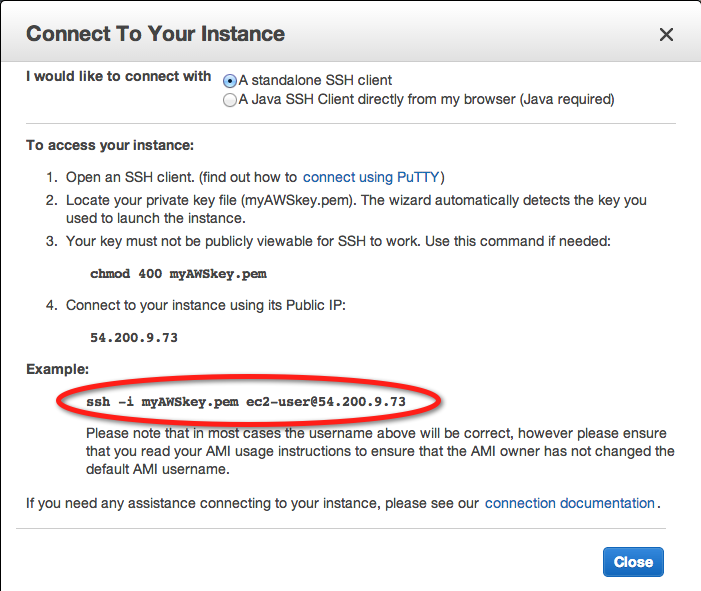
- Select the new instance and click on the Connect button. This will give you the address to use for an ssh connection.

- Note the IP address and the format of the command. Your IP address will be different from the one shown here. The command itself will have to be slightly modified to use the new key you have just downloaded. Since we have put our key in our ~/.ssh folder, the command becomes:
ssh -i ~/.ssh/myAWSkey.pem ec2-user@54.200.9.73
5) Setup your environment
- Ok, you should be connected to your instance via ssh. Now is a good time to setup the minimum environment you need to run your application. In our case we want to edit a shell file with emacs and run a java application.
ssh -i ~/.ssh/myAWSkey.pem ec2-user@54.200.9.73
The authenticity of host '54.200.9.73 (54.200.9.73)' can't be established.
RSA key fingerprint is aa:ef:31:9f:41:25:02:c6:0e:4d:3e:63:db:2e:e6:4b.
Are you sure you want to continue connecting (yes/no)? yes
Warning: Permanently added '54.200.9.73' (RSA) to the list of known hosts.


       __|  __|_  )
       _|  (     /   Amazon Linux AMI
      ___|\___|___|

https://aws.amazon.com/amazon-linux-ami/2013.09-release-notes/
6 package(s) needed for security, out of 18 available
Run "sudo yum update" to apply all updates.
[ec2-user@ip-172-31-18-45 ~]$
- Follow the recommendations and update all the packages:
sudo yum update
- Install emacs:
sudo yum install emacs
- Verify that java is installed by default:
[ec2-user@ip-172-31-18-45 ~]$ java -version
java version "1.6.0_24"
OpenJDK Runtime Environment (IcedTea6 1.11.14) (amazon-65.1.11.14.57.amzn1-x86_64)
OpenJDK 64-Bit Server VM (build 20.0-b12, mixed mode)
- Install additional packages you know you'll need.
5) Upload your Java Application from your Local Machine
It's now time to rsync your Java application to the EC2 instance just created. Ours is called 352PackingV5_Packer3.jar and is a 2D packing application. To rsync it, we need to open a new terminal window on our local machine, and tell rsync to ssh to the remote EC2 instance using the key we received from Amazon, and which we stored in our .ssh folder. The syntax for this command is the following:
rsync -azv --progress -e "ssh -i /Users/xxxxx/.ssh/myAWSkey.pem" 352PackingV5_Packer3.jar ec2-user@54.200.9.73:.
You need to replace /Users/xxxxx/ by the actual path to your .ssh folder for the command to work. Similarly replace ec2-user@54.200.9.73 by the actual URI given to you by Amazon to connect to your EC2 instance. Everything in red should be replaced with your own information.
rsync -azv --progress -e "ssh -i /Users/xxxxx/.ssh/myAWSkey.pem" 352PackingV5_Packer3.jar  ec2-user@54.200.9.73:.
building file list ...
1 file to consider
352PackingV5_Packer3.jar
      649625 100%   11.10MB/s    0:00:00 (xfer#1, to-check=0/1)

sent 629836 bytes  received 42 bytes  179965.14 bytes/sec
total size is 649625  speedup is 1.03
6) Running the Java Application on your EC2 Instance
Switch to the terminal window where you are connected to your EC2 Instance, verify that your application is now in the home directory, and run it!
[ec2-user@ip-172-31-18-45 ~]$ ls
352PackingV5_Packer3.jar

[ec2-user@ip-172-31-18-45 ~]$ java -jar 352PackingV5_Packer3.jar
Syntax: Packer3 N noBands T [-debug]
N = # rects, noBands = # bands, T = # parallel threads (typically # cores)
That's it! You are now ready to run your program.
Tips and Conclusion
That's it! You are now in business! Your application will benefit from 32 cores (which will be used only if your application is written with multithreading in mind!), 60 GB or RAM and fast SSD disks.
Below are some tips you may find useful when running applications on Amazon EC2 instances.
- Make sure you terminate your instance as soon as you have terminated your application. c3.8xlarge instances are not cheap and you are charged by the hour. You can terminate your instance by selecting it on the AWS EC2 console, and choosing Terminate in the menu of actions offered for your instances.
- If your application will run for several hours, you may want to use the screen command to run your application in the background and allow you to disconnect from your terminal window.
 [ec2-user@ip-172-31-18-45 ~]$  screen
 [ec2-user@ip-172-31-18-45 ~]$   java -jar yourApplication
 ...
 ...
 CTRL-A D
 [ec2-user@ip-172-31-18-45 ~]$
- Typing Control-A followed by D allows you to disconnect from the window where your application runs. You can now close the terminal window and reconnect to your EC2 instance from another computer. To reconnect to the window where you app is running, simply enter the command screen -r and you will see the full output of your java application.
- MIT has released a nice Python application called starcluster to easily launch and maintain clusters of instances on Amazon AWS. This makes it even easier than the steps presented here, but you'll have to download and install starcluster first. Check my Tutorial Page on starcluster for more information. Starcluster can be used to launch MPI or Hadoop clusters.
- If you have data or applications that you need to process regularly on EC2 instances, you may want to consider created an EBS storage device on which you store your data, and you attach it to your EC2 when you launch it. See my Starcluster Tutorial Page on how to create and EBS volume and attach it to your instances automatically every time you launch them.
- If your application is NOT multithreaded but you want to run many different versions of it and feed each one different parameters, check out the GNU Parallel command (www.gnu.org/software/parallel/).
