Difference between revisions of "Tutorial: Using Tensorflow with Docker"
(→Run Docker) |
(→Quick Tutorial on how to user Jupyter) |
||
| (19 intermediate revisions by the same user not shown) | |||
| Line 2: | Line 2: | ||
---- | ---- | ||
<br /> | <br /> | ||
| + | {| | ||
| + | | | ||
__TOC__ | __TOC__ | ||
| + | | width="50%" | | ||
| + | | ||
| + | | | ||
| + | [[Image:DockerLogo.png|200px|right]] | ||
| + | |} | ||
| + | |||
<br /> | <br /> | ||
<bluebox> | <bluebox> | ||
| − | These are very quick instructions for installing Docker under Mac OSX and for running Tensorflow on it. | + | These are very quick instructions for installing Docker under '''Mac OSX''' and for running Tensorflow on it. This is a summarized version of the longer explanations given on the official TensorFlow Install page: |
| + | * https://www.tensorflow.org/get_started/os_setup#test_the_tensorflow_installation | ||
| + | and the Docker Install page: | ||
| + | * https://docs.docker.com/docker-for-mac/ | ||
| + | |||
</bluebox> | </bluebox> | ||
<br /> | <br /> | ||
| Line 57: | Line 69: | ||
<br /> | <br /> | ||
| + | =Create a Script to Start Docker Automatically= | ||
| + | <br /> | ||
| + | If you are using a Mac or Linux machine, create a script called '''startDocker.sh''' in your bin directory: | ||
| + | <br /> | ||
| + | :<source lang="bash"> | ||
| + | #! /bin/bash | ||
| + | |||
| + | docker run -it -p 8888:8888 gcr.io/tensorflow/tensorflow | ||
| + | </source> | ||
| + | <br /> | ||
| + | Make your script executable: | ||
| + | |||
| + | chmod +x startDocker.sh | ||
| + | |||
| + | |||
| + | <br /> | ||
| + | |||
=Start Jupiter= | =Start Jupiter= | ||
<br /> | <br /> | ||
Jupiter is an application that runs in a browser and presents the user a virtual disk where the user can create folders and write programs. | Jupiter is an application that runs in a browser and presents the user a virtual disk where the user can create folders and write programs. | ||
| − | * To start the Jupiter connected to Docker, open your browser and enter the URL that was given to you in the previous step, | + | * To start the Jupiter connected to Docker, open your browser and enter the URL that was given to you in the previous step. |
| + | |||
| + | http://localhost:8888/tree?token=someLongSeriesOfHexadecimalDigits | ||
| + | |||
| + | :If you get an error message, replace '''localhost''' by the IP given next to the whale logo, above (I got 192.168.99.100 when I started Docker). | ||
http://192.168.99.100:8888/tree?token=someLongSeriesOfHexadecimalDigits | http://192.168.99.100:8888/tree?token=someLongSeriesOfHexadecimalDigits | ||
| Line 67: | Line 100: | ||
* You should end up with a window similar to this one: | * You should end up with a window similar to this one: | ||
<br /> | <br /> | ||
| − | [[Image:DockerTensorflowJupiter.jpg|center| | + | [[Image:DockerTensorflowJupiter.jpg|center|600px]] |
| + | <br /> | ||
| + | * Double-click on the '''1_hello_tensorflow.ipynb''' Jupiter notebook to open it. | ||
| + | * You may get an error when the notebook opens. Just click on '''Cell''' then '''Run All''' to get rid of the error. | ||
| + | * If the page appears without errors, then all the Tensorflow mini-programs will have run without errors, and you're all set! | ||
| + | <br /> | ||
| + | |||
| + | =Using Jupiter = | ||
| + | <br /> | ||
| + | ==Hello TensorFlow!== | ||
<br /> | <br /> | ||
| + | In Jupyter, create a new notebook, and paste the following code into it: | ||
| + | <br /> | ||
| + | ::<source lang="python"> | ||
| + | ''' | ||
| + | HelloWorld example using TensorFlow library. | ||
| + | Author: Aymeric Damien | ||
| + | Project: https://github.com/aymericdamien/TensorFlow-Examples/ | ||
| + | ''' | ||
| + | from __future__ import print_function | ||
| + | |||
| + | import tensorflow as tf | ||
| + | |||
| + | # Simple hello world using TensorFlow | ||
| + | |||
| + | # Create a Constant op | ||
| + | # The op is added as a node to the default graph. | ||
| + | # | ||
| + | # The value returned by the constructor represents the output | ||
| + | # of the Constant op. | ||
| + | hello = tf.constant('Hello, TensorFlow!') | ||
| + | |||
| + | # Start tf session | ||
| + | sess = tf.Session() | ||
| + | |||
| + | # Run the op | ||
| + | print(sess.run(hello)) | ||
| + | |||
| + | </source> | ||
| + | <br /> | ||
| + | [[Image:HelloTensorFlowExample.png|600px|center]] | ||
| + | <br /> | ||
| + | * Click on '''Cell''', '''Run Cells'''. You should see the "Hello TensorFlow!'' message appear on the page. | ||
| + | * Your installation of TensorFlow works! | ||
| + | <br /> | ||
| + | |||
| + | ==Quick Tutorial on how to use Jupyter== | ||
| + | <br /> | ||
| + | * Here's a [http://nbviewer.jupyter.org/github/jupyter/notebook/blob/master/docs/source/examples/Notebook/Notebook%20Basics.ipynb quick tutorial] on using the Jupyter dashboard. | ||
| + | <!-- * Here's a quick tutorial on writing a Jupyter notebook. --> | ||
| + | <br /> | ||
| + | <br /> | ||
| + | <br /> | ||
| + | <br /> | ||
| + | <br /> | ||
| + | <br /> | ||
| + | <br /> | ||
| + | <br /> | ||
| + | <br /> | ||
| + | <br /> | ||
| + | <br /> | ||
| + | <br /> | ||
<br /> | <br /> | ||
| + | [[Category:Jupyter]][[Category:Python]][[Category:TensorFlow]][[Category:Docker]] | ||
Latest revision as of 10:54, 9 June 2017
--D. Thiebaut (talk) 22:42, 12 February 2017 (EST)
|
|
These are very quick instructions for installing Docker under Mac OSX and for running Tensorflow on it. This is a summarized version of the longer explanations given on the official TensorFlow Install page:
and the Docker Install page:
Install Docker
- Go there: https://docs.docker.com/docker-for-mac/
- Download
- Click on the package (do not worry about the warning)
Run Docker
- Find Docker in the Applications and run it
- It will open a Terminal window
- Note the IP that is specified at the end (should be http://192.168.99.100/)
                        ##         .
                  ## ## ##        ==
               ## ## ## ## ##    ===
           /"""""""""""""""""\___/ ===
      ~~~ {~~ ~~~~ ~~~ ~~~~ ~~~ ~ /  ===- ~~~
           \______ o           __/
             \    \         __/
              \____\_______/


docker is configured to use the default machine with IP 192.168.99.100
For help getting started, check out the docs at https://docs.docker.com
docker is configured to use the default machine with IP 192.168.99.100
For help getting started, check out the docs at https://docs.docker.com
- Quick Docker by pressing Ctrl-C twice and return to the command line
Install TensorFlow "in" Docker
- Run the following command at the prompt, in the same Terminal session:
docker run -it -p 8888:8888 gcr.io/tensorflow/tensorflow
- This will download tensorflow and will take a few minutes (~ 8 minutes)
- Make a note of the URL that is given. It will be of the form:
http://localhost:8888/tree?token=someLongSeriesOfHexadecimalDigits
Create a Script to Start Docker Automatically
If you are using a Mac or Linux machine, create a script called startDocker.sh in your bin directory:
#! /bin/bash

docker run -it -p 8888:8888 gcr.io/tensorflow/tensorflow
Make your script executable:
chmod +x startDocker.sh
Start Jupiter
Jupiter is an application that runs in a browser and presents the user a virtual disk where the user can create folders and write programs.
- To start the Jupiter connected to Docker, open your browser and enter the URL that was given to you in the previous step.
http://localhost:8888/tree?token=someLongSeriesOfHexadecimalDigits
- If you get an error message, replace localhost by the IP given next to the whale logo, above (I got 192.168.99.100 when I started Docker).
http://192.168.99.100:8888/tree?token=someLongSeriesOfHexadecimalDigits
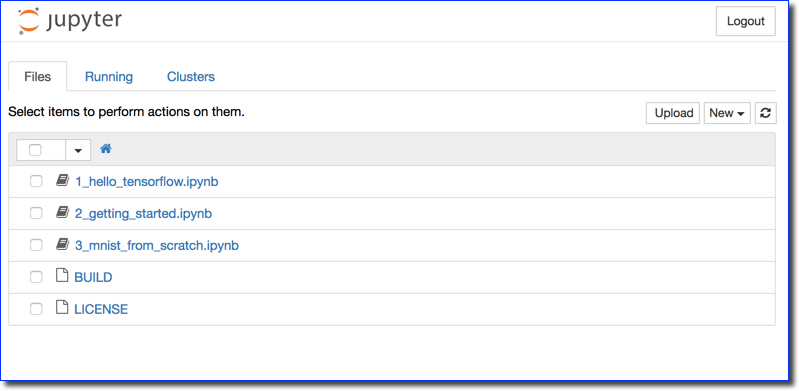
- You should end up with a window similar to this one:
- Double-click on the 1_hello_tensorflow.ipynb Jupiter notebook to open it.
- You may get an error when the notebook opens. Just click on Cell then Run All to get rid of the error.
- If the page appears without errors, then all the Tensorflow mini-programs will have run without errors, and you're all set!
Using Jupiter
Hello TensorFlow!
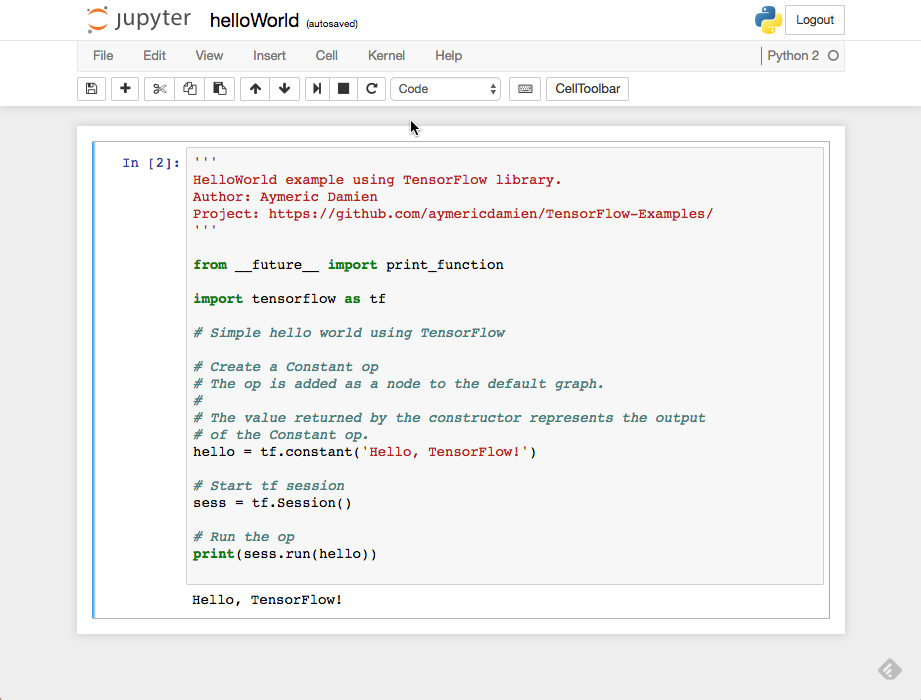
In Jupyter, create a new notebook, and paste the following code into it:
'''
HelloWorld example using TensorFlow library.
Author: Aymeric Damien
Project: https://github.com/aymericdamien/TensorFlow-Examples/
'''

from __future__ import print_function

import tensorflow as tf

# Simple hello world using TensorFlow

# Create a Constant op
# The op is added as a node to the default graph.
#
# The value returned by the constructor represents the output
# of the Constant op.
hello = tf.constant('Hello, TensorFlow!')

# Start tf session
sess = tf.Session()

# Run the op
print(sess.run(hello))
- Click on Cell, Run Cells. You should see the "Hello TensorFlow! message appear on the page.
- Your installation of TensorFlow works!
Quick Tutorial on how to use Jupyter
- Here's a quick tutorial on using the Jupyter dashboard.


