Difference between revisions of "Hadoop Tutorial 4: Start an EC2 Instance"
(→Connecting using SSH) |
(→References) |
||
| (7 intermediate revisions by the same user not shown) | |||
| Line 11: | Line 11: | ||
<br /> | <br /> | ||
<br /> | <br /> | ||
| + | |||
| + | =References= | ||
| + | |||
| + | * A good description for reserving and connecting an AMI from the terminal window using the ec2-tools can be found here: [http://docs.amazonwebservices.com/AWSEC2/2008-08-08/GettingStartedGuide/index.html?running-an-instance.html#authorizing-access-to-an-instance docs.amazonwebservices.com]. | ||
| + | * Alternatively, you can also try this page: [http://paulstamatiou.com/how-to-getting-started-with-amazon-ec2 paulstamatiou.com]. | ||
=Method #1: Using the AWS Console= | =Method #1: Using the AWS Console= | ||
| Line 121: | Line 126: | ||
thiebaut webuser | thiebaut webuser | ||
[root@ip-10-244-181-219 ~]# | [root@ip-10-244-181-219 ~]# | ||
| + | |||
| + | ===Installing Software=== | ||
| + | |||
| + | * Try editing a file with emacs... | ||
| + | * Oops, emacs is not installed on the EC2 Instance. No big deal, we can install it. The installation package under Fedora is called '''yum''': | ||
| + | |||
| + | yum -y install emacs | ||
| + | |||
| + | * Now try editing with emacs... :-) | ||
| + | |||
| + | |||
| + | |||
| + | <br /> | ||
| + | <greenbox> | ||
| + | [[Image:ComputerLogo.png|right |100px]] | ||
| + | ;Lab Experiment #1: | ||
| + | : Run the multiprocessing version of the NQueens program on your new Instance and compare its execution time to the best time obtained so far. | ||
| + | |||
| + | : The multiprocessing version of the N-Queens program is available [[CSC352_multiprocessingNQueens.py | here]]. An easy way to time the execution of multiple runs would be: | ||
| + | |||
| + | ::<tt>for i in {15..21} ; do echo -n $i<br /> /usr/bin/time python2.6 multiprocessingNQueens.py $i 2>&1 | grep real<br /> done</tt> | ||
| + | |||
| + | : You will discover that the multiprocessing python module runs only with Python 2.6! So you'll have to install it before running the program. The steps are simple: | ||
| + | :* install gcc first | ||
| + | :* download the source code for Python2.6 | ||
| + | :* untar it into a directory | ||
| + | :* compile it | ||
| + | :* install it | ||
| + | |||
| + | : These steps are shown below | ||
| + | |||
| + | ::<tt> yum -y install gcc </tt> | ||
| + | ::<tt> wget http://www.python.org/ftp/python/2.6.5/Python-2.6.5.tgz</tt> | ||
| + | ::<tt> tar -xzvf Python-2.6.5.tgz</tt> | ||
| + | ::<tt> cd Python-2.6.5</tt> | ||
| + | ::<tt> ./configure</tt> | ||
| + | ::<tt> make</tt> | ||
| + | ::<tt> make install</tt> | ||
| + | |||
| + | : You should have python 2.6 available to you. To invoke it, simply use '''python2.6''' at the command line. | ||
| + | </greenbox> | ||
| + | <br /> | ||
=Method #2: Using the EC2 Tools= | =Method #2: Using the EC2 Tools= | ||
| Line 157: | Line 204: | ||
<br /> | <br /> | ||
<br /> | <br /> | ||
| − | |||
| − | |||
| − | |||
| − | |||
| − | |||
| − | |||
| − | |||
| − | |||
| − | |||
| − | |||
| − | |||
<br /> | <br /> | ||
<br /> | <br /> | ||
Latest revision as of 15:24, 22 July 2011
--D. Thiebaut 16:01, 18 April 2010 (UTC)
|
Creating an EC2 Instance refers to the action of starting a server on Amazon using one's credential, and then connecting to it using ssh. |
References
- A good description for reserving and connecting an AMI from the terminal window using the ec2-tools can be found here: docs.amazonwebservices.com.
- Alternatively, you can also try this page: paulstamatiou.com.
Method #1: Using the AWS Console
Steps
The steps are fairly simple:
Launch instance from AWS console
- Connect to the AWS console (see Tutorial 3 for a reminder), and then select Amazon EC2.
- In the QuickStart tab, pick "Fedora LAMP Server", as a machine to instantiate.
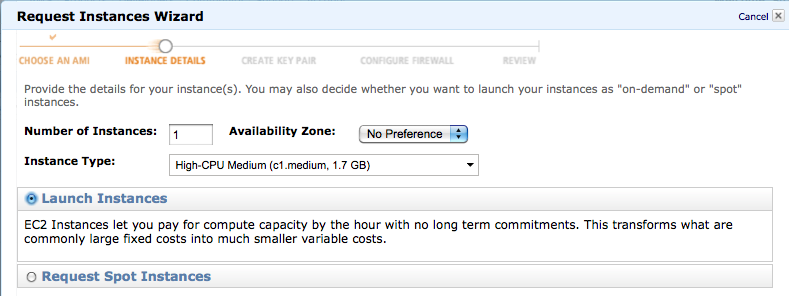
- Select 1 instance, pick the architecture of your choice, and No Preference for the zone.
- Select Launch Instance (Spot Instances are low-rate machines that run only when the demand is low, and the user pays less).
- Click on Continue (make sure your browser window is large enough to see the bottom part of the pop-up!)

- Use defaults for Kernel Id and RamDisk Id.
- No Monitoring
- Click on Continue

- Pick a name for your key-pair file (e.g. dftKeyPair), then click on Create New Key Pair.
- When prompted, save the key-pair file (dftKeyPair.pem) to a local directory on your computer (Desktop, for example).
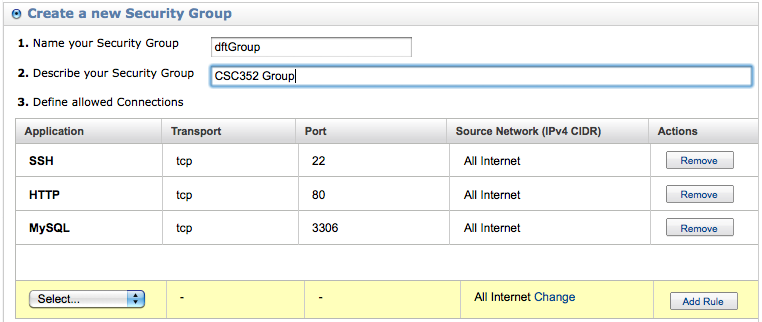
- Follow the directions to create a security group (I called it dftGroup for simplicity).

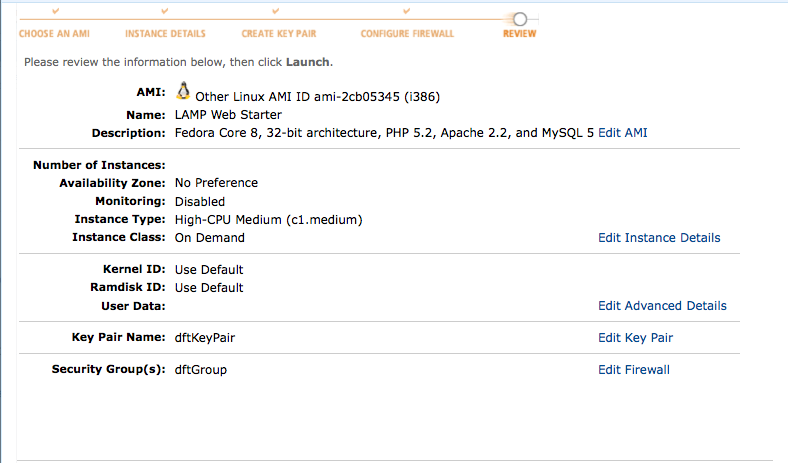
- Review!

- Launch!
- Watch as the instance is created, and loads up...

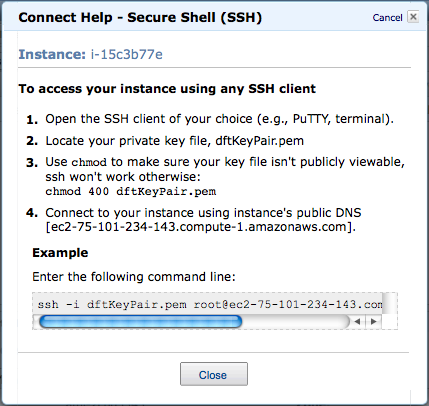
- When the instance is created, right click on it and click on Connect
Connecting using SSH
- First create a working directory on your local computer (I'll assume you are using a Mac or a Linux box. Similar steps are easy to take for Windows)
- Start a Terminal window
- create a new working directory and copy the Key-Pair file into it:
 cd /
 mkdir aws
 cd aws
 cp  ~/Desktop/dftKeyPair.pem .
 chmod go-r dftKeyPair.pem
 ls -l
 total 8
 -rw-------@ 1 thiebaut  wheel  1693 Apr 22 08:25 dftKeyPair.pem
- Copy/Paste the ssh command into a shell that you will have started
ssh -i dftKeyPair.pem root@ec2-75-101-234-143.compute-1.amazonaws.com
- You should be connected!
  ssh -i dftKeyPair.pem root@ec2-75-101-234-143.compute-1.amazonaws.com
  The authenticity of host 'ec2-75-101-234-143.compute-1.amazonaws.com...
  RSA key fingerprint is cd:79:eb:e5:e9:2e:d6:a2:9c:...
  Are you sure you want to continue connecting (yes/no)? yes
  Warning: Permanently added 'ec2-75-101-234-143.compute-1.amazonaws.com,7...


        __|  __|_  )  Fedora 8
        _|  (     /    32-bit
       ___|\___|___|

  Welcome to an EC2 Public Image
                       :-)

   Base

--[ see /etc/ec2/release-notes ]--

 [root@ip-10-244-181-219 ~]#
- You are now root of a machine on Amazon's cloud. Play with it!
- Check that the mysql server is working:
  [root@ip-10-244-181-219 ~]# mysql
  Welcome to the MySQL monitor.  Commands end with ; or \g.
  Your MySQL connection id is 2
  Server version: 5.0.45 Source distribution

  Type 'help;' or '\h' for help. Type '\c' to clear the buffer.

  mysql> show databases;
  +--------------------+
  | Database           |
  +--------------------+
  | information_schema |
  | mysql              |
  | test               |
  +--------------------+
  3 rows in set (0.00 sec)

  mysql> quit
- Add a new user
 [root@ip-10-244-181-219 ~]# adduser thiebaut
 [root@ip-10-244-181-219 ~]# ls /home
 thiebaut  webuser
 [root@ip-10-244-181-219 ~]#
Installing Software
- Try editing a file with emacs...
- Oops, emacs is not installed on the EC2 Instance. No big deal, we can install it. The installation package under Fedora is called yum:
yum -y install emacs
- Now try editing with emacs... :-)
 |  | |
| ||
 |  |
Method #2: Using the EC2 Tools
Steps
- Download the EC2 Tools from the Amazon EC2 Resource Center.
- install them in ~/bin/ec2-api-tools (see the Getting Started Guide from Amazon for more info).
- Download the pem files containing your private key and certificate from the Amazon EC2 page (see step above)
- Modify your .bash_profile file and set several variables:
PATH=$PATH:/Users/thiebaut/bin/ec2-api-tools/bin

# Amazon AWS/EC2 tools
export EC2_HOME=/Users/thiebaut/bin/ec2-api-tools
export JAVA_HOME=/System/Library/Frameworks/JavaVM.framework/Home
export EC2_PRIVATE_KEY=~/.ssh/pk-WMW2M4ZVFMCZJXSXJN4D7ZS4RMTBJ7VV.pem
export EC2_CERT=~/.ssh/cert-WMW2M4ZVFMCZJXSXJN4D7ZS4RMTBJ7VV.pem
- Source the .bash_profile file
source .bash_profile
- Test the ec2 tools:
ec2-describe-images -a | grep hadoop-ec2-images
- verify that a list of images is printed out.
IMAGE	ami-ee53b687	hadoop-ec2-images/hadoop-0.17.0-i386.manifest.xml	111560892610	available	public
		i386	machine	aki-a71cf9ce	ari-a51cf9cc		instance-store
IMAGE	ami-f853b691	hadoop-ec2-images/hadoop-0.17.0-x86_64.manifest.xml	111560892610	available	public
		x86_64	machine	aki-b51cf9dc	ari-b31cf9da		instance-store

