Difference between revisions of "CSC270 Introduction to the 6811"
(→LDAA Extended) |
(→References) |
||
| (One intermediate revision by the same user not shown) | |||
| Line 55: | Line 55: | ||
==Introduction== | ==Introduction== | ||
| − | First, let's explore the kits. The keyboard can be used to enter hexadecimal value into memory as well as into CPU registers. The table below lists the main commands and the actions they perform. You can get more information by checking this Heathkit document starting Page 15 in the pdf, which corresponds to Page 13 of the actual document. The full description of all the keys and what they do can be found [http:// | + | First, let's explore the kits. The keyboard can be used to enter hexadecimal value into memory as well as into CPU registers. The table below lists the main commands and the actions they perform. You can get more information by checking this Heathkit document starting Page 15 in the pdf, which corresponds to Page 13 of the actual document. The full description of all the keys and what they do can be found [http://cs.smith.edu/~dthiebaut/classes/270/ETW3800_W6811CPU.pdf in this pdf of the HeathKit manual]. |
{| border="1" | {| border="1" | ||
| Line 290: | Line 290: | ||
*The 6811 Processor: references | *The 6811 Processor: references | ||
| − | ** The official Motorola [http:// | + | ** The official Motorola [http://cs.smith.edu/~dthiebaut/classes/270/6811/68hc11a8.pdf 68HC11A8 Data Sheet]. Fairly cryptic... |
** [http://www.clear.rice.edu/elec201/Book/6811_asm.html A good tutorial on 6811 assembly language] ([[Media:6811AssemblyTutorial_RiceUniversity.pdf|pdf]]) | ** [http://www.clear.rice.edu/elec201/Book/6811_asm.html A good tutorial on 6811 assembly language] ([[Media:6811AssemblyTutorial_RiceUniversity.pdf|pdf]]) | ||
** A Motorola [[Media:6811Manual.pdf | 6811 Manual]]. It is a nicely written refresher on many concepts of assembly language applied to the 6811. | ** A Motorola [[Media:6811Manual.pdf | 6811 Manual]]. It is a nicely written refresher on many concepts of assembly language applied to the 6811. | ||
| Line 296: | Line 296: | ||
*** Get a refresher for the different instruction types (arithmetic, shifts, control, etc) in Section 3.4. | *** Get a refresher for the different instruction types (arithmetic, shifts, control, etc) in Section 3.4. | ||
*** The condition code register is covered in Section 3.5. Skip Section 4. | *** The condition code register is covered in Section 3.5. Skip Section 4. | ||
| − | ** [http:// | + | ** [http://cs.smith.edu/~dthiebaut/classes/270/6811/68hc11ref-2002.pdf M68HC11 Technical Reference], from Motorola. |
***Section 6.5 shows the instructions in logical groups. | ***Section 6.5 shows the instructions in logical groups. | ||
| − | * [http:// | + | * [http://cs.smith.edu/~dthiebaut/classes/270/6811/68hc11pocket.pdf M68HC11 Pocket Reference]. |
**Very useful, on Page 15, a list of all the opcodes supported by the 6811, in numerical (hex) order. | **Very useful, on Page 15, a list of all the opcodes supported by the 6811, in numerical (hex) order. | ||
| − | * [http:// | + | * [http://cs.smith.edu/~dthiebaut/classes/270/6811/68hc11a8ref.pdf 68HC11A8 Technical Reference]: a hardware & engineering description. of the 6811, its ports, and how it operates. |
*** See Section 10 for a cycle-by-cycle description of the execution of each instruction. | *** See Section 10 for a cycle-by-cycle description of the execution of each instruction. | ||
*** See Appendix A, Figure A-14 for the timing diagram of a typical (multiplexed expansion) memory access. | *** See Appendix A, Figure A-14 for the timing diagram of a typical (multiplexed expansion) memory access. | ||
| Line 306: | Line 306: | ||
* [[Media:CSC270_Assembly_Instructions.pdf | 2-Page List]] of all the 6811 Instructions | * [[Media:CSC270_Assembly_Instructions.pdf | 2-Page List]] of all the 6811 Instructions | ||
* [http://www.aspisys.com/asm11.htm Software] for the 6811 | * [http://www.aspisys.com/asm11.htm Software] for the 6811 | ||
| − | * <font color="magenta">[http:// | + | * <font color="magenta">[http://cs.smith.edu/~dthiebaut/classes/270/ETW3800_W6811CPU.pdf Heathkit ETW3800 Trainer manual (pdf)]</font> |
Latest revision as of 11:44, 19 March 2016
--D. Thiebaut 09:57, 14 March 2012 (EDT)
Contents
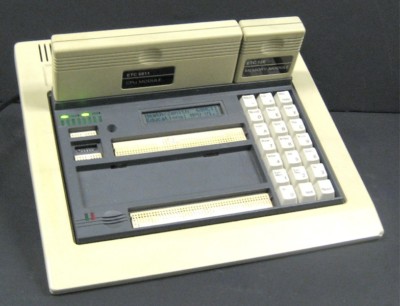
The 6811 HeathKit
The 6811 Processor
Chip

Architecture
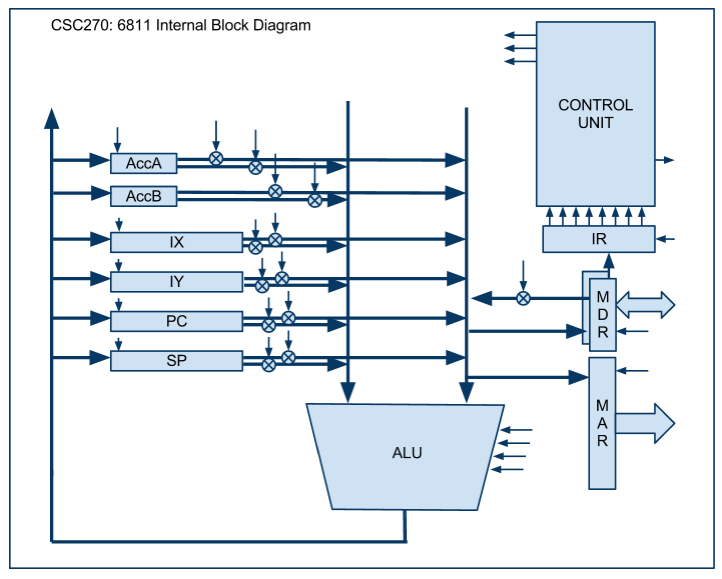
The Processor
The Processor and Memory
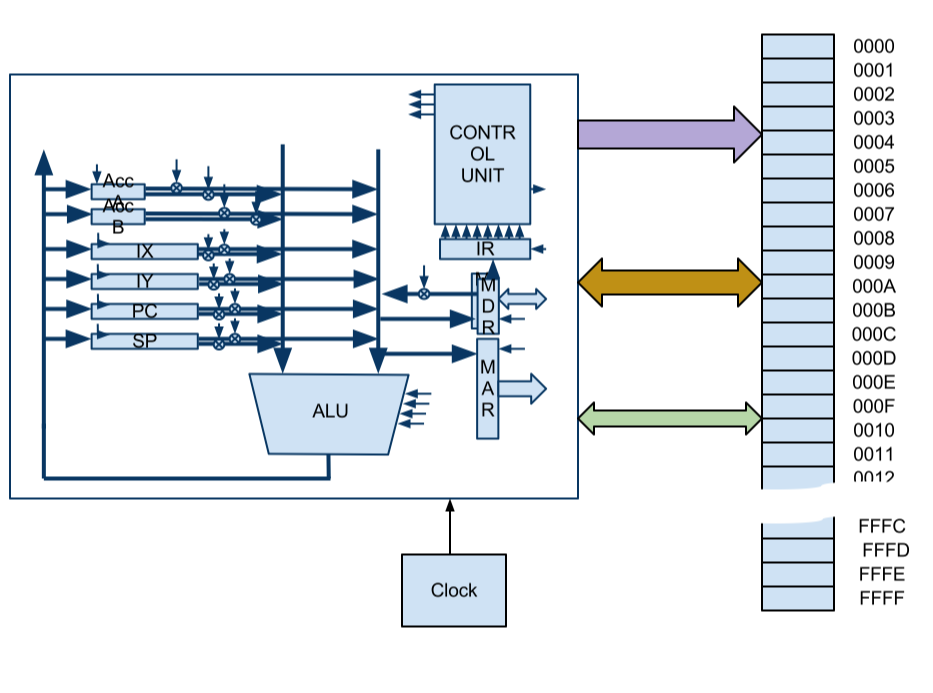
Execution of an Instruction
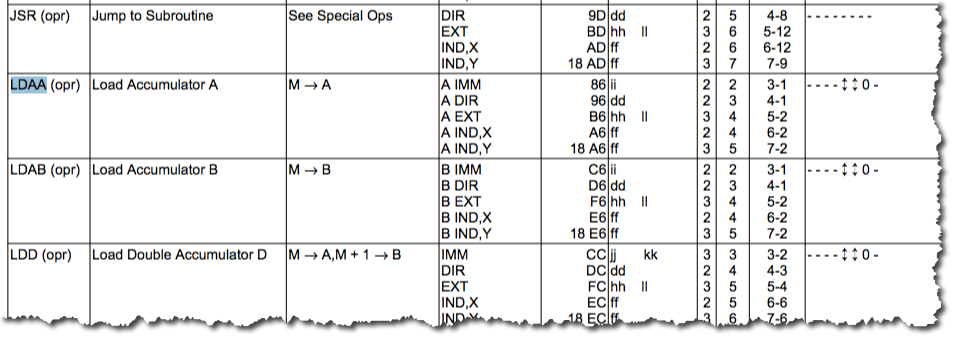
LDAA Extended
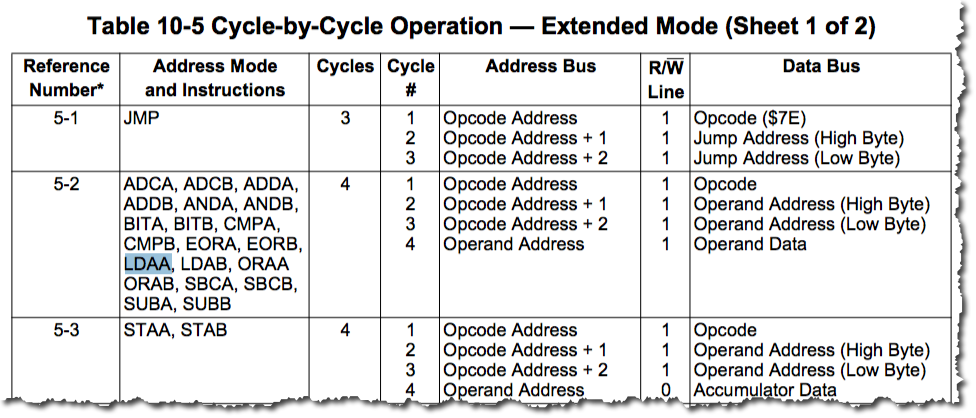
- The tables below are taken from Section 10 of Motorola's 6811 Technical Data Manual.
Assembly Language Example
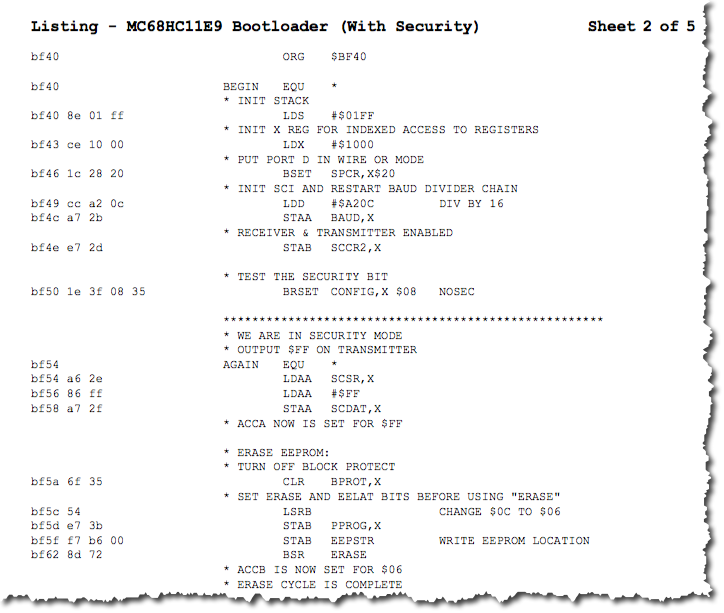
- See Bootloader listing, at end of pdf.
Exercise
- Declare two variables in memory, and sum them up. Store the result in a third variable. In essence, write the assembly language equivalent to this java code:
      int x = 5, y = 7, z;

      z = x + y;
Mini Lab (optional)
- This part is taken from Lab 7, which is the true introductory lab for the 6811.
Introduction
First, let's explore the kits. The keyboard can be used to enter hexadecimal value into memory as well as into CPU registers. The table below lists the main commands and the actions they perform. You can get more information by checking this Heathkit document starting Page 15 in the pdf, which corresponds to Page 13 of the actual document. The full description of all the keys and what they do can be found in this pdf of the HeathKit manual.
| Key | Name | Description |
|---|---|---|
|
|
RESET |
Takes you out of trouble! Press this key whenever you want to return to the "main prompt" showing CPU UP. |
|
|
RPO |
Return to Previous Operation. |
|
- |
Return |
Press the RETURN key to exit a function and save data contained in the CPU registers. |
|
+ |
List |
Use List in break mode to list the breakpoints. |
|
RPO |
Help |
Display a help message. Keep pressing it for more messages. |
|
D |
RS-232 |
Press this key to transfer control from the kit's keyboard to the serial port. |
|
E |
Baud |
Press this key to set the transfer rate to the outside serial port. |
|
F |
Insert |
Use Insert to change the contents of the memory. |
|
A |
Load |
Use Load to transfer a file stored in the memory module to the memory in the kit. We will not use the memory module in this course. |
|
B |
Save |
Use Save to transfer a file from the kit memory to the memory module. We will not use the memory module in this course. |
|
C |
Dup |
Press Dup (Duplicate) to copy a fie from one memory module to another. |
|
7 |
Break |
Use the Break key to set a breakpoint in memory. |
|
8 |
W Reg |
Use W-Reg to break a program when a register value reaches a desired value |
|
9 |
W Loc |
Press the W-Loc key to break a program when an address location reaches a desired value. This mode is similar to Break. |
|
4 |
M Blk |
Use the M-Bkl key to move a block of data in memory from another memory location. |
|
5 |
I Blk |
Press the I-Blk key to set a block of memory to a desired value. First enter the start address, then the end address. |
|
6 |
Down |
Press Down to download a Motoral Shex file into the kit's memory. |
|
1 |
Exm Mem |
Pressing this key in the select mode lets you examine the contents of any memory location. |
|
2 |
Exm Reg |
Pressing this key in the select mode allows you to modify any of the CPU registers |
|
3 |
Go |
Press Go to run a program in memory. The default start address is 0000H, but you can specify another address. |
|
0 |
SS |
Allows for single stepping the program. |
|
|
NMI |
Press NMI to interrupt any program running, or operation being performed by the trainer. The memory is not modified. |
|
|
Reset |
Press Reset to reinitialize the Trainer to its power-up state. All breakpoints are erased. |
Inputing your first program in the Kit
Your next step is to enter a test program in memory. The code of the assembled program is shown in hexadecimal below, with the address in the leftmost column, and the contents of the bytes on the right hand side. These bytes must be stored starting at address 0000 in memory. Do not worry about how this program works for right now. This is simply a test that will get you familiar with the kit and entering hex information.
     ADDR BYTES
     0000 CC 00 18
     0003 BD C0 1B
     0006 BD C0 27
     0009 CC 00 27
     000C BD C0 1B
     000F BD C0 27
     0012 BD C0 27
     0015 BD C0 00
     0018 50 72 6F 67 72 61 6D 6D 69 6E 67 20 69 73
     0026 00
     0027 0D
     0028 45 61 73 79 20 61 6E 64 20 46 75 6E 21 21 21
     0037 00
To enter the program, follow these steps:
- 1. press
I 0000
- for Insert starting at Address 0)
- 2. Then enter the bytes, pressing the corresponding keys. The kit will automatically show you the address of the byte you are entering. Be carefull to wait until your 2-digit value is accepted before entering the next one.
- 3. If you make an entry error, press the - key. Pressing the - key backs you up one address at a time. When you reach the byte with the wrong information, retype it. You can go up and down the memory with - and + keys. .
- 4. The series of byte is a simple program that should display two strings on the kit. Be careful, the display lasts a few seconds and disappears to show the Kit's greeting line.
- 5. When you are done, press
NMI
- to stop the insert mode and return to the kit's logo.
- 6. Press
Exm Mem 0000
- to examine the memory starting at 0000. Press the + and - keys to go forward or backward in the memory. When you are satisfied that you have entered the sequence correctly, press
NMI
- again.
- 7. Now make the processor start the program:
Go 0000
- 8. You should two strings appear in the display. If nothing of the sort happens, you probably have an error in your program. Check it again by comparing the contents of the memory to the string of hex numbers in the code above!
References
- The 6811 Processor: references
- The official Motorola 68HC11A8 Data Sheet. Fairly cryptic...
- A good tutorial on 6811 assembly language (pdf)
- A Motorola 6811 Manual. It is a nicely written refresher on many concepts of assembly language applied to the 6811.
- Check Section 3.2 on addressing modes (inherent, direct, extended, indexed, relative).
- Get a refresher for the different instruction types (arithmetic, shifts, control, etc) in Section 3.4.
- The condition code register is covered in Section 3.5. Skip Section 4.
- M68HC11 Technical Reference, from Motorola.
- Section 6.5 shows the instructions in logical groups.
- M68HC11 Pocket Reference.
- Very useful, on Page 15, a list of all the opcodes supported by the 6811, in numerical (hex) order.
- 68HC11A8 Technical Reference: a hardware & engineering description. of the 6811, its ports, and how it operates.
- See Section 10 for a cycle-by-cycle description of the execution of each instruction.
- See Appendix A, Figure A-14 for the timing diagram of a typical (multiplexed expansion) memory access.
- 6811 Instruction Set, with hexadecimal opcodes. A reverse map, from hex to instructions can be found here.
- 2-Page List of all the 6811 Instructions
- Software for the 6811
- Heathkit ETW3800 Trainer manual (pdf)